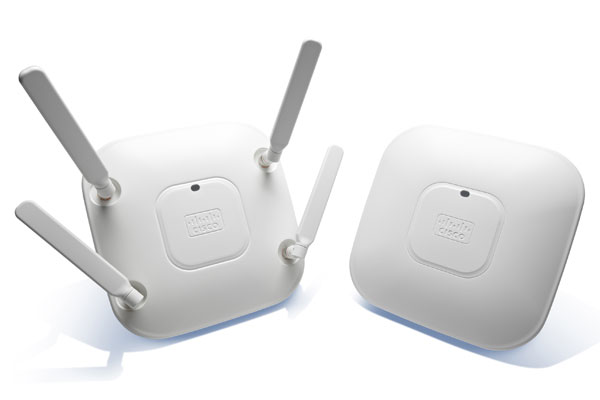
Whether a Cisco wireless access point (AP) was pulled from production or purchased new, it comes in one of the two operating mode: Lightweight or Autonomous Mode. When you are deploying the AP on your network, you must decide what mode you want to run. The decision is fairly easy. If you are dealing with a single location, a small office or home network, autonomous mode is recommended. If you are setting up a wireless network for a larger office space that requires more than 3 access points locally or remotely across multiple geographic locations, deploying in Lightweight mode is recommended. In this session we’ll explain converting Cisco Wireless Access Point Lightweight mode Autonomous mode.
Lightweight (LWAPP) Mode vs. Autonomous Mode
First of all let’s put all the terms together-
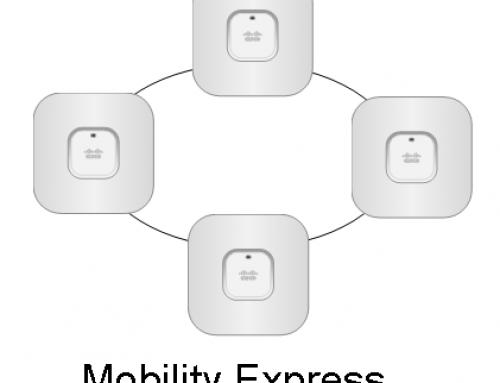
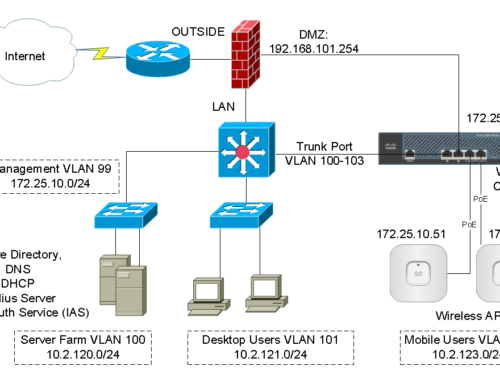
Lightweight (LWAPP) Mode: Centrally managed by a Wireless LAN Controller or WLC. The WLC can be a physical appliance for large networks or it can be a virtual machine. Sometimes it is embedded into ISR router or a switch such as Cat3850. Cisco calls it “Converged Access”. The “brain” is at the controller level. Think of the AP is simply an Ethernet extension transmitting data frames between wire and wireless. The controller tells the AP who to transmit to and what to transmit and all added on security, OoS and so on.
Autonomous Mode: Also known as Standalone Mode. The AP itself is in charge of all the operations such as managing SSIDs, security, client authentication, even DHCP and DNS. All services are self-contained and individually managed by each AP.
What about CAPWAP?
CAPWAP, based on LWAPP, is a standard interoperable protocol that enables a controller to manage a collection of wireless access points.
LWAPP was invented in 2001 as a mean for an AP and a controller to exchange control and data, by a company called Airespace. When Cisco acquired Airespace in 2005, they sponsored an effort to standardized this protocol. LWAPP was offered as a basis to a something IETF already working on called Control and Provisioning of Access Points (CAPWAP). After about 2 years of re-crafting, the slightly modified and improved, CAPWAP protocol came out, intended as being an RCC, therefore available to anyone. Cisco integrated CAPWAP into their solution.
Today, all Cisco controllers (and APs) use CAPWAP, but controllers can still recognize LWAPP requests and push to the matching AP a firmware that contains CAPWAP, so that the AP can join the controller successfully.
You can deploy CAPWAP controllers and LWAPP controllers on the same network. The CAPWAP-enabled software allows access points to join either a controller running CAPWAP or LWAPP. The only exceptions are that the Cisco Aironet 1040, 1140, 1260, 3500, and 3600 Series Access Points, which support only CAPWAP and join only controllers that run CAPWAP. For example, an 1130 series access point can join a controller running either CAPWAP or LWAPP where an1140 series access point can join only a controller that runs CAPWAP. Got confused? My recommendation is that always upgrade the code to a recent software release and it most likely will work in your environment. Unless you are running really old hardware, you’ll be fine in most cases.
How can you tell if an AP is running in Lightweight mode or Autonomous mode?
There are a few signs you can find to determine whether your AP was configured in Lightweight or Autonomous mode.
Autonomous APs have in their image name: K9W7 while Lightweight APs have K9W8. You can display the information using CLI command “show version” over Console / SSH / Telnet.
AP that is running in Lightweight mode:
System image file is "flash:/ap3g1-k9w8-mx.124-23c.JA8/ap3g1-k9w8-xx.124-23c.JA8"
AP that is running in Autonomous mode:
System image file is "flash:/ap3g2-k9w7-mx.153-3.JC1/ap3g2-k9w7-xx.153-3.JC1"
If there is “LAP” or “CAP” in the part number, the AP is shipped in Lightweight mode.
Product/Model Number : AIR-LAP1262N-A-K9
Product/Model Number : AIR-LAP1242AG-A-K9
With an AP running in Lightweight mode, configuration using CLI is not available (keep reading for tricks that enables you to do) since all the configuration is done at the Controller level and pushed to the AP.
AP#config t
^
% Invalid input detected at '^' marker.
Converting Cisco Wireless Access Point from Lightweight mode to Autonomous mode and vice versa
Lightweight to Autonomous conversion
Step 1: Download the software image from Cisco.com matching your AP’s model
First of all, pick the right image for your access point model and make sure you download the image for autonomous mode.

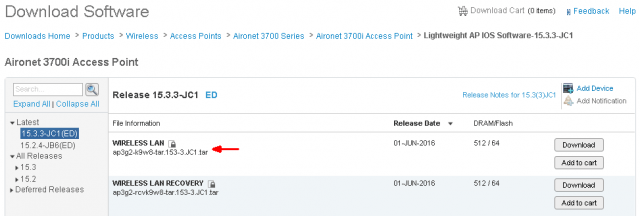
In this case you’ll be downloading “ap3g2-k9w8-tar.153-3.JC1.tar”.
Step 2: Prepare the AP for TFTP code upload
An IP address is then needed to be configured on the AP’s Ethernet interface. Connect a Console cable to the AP and login use Hyper Terminal client such as Putty. The default username is “Cisco” with password “Cisco”. Note that “C” is in upper case. The enable password is also “Cisco”.
Once you are in you’ll realize that “config t” will not be taken if the AP was previously configured in Lightweight mode. You need to enter a special debug command to be able to enter the configuration mode.
AP>en
AP#
AP#config t
^
% Invalid input detected at '^' marker.

AP#debug capwap console cli or
AP#debug lwapp console cli
Note: all newer APs shipped with CAPWAP code you’ll need to use the first command. Otherwise use the second command. It enables you to enter configuration mode.
AP#config t
AP(confg)
Configure an IP address on the AP and verify network connectivity to the computer. In my case I used the follow IP address:
AP: 172.30.30.2 255.255.255.0
Computer: 172.30.30.5 255.255.255.0
Here is the configuration.
AP(confg)interface BVI1  (in my case, Gig0 was part of BVI1 bridge group. IP address is assigned at the bridge group level)
AP(confg-if)ip 172.30.30.2 255.255.255.0 (same subnet as that of the laptop)
AP(confg-if)end
My interface configuration looked like this:
interface GigabitEthernet0
   no ip address
   duplex auto
   speed auto
   bridge-group 1
   bridge-group 1 spanning-disabled
   no bridge-group 1 source-learning
 !

interface BVI1
   mac-address 84b8.02af.xxxx
   ip address 172.30.30.2 255.255.255.0
   ipv6 address dhcp
   ipv6 address autoconfig
   ipv6 enable
!
ip default-gateway 172.30.30.1
Next, configure your computer with an IP in the same subnet (172.30.30.5). You should be able to ping each other and make sure the network connectivity is working between the AP and your computer that will be used for code transfer.
AP#ping 172.30.30.5
Type escape sequence to abort.
Sending 5, 100-byte ICMP Echos to 172.30.30.5, timeout is 2 seconds:
!!!!!
Success rate is 100 percent (5/5), round-trip min/avg/max = 1/3/8 ms
Step 3: Transfer the autonomous image to the AP using TFTP
TFTPD32 is free TFTP server software you can install on your computer. Launch the tool and copy the Cisco image you just downloaded in TFTPD32’s default directory. Transfer and install the image on the AP.
Use the archive download-sw command, with the /force-reload argument to have the AP reboot at the end of the cycle, and /overwrite to replace the autonomous code with the Autonomous code.
AP#archive download-sw /force-reload /overwrite tftp://172.30.30.5/ ap3g2-k9w7-mx.153-3.JC1The AP will reboot after the new code has been installed. It’ll come back up in Autonomous mode. You can confirm it by “show version”.
Autonomous to Lightweight conversion (CLI and TFTP)
Cisco has released a free tool called the “Autonomous to Lightweight Mode Upgrade Tool” that allows autonomous access point models to be configured for lightweight mode operation.
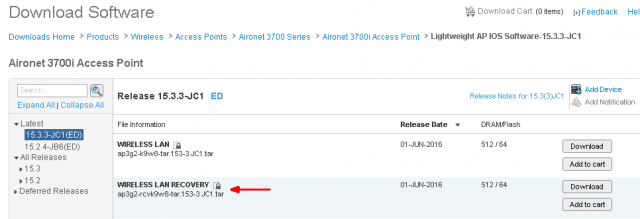
Step 1: Download the CAPWAP (or LWAPP if your AP does not support CAPWAP) file matching your access point model from Cisco.com.
Two types of file images are available:
Fully functional CAPWAP files, identified by the k9w8 string in their name. When booting this image, the AP is fully functional and can join a controller to obtain its configuration.
Recovery mode CAPWAP files, identified by the rcvk9w8 string in their name. These files are smaller than the fully functional k9w8 files. When booting rcvk9w8 files, the AP can join a controller to download a fully functional image. The AP will then reboot, use the fully functional image and rejoin a controller to obtain its configuration.
Using the “recovery mode” image is recommended since the WLC will take over control and update the image on the AP anyway. In this case you’ll be downloading “ap3g2-rcvk9w8-tar.153-3.JC1.tar”.
Step 2: Prepare the AP for TFTP code upload
You first need to configure an IP on the AP’s Ethernet interface. Connect a Console cable to the AP and login use Hyper Terminal client such as Putty. The default username is “Cisco” with password “Cisco”. Note that “C” is in upper case. The enable password is also “Cisco”.
AP>en
AP#config t
Configure an IP address on the AP and verify network connectivity to the computer. In my case I used the follow IP address:
AP: 172.30.30.2 255.255.255.0
Computer: 172.30.30.5 255.255.255.0
Here is the configuration.
AP(confg)interface BVI1  (in my case, Gig0 participates in BVI1 bridge group. IP address is assigned at the bridge group level)
AP(confg-if)ip 172.30.30.2 255.255.255.0 (same subnet as that of the laptop)
AP(confg-if)end
My interface configuration looked like this:
interface GigabitEthernet0
   no ip address
   duplex auto
   speed auto
   bridge-group 1
   bridge-group 1 spanning-disabled
   no bridge-group 1 source-learning
!
interface BVI1
   mac-address 84b8.02af.xxxx
   ip address 172.30.30.2 255.255.255.0
   ipv6 address dhcp
   ipv6 address autoconfig
   ipv6 enable
!
ip default-gateway 172.30.30.1
Configure your computer with an IP in the same subnet (172.30.30.5). You should be able to ping each other and make sure the network connectivity is working between the AP and your computer that will be used for code transfer.
AP#ping 172.30.30.5
Type escape sequence to abort.
Sending 5, 100-byte ICMP Echos to 172.30.30.5, timeout is 2 seconds:
!!!!!
Success rate is 100 percent (5/5), round-trip min/avg/max = 1/3/8 ms
AP#
Step 3: Transfer Lightweight recovery image to the AP using TFTP
Use the archive download-sw command, with the /force-reload argument to have the AP reboot at the end of the cycle, and /overwrite to replace the autonomous code with the CAPWAP code.
AP#archive download-sw /force-reload /overwrite tftp://172.30.30.5/ ap3g2-rcvk9w8-tar.153-3.JC1.tar
examining image...
Loading ap3g2-rcvk9w8-tar.153-3.JC1.tar
extracting info (273 bytes)!
Image info:
Version Suffix: rcvk9w8-
Image Name: ap3g2-rcvk9w8-mx
Version Directory: ap3g2-rcvk9w8-mx
Ios Image Size: 2335232
Total Image Size: 2335232
Image Feature: WIRELESS LAN|CAPWAP|RECOVERY
Image Family: ap3g2
Wireless Switch Management Version: 3.0.51.0
Extracting files...
ap3g2-rcvk9w8-mx/ (directory) 0 (bytes)
extracting ap3g2-rcvk9w8-mx/ap3g2-rcvk9w8-mx (2327653 bytes)!!!!!!!!!
extracting ap3g2-rcvk9w8-mx/info (273 bytes)
The AP reboots into lightweight mode and looks for a controller.
The AP will reboot after the new code has been installed. It’ll come back up in Lightweight mode. You can verify it by “show version”.
Autonomous to Lightweight conversion (MODE Button and TFTP)
Optionally, you can convert an AP to Lightweight mode using the MODE Button on the AP without dealing with CLI. It is a handy alternative if you have a massive amount of APs needed conversion. Or you simply don’t have someone who understands CLI commands.
Step 1: Download the Lightweight image from Cisco.com. (the full image, not the recovery image)
In our case, “ap3g2-k9w8-tar.153-3.JC1.tar” is the file we downloaded. Rename the access point image file in the TFTP server folder to ap3g2-k9w7-tar.default for a 2700 or a 3700 series access point. As you noticed the version number is removed and added file extension “default”. It is a static file name for all 2700 and 3700 series APs. You may want to just copy and paste from here.
Step 2: Prepare the TFTP server for file transfer
The key here is that configure the PC on which your TFTP server software runs with a static IP address in the range of 10.0.0.2 to 10.0.0.30.
After the AP is reset and rebooted, it’ll have an IP 10.0.0.1 as default and starts to discover TFTP server in the same subnet. That’s why we want to give the PC an IP within the same range. Connect the AP using a Cat5 Ethernet cable with the PC. Next we move on to reset the access point.
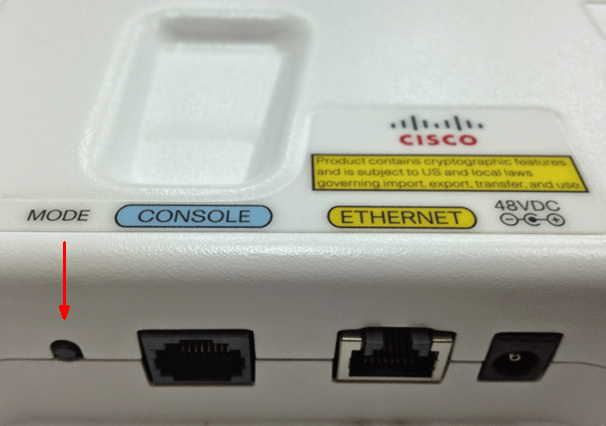
Step 3: Reset the AP using MODE Button
Disconnect power from the AP. Press and hold the MODE button while you reconnect power to the AP. Hold the MODE Button for about 25 seconds until the LED turns red and release the button. This causes the AP to look for a TFTP server on the same subnet. Copy and install the image from your PC automatically. Keep in mind that the AP is looking for the exact file name “ap3g2-k9w7-tar.default”. Wait until the access point reboots as indicated by all LEDs turning green followed by the Status LED blinking green.
The AP running mode can be verified using “show version”. Look for the code it is running on. If it contains “k9w7”, you are running in Lightweight mode.
Finally, let’s say you have 500 APs needed conversion. All you need to do is configure a TFTP server and have all APs connected on the same LAN. Boot them up and hold the MODE Button for 30 seconds on each. Once they reboot, they are in Lightweight mode.
(Optional) Universal Wireless AP Provisioning and Priming
Check your AP’s model number if it has “UX” in the middle of the part number, you have a Universal AP. You need Cisco Universal Wireless AP Provisioning and Priming
Summary
It concludes my tutorial on converting Cisco Wireless Access Point from Lightweight mode to Autonomous mode and vice versa. The process is rather straightforward when converting an Autonomous AP to Lightweight. It is not much of different than upgrading the code on a router or a switch. The only key point is when converting Lightweight AP back to Autonomous, you need the “debug” command to be able to enter configuration mode. Think about why. Cisco doesn’t want someone to be able to easily change configuration on a centrally managed Lightweight AP. You are supposed to configure it at the WLC level. That being said, pick appropriate part number (Lightweight or Autonomous) when you placing the order could save your time converting.
Get your WLC configured. Check out my full tutorial on Cisco Wireless Controller Configuration.
Read more about Cisco wireless access point mode conversions:
LWAPP to Autonomous Conversion and vice versa on Access Points
LWAPP mode to Autonomous mode Conversion using MODE button
Converting Autonomous Access Points to Lightweight Mode

Hello can anyone confirm if ap1g2-k9w7-tar.153-3.JF14i.tar (dated : 22-Mar-2021) is compatible with AIR-CAP1602I-E-K9 please.
I don’t have a Cisco contract (both from ebay). Is there a way I can get this?
The space between the ip-address and the filename is wrong. Besides it would be helpful to state that the filename points to the tar-archive. The example filename is not complete. Please correct it.
Hi, I have a controller based AP and would like to know if there is a similar procedure to downgrade the software. the current code on the AP is higher than the controller and it is failing to join
The process would be similar. It does not matter what code version it is running since you’ll be replacing it with the autonomous version of the code.
Please correct the spelling error for the archive command.. it is not archieve. It took me a while to figure this out!
Thanks for pointing it out. It has been corrected.
Hi i cant to upgrade my access point 3700 i received the next message:
examining image…
DPAA Set for Independent Mode
tide_boot_speed = 1000
DPAA_INIT = 0x0
%Error opening tftp://255.255.255.255/ap3g2-k9w7-tar.default (permission denied)ap:
i review my tftp my IP but i cant to upgrade my access point, please do you know which is the problem with that?ar
Did you specify your TFTP server correctly? It shouldn’t say 255.255.255.255..