As you first set up VIRL, it may be confusing what FLAT, SNAT, Management, INT and EXT networks are, how the Linux Container (LXC) jumpbox benefits the simulation, and the differences between Private Project, Private Simulation and Flat networks. In this session, Cisco VIRL External Connectivity will be explained. If you need help setting up VIRL for the first time, please check out Cisco VIRL Installation on VMWare ESXi.
This example is based on VIRL installation on a VMWare ESXi environment. If you installed VIRL on a workstation using VMWare player or on a bare-metal PC, the VM virtual interface connectivity to VIRL may differ but the overall concept is the same.
During the VIRL initial installation, you were asked to create additional Port Groups –Management, Flat, Flat1, SNAT and INT under ESXi’s vSwitch. You needed to connect VIRL’s ETH0 through ETH3 to these Port Groups respectively .The one being used immediately is the Management Port Group where VIRL’s ETH0 is connected to the rest of your network. Make sure you assign the right VLAN number to the Management port group. This interface is the first bridge between your physical network and the virtual network where the VIRL lab resides. It also enables you to be able to login VIRL and management it. You must assign a valid and routable IP to VIRL’s management interface in your environment. No simulation traffic should be routed through this interface. In later session, I will explain how other Port Groups are used to provide external connectivity to your simulated network.
In my case I assigned an IP 192.168.16.80 to VIRL’ ETH0 for management, and configured VLAN16 (server farm) to the Management Port Group.
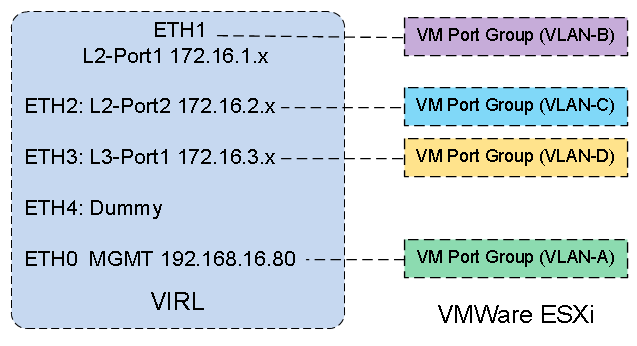
By default, VIRL uses the IP spaces below. It is how VIRL communicates to the simulated network as well as external network.
- ETH0: (Management) – can be DHCP or Static
- ETH1: (L2-Flat) – 172.16.1.254 subnet 255.255.255.0
- ETH2: (L2-Flat-1) – 172.16.2.254 subnet 255.255.255.0
- ETH3: (L3-Snat) – 172.16.3.254 subnet 255.255.255.0
What is a Linux Container (LXC)?
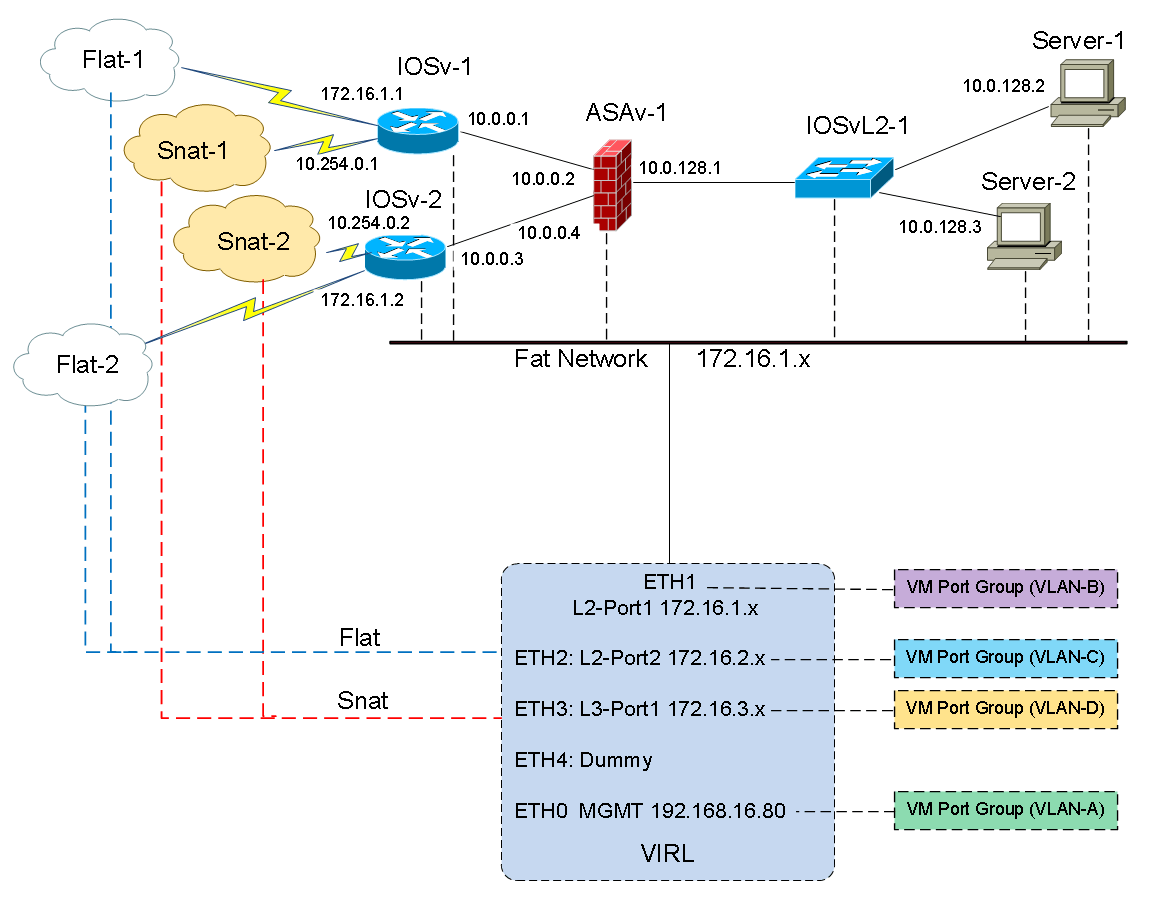
In a Private Project or Simulation (we’ll explain the differences later in the session), a small Ubuntu VM server is introduced by VIRL to bridge the communications between VIRL and the simulated networks or projects over a node’s management interface. The Ubuntu VM is called a Linux Container (LXC). Management access is then achieved by first accessing the LXC using SSH, and then using Telnet or SSH to access the nodes. The LXC can also be configured to forward traffic for nodes in the simulation or even host network applications or services directly to manage the nodes in the simulation. Here is how LXC and VIRL are interconnected.

- LXC-ETH0 — connected to — VIRL ETH1 (L2-Flat) 172.16.1.x/24
- LXC-ETH1 — connected to — Management Network10.255.x.x/16
Note: Every simulated network note and server will have an IP assigned on the management network where LXC-ETH1 is connected. It is different from the management port group where we use to access VIRL.
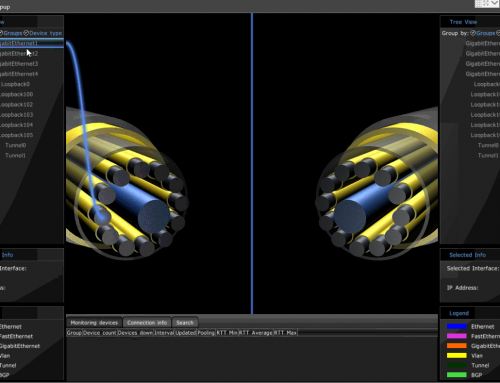
Here is the overall topology how VIRL, LXC and the simulation work together. Note each note would have their management interface connected to the LXC. Management interface does not participate in data-plane traffic. It is designed for management only.

The diagram above represents a “Private” lab. It can be either a Private Project or a Private Simulation. A private network uses LXC, a Linux jumpbox to access the nodes.
Private Simulation, Private Project and Shared Flat network
Private Simulation
- Private Simulation has its own LXC. LXC has connectivity to only those nodes running within a single simulation.
- The LXC cannot see and therefore cannot access the nodes in any other simulations, even those running as part of the same project.
Private Project
- Private Project shares a LXC, even though there are multiple simulations going on in the same Project.
- The LXC cannot see and therefore cannot access the nodes in any other project.
*As you can see the LXC is not only used as a convenient jumpbox, also it is used to create a barrier to segregate multiple simulations and projects in a shared lab environment.
Shared Flat Network
- A shared flat network eliminates the needs of a LXC.
- The management interfaces of the nodes in a simulation are placed directly on the Flat (172.16.1.0/24) network.
- Nodes have visibility to all other nodes in simulations regardless project or user.
- VIRL will have direct access to all simulated nodes via its ETH1 on the Flat network.
Topology for a Shared Flat Network is shown below. Note: Since we’re going to use the Flat subnet for data-plane connectivity we will have to use one of the ‘private’ methods for management. Flat cannot be used for both management- and data-plane connectivity at the same time.
Connecting to external networks
VIRL provides methods for linking external world with simulated routers. The first method is the Flat network. It creates a common Layer-2 network on the same subnet 172.16.1.x, which crosses the physical and virtual environments via the server’s ETH1 interface.
The second method is the SNAT network, creates Statically NAT’d link and boundary between physical and virtual environments via the VIRL server’s ETH2 interface.
“External Connection Tool” is used to create one or more Layer2 (Flat) or Layer3 (Snat) connections from the simulated nodes to the outside world via the Ethernet interface of VIRL.
The best way of demonstrating external connectivity is using a lab. A private simulation lab with LXC is created as shown below. We’ll only focus on IOSv-1 router and its external connectivity to the outside world.
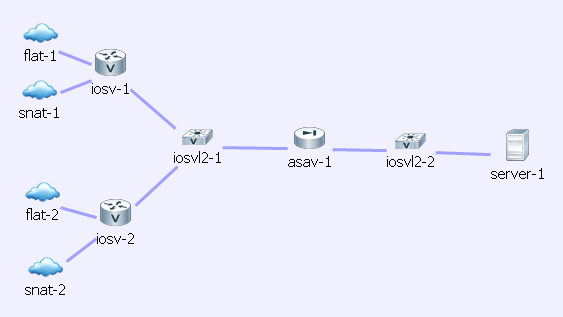
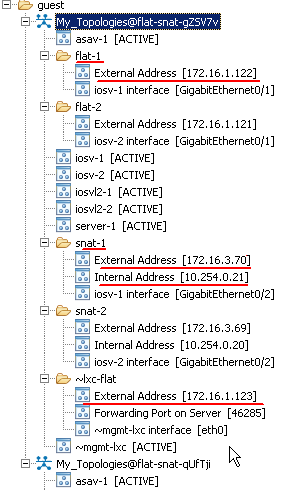
Here is a list of important IP addresses for IOSv-1:
- Gig0/1: 172.16.1.122 connected to Flat-1 external
- Gig0/2: 10.254.0.21 connected to Snat-1 external network
- Gig0/0: 10.255.0.144 connected to LXC’s management network. (does not participate in data traffic)
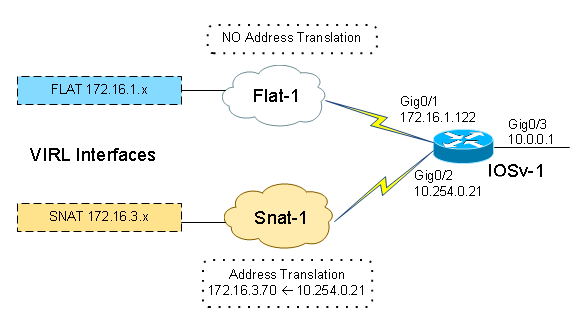
There are two ways for IOSv-1 to communicate to the outside world. One is through its interface Gig0/1 172.16.1.22 over the “Flat1” network. The other way is through its Gig0/2 10.254.0.21 over the “Snat” network. We’ll explain how it works respectively.
Via Flat1 network
It is fairly straight forward since IOSv-1’s Gig0/1 interface is directly connected to the Flat1 network, where VIRL also has an interface on it. For testing, you may configure a default gateway on IOSv-1 to point all outbound traffic to the Flat-1 network. You may now ping VIRL over 172.16.1.254. The “Flat-1” cloud is basically a Layer2 multi-access switch, which does not participate in IP routing whatsoever.
iosv-1(config)#ip route 0.0.0.0 0.0.0.0 GigabitEthernet0/1
iosv-1#ping 172.16.1.254
Type escape sequence to abort.
Sending 5, 100-byte ICMP Echos to 172.16.1.254, timeout is 2 seconds:
!!!!!
Success rate is 100 percent (5/5), round-trip min/avg/max = 2/3/5 ms
Via Snat-1 network
In this case the “Snat-1” cloud acts as a static NAT’ing machine. We are not allowed to see what’s inside but it basically does two things-
- Statically translate one IP to another.
- Place the NAT’d IP on VIRL’s SNAT interface subnet 172.16.3.x.
In our example, the “Snat-1” cloud translates IOSv-1’s Gig0/2 IP 10.254.0.21 to 172.16.3.70 and place the translated traffic onto the same multi-access media as VIRL’s interface 172.16.3.x. All the sudden router IOSv-1 can communicate to any hosts on 172.16.3.x.
There are two more things you need to do –
- Configure a default gateway on IOSv-1 and route all traffic to the Snat-1 cloud. (remember to remove the default route configured in the prior Flat example)
- Configure a static route on VIRL and direct any return traffic going back to IOSv-1.
On IOSv-1:
iosv-1(config)#no ip route 0.0.0.0 0.0.0.0 GigabitEthernet0/1
iosv-1(config)#ip route 0.0.0.0 0.0.0.0 GigabitEthernet0/2
On VIRL:
virl@virl:~$ sudo route add -host 10.254.0.21 gw 172.16.3.70
virl@virl:~$ route
Kernel IP routing table
Destination     Gateway         Genmask         Flags Metric Ref   Use Iface
default         192.168.16.1   0.0.0.0         UG   0     0       0 eth0
10.0.3.0       *               255.255.255.0   U     0     0       0 lxcbr0
10.254.0.21     172.16.3.70     255.255.255.255 UGH   0     0       0 brqaec3dcf0-17
172.16.1.0     *               255.255.255.0   U     0     0       0 brq7dcee2e0-3a
172.16.2.0     *               255.255.255.0   U     0     0       0 brqc1091b8f-96
172.16.3.0     *               255.255.255.0   U     0     0       0 brqaec3dcf0-17
172.16.10.0     *               255.255.255.0   U     0     0       0 eth4
192.168.16.0   *               255.255.255.0   U     0     0       0 eth0
192.168.122.0   *               255.255.255.0   U     0     0       0 virbr0
virl@virl:~$
You can now ping VIRL from IOSv-1.
iosv-1#ping 172.16.1.254
Type escape sequence to abort.
Sending 5, 100-byte ICMP Echos to 172.16.1.254, timeout is 2 seconds:
!!!!!
Success rate is 100 percent (5/5), round-trip min/avg/max = 2/3/5 ms
Here is an illustration on the two methods IOSv-1 uses to access an external network.
You may wonder that even we have made a simulated network talk to VIRL, it is still playing inside a self-contained network. How can we setup the VIRL lab to talk to a “real” external network like a physical router sitting next to you? The answer is you can bridge the virtual lab to your physical network infrastructure using VMware’s vSwitch technology. We’ll use the Flat network in this example. Snat works similarly.
There are two steps you need to do to accomplish this:
Step1: Customize VIRL’s configuration to match your environment.
Most people only configured the Management IP of VIRL during the initial installation. We now need to edit the Flat subnet address to match your specific environment. For me, I needed to change the subnet from 172.16.1.0/24 to 192.168.15.0/24. (192.168.15.0/24 is my lab network where I have a rack of Cisco gears)
virl@virl:~$ vi /etc/virl.ini
## l2 network
## l2_network format is address/cidr format x.x.x.x/x
## Default
## l2_network: 172.16.1.0/24
## l2_mask: 255.255.255.0
## l2_network_gateway: 172.16.1.1

## My lab subnet
l2_network: 192.168.15.0/24
l2_mask: 255.255.255.0
l2_network_gateway: 192.168.15.1

## l2 bridge first and last address for dhcp allocation
## Default
##l2_start_address: 172.16.1.50
##l2_end_address: 172.16.1.253

## Changed the DHCP scope from 50-253 to 200-253 so that it will never have IP conflict with my physical lab.
l2_start_address: 192.168.15.200
l2_end_address: 192.168.15.253

## address on the L2 bridge port for debugging?
## Default is
## l2_address: 172.16.1.254/24

## I changed from .254 to .10 to avoid it conflicting with the network broadcast address.
l2_address: 192.168.15.10/24

## Nameservers for DHCP on flat network (aka flat)
## Substitute with DNS server addresses that are reachable
## Google's public DNS: 8.8.8.8 and 8.8.4.4
##
## Don't set them to identical addresses
##
## Defaults are
## first_flat_nameserver: 8.8.8.8

## Changed it to use my internal DNS server so internal hostnames can be utilized.
first_flat_nameserver: 192.168.16.30
Restart VIRL.
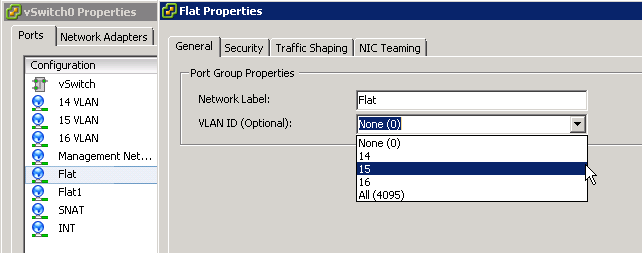
Step2: Configure VMWare ESXi vSwitch VLAN properties.
Match the VLAN ID with the Flat network Port Group. For example, VLAN 15 is allocated to my physical lab on 192.168.15.0/24.
Now your VIRL lab can talk to your physical lab over the Flat network.

You may follow these two steps to configure SNAT and connect to your external lab. Keep in mind that you cannot use the same subnet for both FLAT and SNAT networks. I found It adds complexity while has little to no benefit by using SNAT to connect to an external lab. Unless you want to test specific features I recommend you stay with Flat network.
I’d love to hear from you!
If you have any questions regarding the content, feedback or suggestions for future topics, please leave a comment below.

Very helpful. Thank you!
Thank you for stopping by.
Thank you for the tutorial Jack!
Thank you.
Hello Experts,
I want to connect my virtual routers to external lab via Flat.
Kindly help me in figuring out the solution.
I have deployed the CML on Esxi and assigned VLAN Id 112 to the Flat
My Flat network network setting in settings.ini is below
# Physical Port and virtual bridge for L2 bridge
#Default
l2_port = eth1
l2_bridge_port = br-eth1
#l2 network (AKA flat)
# Default
l2_network = 172.16.1.0/24
l2_mask = 255.255.255.0
l2 network gateway = 172.16.1.1
# l2 bridge first and last address for dhcp allocation
#Default
l2_start_address = 172.16.1.50
l2_end_address = 172.16.1.250
# Do you want to address the L2 bridge port for debugging?
# Default is
address l2 port = True
l2_address = 172.16.1.254
My Esxi server connected with Physical Adapters Vmnic4.
I am able to telnet the routers running in CML from CML Server, but facing issue in connecting external lab.
Is it like we need to connect external physical device to the second nic of Esxi Sever and put the same vlan number as flat.
How about the Vswitch, I have only one Vswitch0, will I need to create one more vswitch.
Thanks in advance.
Thanks and Regards,
Amit
Amit,
First of all, you want to make sure you have VLAN112 on your network, with the same subnet 172.16.1.0/24. The physical NIC on the EXSi server connected to the switch port is a “truck” port, and VLAN 112 is allowed through the trunk. VLAN 112 needs to tagged, meaning it is not a native VLAN on the trunk. Assuming you’ve got the management traffic working and you can access the CML server from your network. We’ll just focus on the Flat (172.16.1.0/24) network connectivity.
The best practice setup is to dedicate a physical NIC on your ESXi server for lab-to-external connectivity. If you have a free NIC available on the ESXi host, connect it to the switch. The switch can be the same switch as your management NIC is connected or different switch. The key is that the switch port must be configured in truck mode as explained above. Next, in vSphere you’ll see a new Vmnic5 comes up. Follow the Step 2 in http://www.speaknetworks.com/cisco-virl-installation-on-vmware-esxi/ and create a Flat network with VLAN ID 112. Accept promiscuous mode as explained in that post. Then go to the CML VM configuration in Step 3 and assign the adapter 2 (or whatever the Flat NIC is) to the Flat network created in Step 2. After rebooting the CML server, you should now have external connectivity.
If you do not have a dedicated NIC on the ESXi host, you may share with the existing one. Follow the same process in Step 3. The key is that whichever physical NIC you use, shared or dedicated, it must carry VLAN 112 tagged traffic from the switch. The switch port must be a truck port.
Hope it helps.
We can connect either a physical or virtual device to the VMnet2 and VMnet3 network and they will be able to talk to iosv device after that. YES NVRAM up up iosv-2#show ip interface brief Interface IP-Address OK?