Do you have any public facing servers such as web servers on your network? Do you have a guest Wi-Fi enabled but you do not want visitors to access your internal resource? In this session we’ll talk about security segmentation by creating multiple security levels on a Cisco ASA firewall. In the end, Cisco ASA DMZ configuration example and template are also provided.
The information in this session applies to legacy Cisco ASA 5500s (i.e. ASA 5505, 5510 and 5520) as well as the next-gen ASA 5500-X series firewall appliances.
Since ASA code version 8.3, there was a major change introduced into the NAT functionality by Cisco. We will cover the configuration for both pre-8.3 and current 9.x releases.
You can download the entire lab setup and configuration files for FREE
As part of our documentation effort, we maintain current and accurate information we provided. Documentations are routinely reviewed and updated. We ask for your email address to keep you notified when the article is updated.
Cisco ASA DMZ Configuration Example
Design Principle
The network diagram below describes common network requirements in a corporate environment.
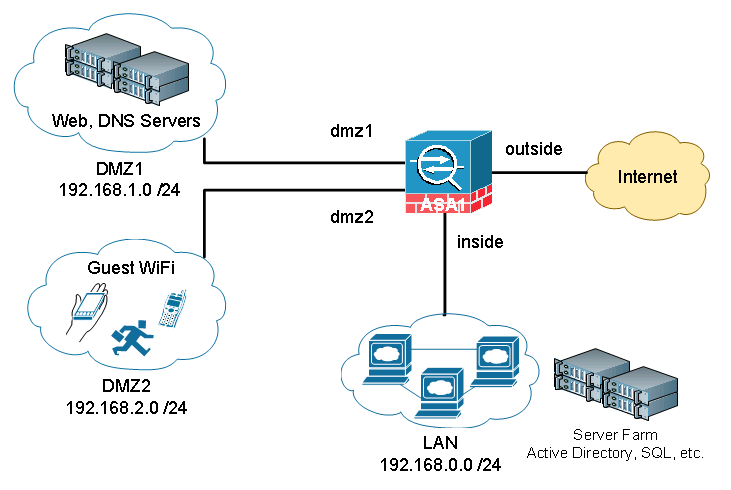
A Cisco ASA is deployed as an Internet gateway, providing outbound Internet access to all internal hosts.
There are four security levels configured on the ASA, LAN, DMZ1, DMZ2 and outside. Their security level from high to low is as following: LAN > DMZ1 > DMZ2 > outside.
- LAN is considered the most secured network. It not only hosts internal user workstations as well as mission critical production servers. LAN users can reach other networks. However, no inbound access is allowed from any other networks unless explicitly allowed.
- DMZ1 hosts public facing web servers. Any one on the Internet can reach the servers on TCP port 80. DMZ1 also hosts DNS servers for guest Wi-Fi in DMZ2.
- DMZ2 is designed as untrusted guest network. Its sole purpose is providing Internet access for visitors. For Internet content filtering, they are required to use the in-house DNS servers in DMZ1.
The design idea here is that we don’t allow any possibilities of compromising the LAN. All “inbound” access to the LAN is denied unless the connection is initiated from the inside hosts. Servers in DMZ1 have two purposes, serving Internet web traffic and DNS resolution queries from DMZ2, the guest Wi-Fi network. We do have DNS servers on the LAN for internal users and servers. But we do not want to open any firewall holes to our most secured network. The worst case assumption is that, in case DMZ2 is compromised since it is the lease controlled network, it can potentially impact DMZ1 because we do have a firewall rules open for DNS access from DMZ2 to DMZ1. Supposed both DMZ1 and DMZ2 are compromised, and the hacker has no way making his way into the LAN subnet because no firewall rules allow any access into the LAN whatsoever.
Security levels on Cisco ASA Firewall
Before jumping into the configuration, I’d like to briefly touch on how Cisco ASAs work in a multi-level security design. The concept is not Cisco specific. It applies to any other business grade firewalls.
By default, traffic passing from a lower to higher security level is denied. This can be overridden by an ACL applied to that lower security interface. Also the ASA, by default, will allow traffic from higher to lower security interfaces. This behavior can also be overridden with an ACL. The security levels are defined by numeric numbers between 0 and 100. 0 is often placed on the untrusted network such as Internet. And 100 is the most secured network. In our example we assign security levels as following: LAN = 100, DMZ1 = 50, DMZ2 = 20 and outside = 0.
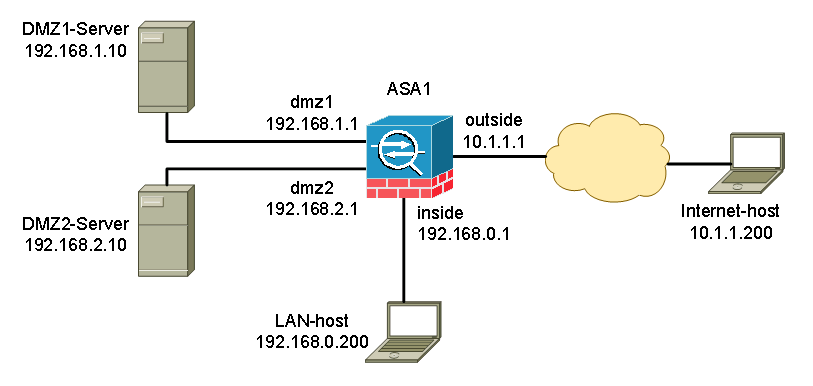
Lab topology setup
In our lab, we used one host in each network to represent the characteristics of that subnet. A host is placed on the internet side for testing.
We’ll first cover the configuration example for ASA code version newer than 8.3, as well as 9.x.
Cisco ASA DMZ Configuration Example
Step 1: Assign security level to each ASA interface
We’ll configure four interfaces on the ASA. Their security levels are: inside (100), dmz1(50), dmz2(20) and outside (0).
interface GigabitEthernet0/0
description to WAN
nameif outside
security-level 0
ip address 10.1.1.1 255.255.255.0
!
interface GigabitEthernet0/1
description to LAN
nameif inside
security-level 100
ip address 192.168.0.1 255.255.255.0
!
interface GigabitEthernet0/2
description to DMZ1
nameif dmz1
security-level 50
ip address 192.168.1.1 255.255.255.0
!
interface GigabitEthernet0/3
description to DMZ2
nameif dmz2
security-level 20
ip address 192.168.2.1 255.255.255.0
Step 2: Configure ASA as an Internet gateway, enable Internet access
There are two main tasks to enable internal hosts to go out to the Internet, configuring Network Address Translation (NAT) and route all traffic to the ISP. You do not need an ACL because all outbound traffic is traversing from higher security level (inside, dmz1 and dmz2) to lower security level (outside).
nat (inside,outside) after-auto source dynamic any interface
nat (dmz1,outside) after-auto source dynamic any interface
nat (dmz2,outside) after-auto source dynamic any interface
The configuration above states that any traffic coming from inside, dmz1 and dmz3 network, translate the source IP to the outside interface’s IP for outbound Internet traffic. The “after-auto” keyword simply set this NAT the least preferred rule to be evaluated after Manual NAT and Auto NAT are evaluated. The reason we want to give it the least preference is to avoid possible conflict with other NAT rules. Let’s talk about the major changes in NAT post-8.3 code briefly.
NAT on the ASA since version 8.3 and later is broken into two types knows as Auto NAT (Object NAT) and Manual NAT (Twice NAT). The first of the two, Object NAT, is configured within the definition of a network object.
The main advantage of Auto NAT is that the ASA automatically orders the rules for processing as to avoid conflicts. This is the easiest form of NAT, but with that ease comes with a limitation in configuration granularity. For example, you cannot make translation decision based on the destination in the packet as you could with the second type of NAT, Manual NAT. Manual NAT is more robust in its granularity, but it requires that the lines be configured in the correct order in order to achieve the correct behavior.
The other change in NAT is that you either define a NAT or you don’t. Traffic that does not match any NAT rules will traverse the firewall without any translation (like NAT exemption but without explicitly configuring it, more like an implicit NAT exemption). The static and global keywords are deprecated. Now it is all about “NAT”.
Next is configuring a default gateway and route all traffic to the upstream ISP. 10.1.1.2 is the gateway the ISP provided.
route outside 0.0.0.0 0.0.0.0 10.1.1.2Also make sure “inspect icmp” is configured under global_policy. It allows icmp return traffic to pass the ASA while the Ping is initiated from inside hosts.
policy-map global_policy
class inspection_default
inspect icmp
At this point, you should be able to ping the host 10.1.1.200 on the Internet from any internal subnets.
Step 3: Configure static NAT to web servers, grant Internet inbound access to web servers
First we define two objects for the web server, one for its internal IP and one for its public facing IP.
object network WWW-EXT
host 10.1.1.10
!
object network WWW-INT
host 192.168.1.10
We have two ways of configuring NAT, Auto NAT (Object NAT) and Manual NAT (Twice NAT). For Auto-NAT, insert this configuration under WWW-INT object.
nat (dmz1,outside) static WWW-EXT service tcp www wwwFor Manual NAT, define the web service object and configure manual NAT in global configuration mode. In our example, we’ll demonstrate Manual NAT. You can only have one set of configuration at a time.
object service WEB-SERVICE
service tcp source eq www
!
nat (dmz1,outside) source static WWW-INT WWW-EXT service WEB-SERVICE WEB-SERVICE
When a host matching the ip address 192.168.1.10 on the dmz1 segment establishes a connection sourced from TCP port 80 (WWW) and that connection goes out the outside interface, we want to translate that to be TCP port 80 (WWW) on the outside interface and translate that IP address to be 10.1.1.10.
That seems a little odd… “sourced from TCP port 80 (www)”, but web traffic is destined to port 80. It is important to understand that these NAT rules are bi-directional in nature. As a result you can re-phrase this sentence by flipping the wording around. The result makes a lot more sense:
When hosts on the outside establish a connection to 10.1.1.10 on destination TCP port 80 (www), we will translate the destination IP address to 192.168.1.10 and the destination port will be TCP port 80 (www) and send it out the dmz1.
Because traffic from the outside to the dmz1 network is denied by the ASA by default, users on the Internet cannot reach the web server despite the NAT configuration. We will need to configure ACLs and allow Internet inbound traffic to access the web server.
access-list OUTSIDE extended permit tcp any object WWW-INT eq www
!
access-group OUTSIDE in interface outside
The ACL states, permit traffic from anywhere to the web server (WWW-INT: 192.168.1.10) on port 80.
In earlier versions of ASA code (8.2 and earlier), the ASA compared an incoming connection or packet against the ACL on an interface without un-translating the packet first. In other words, the ACL had to permit the packet as if you were to capture that packet on the interface. In 8.3 and later code, the ASA un-translates that packet before checking the interface ACLs. This means that for 8.3 and later code, traffic to the host’s real IP is permitted and not the host’s translated IP. Note we used WWW-INT in this example.
Step 4: Inter-security segment access control
Let’s recap the default behavior on a Cisco ASA.
- Traffic initiated from a lower security interface is denied when going to a higher security interface
- Traffic initiated from a higher security interface is allowed when going to a lower security interface
Specifically in our example,
- Traffic initiated from “inside” is allowed to go to any other interface segments – “dmz1”, “dmz2” and “outside”.
- Traffic initiated from “dmz1” is allowed to go to “dmz2” and “outside”. It is denied when going to “inside”.
- Traffic initiated from “dmz2” is allowed only when going to “outside”. All other segment access is denied.
The default rules can be overwritten by ACLs. In our example, we need the guests in dmz2 to be able to use the DNS servers in dmz1. We’ll need to configure ACLs to specifically allow the access.
! define network objects
object network INSIDE-NET
subnet 192.168.0.0 255.255.255.0
!
object network DMZ1-NET
subnet 192.168.1.0 255.255.255.0
!
! define DNS server object
object network DNS-SERVER
host 192.168.1.10
!
access-list DMZ2-ACL extended permit udp any object DNS-SERVER eq domain
access-list DMZ2-ACL extended deny ip any object INSIDE-NET
access-list DMZ2-ACL extended deny ip any object DMZ1-NET
access-list DMZ2-ACL extended permit ip any any
!
access-group DMZ2-ACL in interface dmz2
The ACLs allow traffic initiated from dmz2 to access the DNS server on UDP port 53. Remember there is an implicit “deny ip any any” at the end of the ACL. If we stopped here dmz2’s Internet access will be broken. We added three more lines to deny access to dmz1 and inside networks while allowing the reset of traffic to go to the Internet.
What about ACLs on dmz1 and inside interfaces? We do not need any ACLs on those interfaces because the default security behavior meets our requirements.
Step 5: Verification and troubleshooting
In this session I will demonstrate a few verification and troubleshooting techniques to quickly validate the configuration and identify the problem if any.
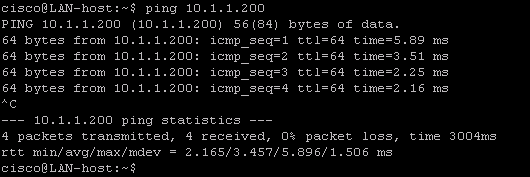
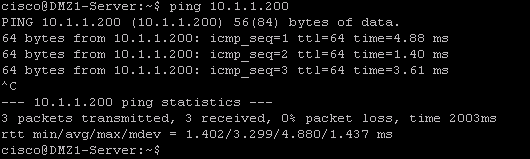
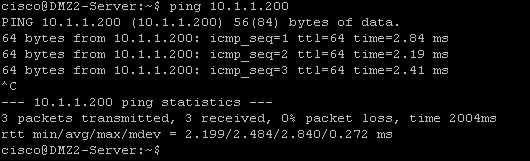
The first technique is using ICMP ping to verify network connectivity. Obviously ping is working does not conclude everything else is also working. However it is a simple tool to confirm that packet from point A can reach point B. In our example we wanted to verify that hosts in each subnet of inside, dmz1 and dmz2 have Internet access. We tried pinging the Internet host at 10.1.1.200 from each internal network.
On the ASA, we enabled ICMP debug mode and made the terminal as the debug message output monitor. By default, the debug messages are sent to the log buffer instead of the screen. You need to view the logs by doing “show logging”. In our case, we wanted to see the logs immediately as they popping up on the screen.
ASA1# debug icmp trace
ASA1# terminal monitor
Ping was initiated from inside host 192.168.0.200, dmz1 host 192.168.1.10 and dmz2 host 192.168.2.10. Responses are being received.
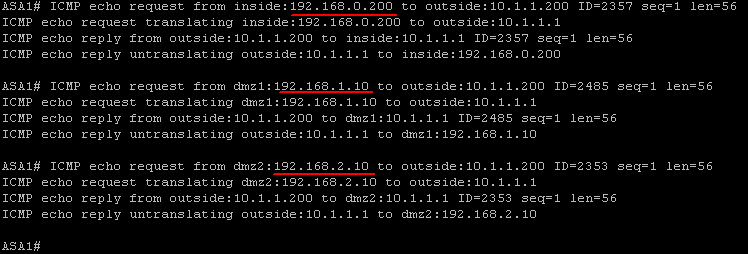
Study the debug message and you’ll see exactly how ICMP packets flow through the network.
- ICMP echo request from inside:192.168.0.200 to outside:10.1.1.200 (The ASA sees an incoming ping packet from inside interface host 192.168.0.200 and trying to reach host 10.1.1.200 on the outside interface)
- ICMP echo request translating inside:192.168.0.200 to outside:10.1.1.1 (The ASA detected a NAT rule would match, and used it to translate the source IP from 192.168.0.200 to 10.1.1.1)
- ICMP echo reply from outside:10.1.1.200 to inside:10.1.1.1 (The host 10.1.1.200 on the Internet replied to the ping request and send the return traffic to 10.1.1.1)
- ICMP echo reply untranslating outside:10.1.1.1 to inside:192.168.0.200 (The ASA sees the ping return traffic and it matches an established traffic session when the outbound ping traffic was generated. The ASA knows exactly who requested it and who is desperately waiting for it. The ASA un-translate the IP from 10.1.1.1 to 192.168.0.200 and send it to 192.168.0.200).
After testing, do remember to deactivate the debug mode because it is system resource consuming.
ASA1# no debug allThe second technique is using Packet Tracer to simulate packets going through the ASA and see how the ASA treats the packet step-by-step. It is an excellent tool when you do not have access to either side of the servers to generate real traffic. Or before going live, you wanted to make sure the configuration will do what’s intended.
We’ll do two packet tracer tests to validate these critical services:
The ASA will allow inbound web traffic to the web server in DMZ1.
The ASA will allow users in DMZ2 to access the DNS server in DMZ1.
We first simulate web browsing traffic initiated from a host on the internet with IP 10.1.1.200, trying to reach the web server on port 80. The following command sates:
“Generate a fake packet and push it through to the ASA’s outside interface in the inbound direction. The packet comes with source IP 10.1.1.200 using a random high port number 1234 and destination IP 10.1.1.10 to the web server on port 80.”
ASA1# packet-tracer input outside tcp 10.1.1.200 1234 10.1.1.10 http detailed
Phase: 1
Type: ACCESS-LIST
Subtype:
Result: ALLOW
Config:
Implicit Rule
Additional Information:
 Forward Flow based lookup yields rule:
 in  id=0x7fffd1991830, priority=1, domain=permit, deny=false
        hits=43, user_data=0x0, cs_id=0x0, l3_type=0x8
        src mac=0000.0000.0000, mask=0000.0000.0000
        dst mac=0000.0000.0000, mask=0100.0000.0000
        input_ifc=outside, output_ifc=any

Phase: 2
Type: UN-NAT
Subtype: static
Result: ALLOW
Config:
nat (dmz1,outside) source static WWW-INT WWW-EXT service WEB-SERVICE WEB-SERVICE
Additional Information:
NAT divert to egress interface dmz1
Untranslate 10.1.1.10/80 to 192.168.1.200/80

Phase: 3
Type: ACCESS-LIST
Subtype: log
Result: ALLOW
Config:
access-group OUTSIDE in interface outside
access-list OUTSIDE extended permit tcp any object WWW-INT eq www
Additional Information:
 Forward Flow based lookup yields rule:
 in  id=0x7fffd12e7660, priority=13, domain=permit, deny=false
        hits=1, user_data=0x7fffd8eb9d00, cs_id=0x0, use_real_addr, flags=0x0, protocol=6
        src ip/id=0.0.0.0, mask=0.0.0.0, port=0, tag=any
        dst ip/id=192.168.1.200, mask=255.255.255.255, port=80, tag=any, dscp=0x0
        input_ifc=outside, output_ifc=any

Phase: 4
Type: NAT
Subtype:
Result: ALLOW
Config:
nat (dmz1,outside) source static WWW-INT WWW-EXT service WEB-SERVICE WEB-SERVICE
Additional Information:
Static translate 10.1.1.200/1234 to 10.1.1.200/1234
 Forward Flow based lookup yields rule:
 in  id=0x7fffd1cc1b50, priority=6, domain=nat, deny=false
        hits=1, user_data=0x7fffd12e6270, cs_id=0x0, flags=0x0, protocol=6
        src ip/id=0.0.0.0, mask=0.0.0.0, port=0, tag=any
        dst ip/id=10.1.1.10, mask=255.255.255.255, port=80, tag=any, dscp=0x0
        input_ifc=outside, output_ifc=dmz1
...
output omitted for brevity
...
Result:
input-interface: outside
input-status: up
input-line-status: up
output-interface: dmz1
output-status: up
output-line-status: up
Action: allow
Looking through the packet tracer results, we learned the following:
- Phase 1 is Layer 2 MAC level ACL, we do not have any MAC level restriction configured and all traffic is allowed by default.
- At Phase 2, packet is being un-NAT’d before sending to the outside interface ACL. That’s why we needed to use the real-IP or the internal IP WWW-INT when configuring the ACL. It is a major change since ASA code 8.3. Prior to code 8.3, ACL was checked first before un-NAT’ing.
- Phase 3 shows the outside ACL is being verified and the traffic is allowed.
- The reset of the phases put the packet through various of policy checks such as QoS, policy-maps and etc. We don’t have any of those configured so there was no effect to the packet.
- In the end, a nice summary is displayed. The input interface is outside, the output interface is dmz1 and the traffic is sent through successfully.
Similarly, we can do the pack tracer testing between dmz2 and dmz1, to verify the host in dmz2 has access to dmz1’s DNS server.
ASA1# packet-tracer input dmz2 udp 192.168.2.10 1234 192.168.1.10 domain detailed
Phase: 1
Type: ACCESS-LIST
Subtype:
Result: ALLOW
Config:
Implicit Rule
Additional Information:
 Forward Flow based lookup yields rule:
 in  id=0x7fffd1a76710, priority=1, domain=permit, deny=false
        hits=12, user_data=0x0, cs_id=0x0, l3_type=0x8
        src mac=0000.0000.0000, mask=0000.0000.0000
        dst mac=0000.0000.0000, mask=0100.0000.0000
        input_ifc=dmz2, output_ifc=any

Phase: 2
Type: ROUTE-LOOKUP
Subtype: Resolve Egress Interface
Result: ALLOW
Config:
Additional Information:
found next-hop 192.168.1.10 using egress ifc  dmz1

Phase: 3
Type: ACCESS-LIST
Subtype: log
Result: ALLOW
Config:
access-group DMZ2-ACL in interface dmz2
access-list DMZ2-ACL extended permit udp any object DNS-SERVER eq domain
Additional Information:
 Forward Flow based lookup yields rule:
 in  id=0x7fffd1cdad10, priority=13, domain=permit, deny=false
        hits=0, user_data=0x7fffd8eb9b80, cs_id=0x0, use_real_addr, flags=0x0, protocol=17
        src ip/id=0.0.0.0, mask=0.0.0.0, port=0, tag=any
        dst ip/id=192.168.1.10, mask=255.255.255.255, port=53, tag=any, dscp=0x0
        input_ifc=dmz2, output_ifc=any
...
output omitted for brevity
...
Result:
input-interface: dmz2
input-status: up
input-line-status: up
output-interface: dmz1
output-status: up
output-line-status: up
Action: allow
- Since there is no NAT involved, Phase 2 went straight to route lookup. The output interface dmz1 was identified.
- Phase 3 checks the ACL, and it granted traffic to go through.
- The reset of the phases stayed the same. In the end, the packet was sent through dmz1 interface successfully.
Both packet tracer results confirmed our configuration is correct. Let try packet tracer testing on something that is not supposed to work. We wanted to see the ASA actually blocks the traffic.
The web server is not configured to serve FTP traffic. We’ll send a FTP request to the webs server and see what happens.
ASA1# packet-tracer input outside tcp 10.1.1.200 1234 10.1.1.10 ftp detailed
Phase: 1
Type: ROUTE-LOOKUP
Subtype: Resolve Egress Interface
Result: ALLOW
Config:
Additional Information:
found next-hop 10.1.1.10 using egress ifc  outside

Result:
input-interface: outside
input-status: up
input-line-status: up
output-interface: outside
output-status: up
output-line-status: up
Action: drop
Drop-reason: (nat-no-xlate-to-pat-pool) Connection to PAT address without pre-existing xlate
The ASA dropped the packet because there is no NAT rules configured to transfer FTP traffic to anything. It didn’t even get to the ACL check point.
Cisco ASA pre-8.3 code configuration
Step 1: Assign security level to each ASA interface (same)
Step 2: Configure ASA as an Internet gateway, enable Internet access
We configure a “global NAT” to use the outside interface IP for Internet surfing. The number “10” is the NAT group ID that will draw from the global NAT. We then define NAT group ID 10 for each internal subnets to use the global NAT.
global (outside) 10 10.1.1.1
nat (inside) 10 192.168.0.0 255.255.255.0
nat (dmz1) 10 192.168.1.0 255.255.255.0
nat (dmz2) 10 192.168.2.0 255.255.255.0
That’s all you needed for outbound Internet.
The default route to the Internet gateway is configured the same.
route outside 0.0.0.0 0.0.0.0 10.1.1.2Step 3: Configure static NAT to web servers, grant Internet inbound access to web servers
Configure a one-to-one static NAT for the web server. The ACL permits anyone on the Internet to access the web server on port 80. The difference in configuration is that we used publically NAT’d IP instead of the web server’s internal IP in the ACL.
static (dmz1,outside) 10.1.1.10 192.168.1.10 netmask 255.255.255.255
access-list OUTSIDE extended permit tcp any host 10.1.1.10 eq www
access-group OUTSIDE in interface outside
Step 4: Inter-security segment access control
First we configure the ACLs to allow DNS access from dmz2 to dmz1.
access-list DMZ2-ACL extended permit udp any host 192.168.1.10 eq domain
access-list DMZ2-ACL extended deny ip any 192.168.0.0 255.255.255.0
access-list DMZ2-ACL extended deny ip any 192.168.1.0 255.255.255.0
access-list DMZ2-ACL extended permit ip any any
!
access-group DMZ2-ACL in interface dmz2
By default, ASA code prior to 8.3 will try to NAT any traffic going through an interface. We do not want the ASA to perform Network Address Translations among internal interfaces unless the traffic is heading to the outside interface. The configuration below basically states: traffic going from “inside” to “dmz1” or “dmz2” do not NAT (or NAT to the same IP they came with). Same logic applies the traffic going from dmz2 to dmz1.
static (inside,dmz1) 192.168.0.0 192.168.0.0 netmask 255.255.0.0
static (inside,dmz2) 192.168.0.0 192.168.0.0 netmask 255.255.0.0
static (dmz2,dmz1) 192.168.0.0 192.168.0.0 netmask 255.255.0.0
In the packet tracer tests, you may observe that packets are checked by the ACLs before being NAT’d.
That’s all you need to configure on an ASA running pre-8.3 code. It concludes the tutorial on Cisco ASA DMZ Configuration Example.
You can download the entire lab setup and configuration files for FREE. The package includes:


- Read the instruction first It covers what each downloaded file is for and how to use them.
- The article in PDF format for your offline reference.
- Final “show running-configuration” for the Cisco ASA. You may use it on any compatible ASA devices.
- Cisco VIRL topology file with initial lab configuration. You may load the topology file directly into your VIRL server. It contains initial wiring and IP assignments.
- Cisco VIRL topology file with final lab configuration. It is fully configured lab based on the requirements in the article.
- Optional configuration files used for Linux hosts in the simulation. Follow the INSTRUCTION.pdf for when and how to use it.
As part of our documentation effort, we maintain current and accurate information we provided. Documentations are routinely reviewed and updated. We ask for your email address to keep you notified when the article is updated.
If you have any questions regarding the content, feedback or suggestions for future topics, please leave a comment below.
Hi Ray,
Thank you for your kind words. Please make sure you subscribe to my email list and you’ll get an email when I have updates on any posts and when new articles posted.
Exactly what I needed and more, thanks for sharing
Glad it helped.
This solved my NAT configuration problem! I couldn’t get the inside vlan to talk to the DMZ, but this tutorial was excellent in helping me configure the NAT correctly. Thanks so much!
Glad it was helpful.
Thanks, this pointed me in the right direction. Combined with the other examples i think i’ll manage.
Glad it was helpful.
Nice piece , I was enlightened by the info , Does anyone know if my business can access a template NY DTF ST-140 example to use ?