When it comes to implementing remote access VPN, there are many options. Check out my article on deciding among PPTP vs L2TP/IPSec vs SSTP vs IKEv2 vs OpenVPN. In that article, I listed a few things to look for when trying to pick a VPN protocol. PPTP is the first one to throw out because of its lack of data integrity check and security vulnerabilities.. L2TP/IPSec and IKEv2 were the ones I recommended. In this article, we’ll cover configuring L2TP over IPSec VPN on Cisco ASA. Both pre-8.3 code and post-8.3 code configuration samples are included.
Save time by downloading the validated configuration scripts and have your VPN up in minutes.
What is L2TP/IPSec
L2TP is a combination of PPTP and Layer 2 Forwarding (L2F), a technology developed by Cisco. L2TP combines the best features of PPTP and L2F. Even the underlying tunneling technology still utilizes PPP specifications. the encryption is done by IPSec in transport mode. L2TP/IPSec protocol uses UDP port 500.
Encapsulation
L2TP has two layers of encapsulations – inner L2TP encapsulation and outer layer IPSec encapsulation. The inner layer comprised of an L2TP header and a UDP header wrapped around the PPP frame. The outer layer adds IPSec ESP (Encapsulating Security Payload) header and trailer to the first layer. The IPSec authentication trailer provides message integrity check and authentication.
Encryption
Data encryption is done with one of the following protocols by using encryption keys generated from the IKE negotiation process. AES-256 (Advanced Encryption Standard), AES-192, AES-128, and 3DES encryption algorithms. Since vulnerabilities have been found in 3DES algorithms, using 3DES is no longer recommended.
Why I recommend
Unlike PPTP and SSTP, L2TP/IPsec enables machine authentication at the IPsec layer and user level authentication at the PPP layer. It supports either computer certificates or a pre-shared key as the authentication method for IPsec. L2TP/IPsec provides data confidentiality, data integrity, and data authentication.
Furthermore, L2TP/IPSec supports the highest encryption. It checks data integrity and encapsulates the data twice. It is not the fastest VPN solution because of the double encapsulation overhead but you can’t really notice it running on the modem hardware.
Next we’ll dive right into the configuration part.
Network Topology
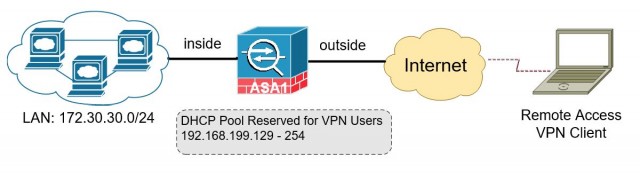
A simple network is composed of a Corp LAN, a Cisco ASA acting as an Internet gateway and firewall. Remote VPN users connect to the Corp LAN using L2TP/IPSec VPN. A DHCP pool is reserved on the ASA for VPN users. We’ll also implement “split tunneling” so that regular Internet traffic is not sent through the tunnel. For simplicity, VPN user authentication is done locally on the ASA. You can configure RADIUS authentication to an AD. It is outside the scope of this article.
- Corp LAN: 172.30.30.0/24
- DHCP Pool for VPN users: 192.168.199.100 – 200
Configuring L2TP over IPSec VPN on Cisco ASA Configuration Example
In this session, a step-by-step configuration tutorial is provided for both pre-8.3 and post-8.3 code. Save time by downloading the validated configuration scripts and have your VPN up in minutes.
Step 1: Configure a DHCP Pool for VPN users
This address pool should not overlap with your existing network. It is not a good idea to share a portion of your existing LAN subnet with VPN users. If you put them on the same network, they would have access to everything on the same subnet. For better security and flexible traffic control, I would put VPN users on their own subnet, and in a range that can be expressed by a subnet mask. For example 192.168.199.129 – 254 /25 (subnet mask 255.255.255.128). The benefit is that you can do route summarization, ACL to cover this subnet easily and cleanly.
ip local pool VPNPOOL 192.168.199.129-192.168.199.254 mask 255.255.255.128Step 2: Create group-policy and tunnel-group
Note that I use all capital letters for variables being referenced in the command. They are just a name, you can name them anything make sense in your environment.
group-policy SSLGROUPPOLICY internal
group-policy SSLGROUPPOLICY attributes
dns-server value 4.2.2.2 ! --- can be your internal DNS servers or public DNS servers
vpn-tunnel-protocol l2tp-ipsec ! --- specifying the protocol being used
default-domain value speaknetworks.com
intercept-dhcp enable
!
Next we define a “Tunnel Group” for the tunnel, You MUST use the default group with default name “DefaultRAGroup“ (the only exception is if you use certificate based authentication).
tunnel-group DefaultRAGroup general-attributes
address-pool VPNPOOL ! --- VPN user will be assigned with an IP in the pool
default-group-policy SSLGROUPPOLICY ! --- references the group-policy defined earlier
authentication-server-group LOCAL ! --- user local authentication
!
tunnel-group DefaultRAGroup ppp-attributes
no authentication pap
authentication chap
authentication ms-chap-v1
authentication ms-chap-v2
! Pre-8.3 code
tunnel-group DefaultRAGroup ipsec-attributes
pre-shared-key MyVPNPassWord#@ ! --- It is the group password for all VPN users
!
! Post-8.3 code
tunnel-group DefaultRAGroup ipsec-attributes
Ikev1 pre-shared-key MyVPNPassWord#@ ! --- It is the group password for all VPN users
Step 3: Configure VPN Phase 1 and Phase 2
You’ll see didn’t follow the logical order of configuring Phase 1, Phase 2. It is because later configuration are being referenced by earlier configuration in the CLI. I arranged the configuration order so that it is the actual workflow- define a parameter, reference it in a modular configuration, apply the modular to global configuration.
First define transform-set used in Phase 2. In this example, we use 3DES encryption and SHA hashing. The tunnel will be in transport mode instead of VPN mode (default).
! Pre-8.3 code
crypto ipsec transform-set ESP-3DES-SHA esp-3des esp-sha-hmac
crypto ipsec transform-set ESP-3DES-SHA mode transport
! Post-8.3 code
crypto ipsec ikev1 transform-set ESP-3DES-SHA esp-3des esp-sha-hmac
crypto ipsec ikev1 transform-set ESP-3DES-SHA mode transport
Next we prepare for Phase 2 configuration. We configure a “dynamic-map” to use the transform-set defined above. Then setup a crypto map, referencing the dynamic-map, and assign it to the outside interface of the ASA. The outside interface is Internet facing where VPN users come in from. The numbers 10 and 20 are arbitrary sequential numbers to differentiate one crypto map / VPN tunnels from another. You can have multiple VPN tunnels terminated on a single ASA.
! Pre-8.3 code
crypto dynamic-map L2TP-MAP 10 set transform-set ESP-3DES-SHA
crypto map L2TPVPN 20 ipsec-isakmp dynamic L2TP-MAP
crypto map L2TPVPN interface outside
! Post-8.3 code
crypto dynamic-map L2TP-MAP 10 set ikev1 transform-set ESP-3DES-SHA
crypto map L2TPVPN 20 ipsec-isakmp dynamic L2TP-MAP
crypto map L2TPVPN interface outside
Phase 1 configuration is followed. We create a Phase 1 policy, which defines using pre-share key for authentication, SHA for hashing and Diffie Hellman group 2 for secure key exchange. The number “10” is a sequential number that the ASA checks in that order. If you want a policy to be evaluated first, make a smaller number. Finally we enable the IKE on the outside interface.
! Pre-8.3 code
crypto isakmp policy 10
authentication pre-share
encryption 3des
hash sha
group 2
lifetime 86400
!
crypto isakmp enable outside
! Post-8.3 code
crypto ikev1 policy 10
authentication pre-share
encryption 3des
hash sha
group 2
lifetime 86400
!
crypto ikev1 enable outside
Step 4: Split-Tunneling configuration
By default, all traffic is sent through the VPN tunnel once a client is connected. Even though it is the most secure way to manage VPN users (i.e. web content filtering), in a lot of instances people prefer splitting the Internet traffic off the VPN tunnel to save Internet bandwidth on the VPN headend such as a Corp network.
! Configure a standard ACL to cover Corp LAN
access-list Split-Tunnel-ACL standard permit 172.30.30.0 255.255.255.0
Configure NAT exclusion between Corp LAN and VPN users
! Pre-8.3 code
access-list nonat extended permit ip 172.30.30.0 255.255.255.0 192.168.199.0 255.255.255.0
nat (inside) 0 access-list nonat
! Post-8.3 code
object network Corp-Subnet
subnet 172.30.30.0 255.255.255.0
!
object network L2TP-Subnet
subnet 192.168.199.128 255.255.255.128
!
nat (inside,outside) source static Corp-Subnet Corp-Subnet destination static L2TP-Subnet L2TP-Subnet no-proxy-arp route-lookup! Add Split-Tunneling configuration to the group-policy
group-policy SSLGROUPPOLICY attributes
split-tunnel-policy tunnelspecified
split-tunnel-network-list value Split-Tunnel-ACLStep 5: Lastly, configure local VPN user accounts on the ASA
Don’t overlook the keyword “mschap” in the end when you creating user accounts on the ASA. Without it, users would not be able to connect to the VPN.
username vpnuser password PASS123 mschapYou have completed configuring L2TP over IPSec VPN on Cisco ASA.
Save time by downloading the validated configuration scripts and have your VPN up in minutes.
Troubleshooting
The most common issues that I have seen many people ran into including myself. I thought it is a good idea to document them here for your reference.
Issue 1: Authentication failed
You must configure a local username account with “mschap” keyword.
If you didn’t add the mschap keyword in the end when creating a user account, you get this error in logs. ASA complains about no username identified. The ASA only uses the accounts with mschap option enabled.
Jul 12 2016 11:28:49: %ASA-4-113019: Group = DefaultRAGroup, Username = , IP = 67.52.159.6, Session disconnected. Session Type: IPsecOverNatT, Duration: 0h:00m:03s, Bytes xmt: 3468, Bytes rcv: 3090, Reason: L2TP initiated
ASA# username vpnuser password PASS123 ?
configure mode commands/options:
encrypted Indicates the <password> entered is encrypted
mschap The password will be converted to unicode and hashed using MD4. User entries must be created this way if they are to be authenticated using MSCHAPv1 or MSCHAPv2
nt-encrypted Indicates the <password> entered has been converted to unicode and hashed using MD4, and can be used for MS-CHAP.
privilege Enter the privilege level for this user

ASA# username vpnuser password PASS123 mschap
ASA# sho run | i username
username vpnuser password tVwP2tvXdJ1aoRMBIoF7TA== nt-encrypted
If you didn’t add the mschap keyword in the end when creating a user account, you get this error in logs. ASA complains about no username identified. The ASA only uses the accounts with mschap option enabled.
Jul 12 2016 11:28:49: %ASA-4-113019: Group = DefaultRAGroup, Username = , IP = 67.52.159.6, Session disconnected. Session Type: IPsecOverNatT, Duration: 0h:00m:03s, Bytes xmt: 3468, Bytes rcv: 3090, Reason: L2TP initiated
Issue 2: Tunnel-group issue
You HAVE TO use the default tunnel-group named DefaultRAGroup. If you used any other tunnel group names, you’ll get error in the logs.
Jul 12 2016 11:26:29: %ASA-4-713903: Group = 66.52.19.6, IP = 66.52.19.6, Can’t find a valid tunnel group, aborting…!
Jul 12 2016 11:26:32: %ASA-4-713903: IP = 66.52.19.6, Header invalid, missing SA payload! (next payload = 4)
Jul 12 2016 11:26:35: %ASA-4-713903: IP = 66.52.19.6, Header invalid, missing SA payload! (next payload = 4)
Issue 3: Connected to VPN but unable to access Corp LAN hosts
After the VPN is connected, you found that the ASA inside interface is the only IP you can ping (assuming icmp is allowed on ASA). And errors show in the logs:
Jul 13 2016 09:51:51: %ASA-5-305013: Asymmetric NAT rules matched for forward and reverse flows; Connection for icmp src outside:192.168.199.129 dst inside:172.30.30.30 (type 8, code 0) denied due to NAT reverse path failure
The most common cause of this error is NAT exemption. Make sure you have “nonat” configured in the pre-8.3 code and “nat (inside,outside)” statement configured in post-8.3 code.
Still having issue? Use packet-tracer to verify traffic flow
ASA# packet-tracer input outside icmp 192.168.199.100 8 0 172.30.30.30

Phase: 1
Type: ROUTE-LOOKUP
Subtype: input
Result: ALLOW
Config:
Additional Information:
in 172.30.30.0 255.255.255.0 inside

Phase: 2
Type: ACCESS-LIST
Subtype: log
Result: ALLOW
Config:
access-group outside_access_inside in interface outside
access-list outside_access_inside extended permit icmp any any

Additional Information:

Phase: 3
Type: IP-OPTIONS
Subtype:
Result: ALLOW
Config:
Additional Information:

Phase: 4
Type: CP-PUNT
Subtype:
Result: ALLOW
Config:
Additional Information:

Phase: 5
Type: L2TP-PPP
Subtype:
Result: ALLOW
Config:
Additional Information:

Phase: 6
Type: INSPECT
Subtype: np-inspect
Result: ALLOW
Config:
Additional Information:

Phase: 7
Type:
Subtype:
Result: ALLOW
Config:
Additional Information:

Phase: 8
Type: VPN
Subtype: ipsec-tunnel-flow
Result: ALLOW
Config:
Additional Information:

Phase: 9
Type: DEBUG-ICMP
Subtype:
Result: ALLOW
Config:
Additional Information:

Phase: 10
Type: NAT-EXEMPT
Subtype: rpf-check
Result: ALLOW
Config:
Additional Information:

Phase: 11
Type: NAT
Subtype: rpf-check
Result: ALLOW
Config:
nat (inside) 1 172.30.30.0 255.255.255.0
match ip inside 172.30.30.0 255.255.255.0 outside any
dynamic translation to pool 1 (76.176.134.86 [Interface PAT])
translate_hits = 623987, untranslate_hits = 96153
Additional Information:

Phase: 12
Type: FLOW-CREATION
Subtype:
Result: ALLOW
Config:
Additional Information:
New flow created with id 1700646, packet dispatched to next module

Result:
input-interface: outside
input-status: up
input-line-status: up
output-interface: inside
output-status: up
output-line-status: up
Action: allow
If you do not have “NAT exemption” configured, you’ll get:
Phase: 10
Type: NAT
Subtype: rpf-check
Result: DROP
Config:
nat (inside) 1 172.30.30.0 255.255.255.0
match ip inside 172.30.30.0 255.255.255.0 outside any
dynamic translation to pool 1 (76.176.134.86 [Interface PAT])
translate_hits = 623719, untranslate_hits = 96134
It concludes the tutorial on configuring L2TP over IPSec VPN on Cisco ASA. I hope you find the information helpful. If you have questions or VPN issues not documented here, please leave a comment below. I’ll be happy to help.
nat (inside) 0 access-list nonat
error when enter this command
You have a 8.4(6) code. You need to apply the post-8.3 code configuration from the sample above.
Dear My Current configuration as follow you guide but not connecting L2TP VPN
Please help
ASA# sh start
: Saved
: Written by enable_15 at 18:50:41.559 UTC Tue Feb 25 2003
!
ASA Version 8.4(6)
!
hostname ASA
enable password AuP4zfCk3hcuWRNQ encrypted
passwd 2KFQnbNIdI.2KYOU encrypted
names
!
interface Ethernet0/0
nameif outside
security-level 0
ip address 192.168.1.6 255.255.255.0
!
interface Ethernet0/1
nameif inside
security-level 100
ip address 192.168.2.200 255.255.255.0
!
interface Ethernet0/2
shutdown
no nameif
no security-level
no ip address
!
interface Ethernet0/3
shutdown
no nameif
no security-level
no ip address
!
interface Management0/0
nameif management
security-level 100
no ip address
management-only
!
ftp mode passive
object network Internal
subnet 192.168.2.0 255.255.255.0
object network corp-subnet
subnet 192.168.2.0 255.255.255.0
object network L2TP-Subnet
subnet 192.168.3.128 255.255.255.128
access-list inside_access_in extended permit ip any any
access-list outside_access_in extended permit ip any any
access-list split-Tunnel-ACL standard permit 192.168.2.0 255.255.255.0
access-list nonat extended permit ip 192.168.2.0 255.255.255.0 192.168.30.0 255. 255.255.0
pager lines 24
logging enable
logging asdm informational
mtu management 1500
mtu outside 1500
mtu inside 1500
ip local pool VPNPOOL 192.168.30.100-192.168.30.200 mask 255.255.255.0
no failover
icmp unreachable rate-limit 1 burst-size 1
no asdm history enable
arp timeout 14400
no arp permit-nonconnected
nat (inside,outside) source static corp-subnet corp-subnet destination static L2 TP-Subnet L2TP-Subnet no-proxy-arp route-lookup
!
object network Internal
nat (any,outside) dynamic interface
access-group outside_access_in in interface outside
access-group inside_access_in in interface inside
route outside 0.0.0.0 0.0.0.0 192.168.1.250 1
timeout xlate 3:00:00
timeout pat-xlate 0:00:30
timeout conn 1:00:00 half-closed 0:10:00 udp 0:02:00 icmp 0:00:02
timeout sunrpc 0:10:00 h323 0:05:00 h225 1:00:00 mgcp 0:05:00 mgcp-pat 0:05:00
timeout sip 0:30:00 sip_media 0:02:00 sip-invite 0:03:00 sip-disconnect 0:02:00
timeout sip-provisional-media 0:02:00 uauth 0:05:00 absolute
timeout tcp-proxy-reassembly 0:01:00
timeout floating-conn 0:00:00
dynamic-access-policy-record DfltAccessPolicy
user-identity default-domain LOCAL
http server enable
http 192.168.1.0 255.255.255.0 management
http 192.168.2.0 255.255.255.0 inside
no snmp-server location
no snmp-server contact
snmp-server enable traps snmp authentication linkup linkdown coldstart warmstart
crypto ipsec ikev1 transform-set ESP-3DES-SHA esp-3des esp-sha-hmac
crypto ipsec ikev1 transform-set ESP-3DES-SHA mode transport
crypto dynamic-map L2TP-MAP 10 set ikev1 transform-set ESP-3DES-SHA
crypto map L2TPVPN 20 ipsec-isakmp dynamic L2TP-MAP
crypto map L2TPVPN interface outside
crypto ikev1 enable outside
crypto ikev1 policy 10
authentication pre-share
encryption 3des
hash sha
group 2
lifetime 86400
telnet timeout 5
ssh timeout 5
ssh key-exchange group dh-group1-sha1
console timeout 0
threat-detection basic-threat
threat-detection statistics host
threat-detection statistics port
threat-detection statistics protocol
threat-detection statistics access-list
no threat-detection statistics tcp-intercept
webvpn
group-policy SSLGROUPPOLICY internal
group-policy SSLGROUPPOLICY attributes
dns-server value 8.8.8.8
vpn-tunnel-protocol l2tp-ipsec
split-tunnel-policy tunnelspecified
split-tunnel-network-list value split-Tunnel-ACL
default-domain value itd.pk
intercept-dhcp enable
username Shabbir password 7xf1NtYyEuHuFABjEzQW/g== nt-encrypted
tunnel-group DefaultRAGroup general-attributes
address-pool VPNPOOl
address-pool VPNPOOL
default-group-policy SSLGROUPPOLICY
tunnel-group DefaultRAGroup ipsec-attributes
ikev1 pre-shared-key *****
tunnel-group DefaultRAGroup ppp-attributes
authentication pap
authentication ms-chap-v2
!
class-map inspection_default
match default-inspection-traffic
!
!
policy-map type inspect dns preset_dns_map
parameters
message-length maximum client auto
message-length maximum 512
policy-map global_policy
class inspection_default
inspect dns preset_dns_map
inspect ftp
inspect h323 h225
inspect h323 ras
inspect rsh
inspect rtsp
inspect esmtp
inspect sqlnet
inspect skinny
inspect sunrpc
inspect xdmcp
inspect sip
inspect netbios
inspect tftp
inspect ip-options
class class-default
user-statistics accounting
!
service-policy global_policy global
prompt hostname context
HI.
We’ve managed to get our VPN connecting (asa 5525) and can see stuff on the CORP side. we have an issue however.
We have 3 ports
1-VPN with static IP and this is what staff will use for VPN access
2-Internal connecting to the internal Lan
3-External network (used to supply links to other services)
We can connect to the Lan (via VPN) and access everything fine between ports 1&2, but cant access anything on port 3. Port 3 would be used to provide internet facing services (yahoo etc) to VPN users. we don’t want split tunnelling.
i could really do with some help.
here is my code: we basically want a single interface for VPN, a single interface for internal corp lan and a single interface for HSCN internet traffic. currently we can do LAN>HSCN>LAN, VPN>LAN>VPN, but not VPN>HSCN Any idea’s or pointers would be gratefully received. Hardware: ASA5525, 8192 MB RAM, CPU Lynnfield 2400 MHz, 1 CPU (4 cores) : Written by xxx at 16:20:10.338 UTC Mon Jun 8 2020 ! ASA Version 9.12(2) ! terminal width 160 hostname enki-fw01 domain-name internal.xxxxxx.com enable password xxxxxx names no mac-address auto ip local pool VPNPOOL 172.25.25.10-172.25.25.254 mask 255.255.255.0 ! interface GigabitEthernet0/0 nameif LLP-HSCN security-level 0 ip address 194.155.28.114 255.255.255.252 ! interface GigabitEthernet0/1 nameif Inside security-level 100 ip address 192.168.1.8 255.255.255.0 ! interface GigabitEthernet0/2 shutdown no nameif no security-level no ip address ! interface GigabitEthernet0/3 shutdown no nameif no security-level no ip address ! interface GigabitEthernet0/4 shutdown no nameif no security-level no ip address ! interface GigabitEthernet0/5 shutdown no nameif no security-level no ip address ! interface GigabitEthernet0/6 shutdown no nameif no security-level no ip address ! interface GigabitEthernet0/7 nameif EXT-VPN security-level 50 ip address 188.39.159.170 255.255.255.252 ! interface Management0/0 management-only shutdown nameif management security-level 100 ip address 192.168.20.230 255.255.255.0 ! ftp mode passive dns domain-lookup management dns domain-lookup Inside dns domain-lookup EXT-VPN dns domain-lookup LLP-HSCN dns server-group DefaultDNS name-server 192.168.1.51 Inside name-server 192.168.250.20 Inside domain-name internal.xxxxxx.com same-security-traffic permit inter-interface same-security-traffic permit intra-interface object network Corp-Subnet subnet 192.168.0.0 255.255.0.0 object network L2TP-Subnet subnet 172.25.25.0 255.255.255.0 object network nat-test host 192.168.1.119 object service http service tcp destination eq www object network VPN-gw host 188.39.159.169 description VPN-gw object network TPP subnet 20.146.120.0 255.255.255.0 description TPP network 1 object network TPP2 subnet 20.146.248.0 255.255.255.0 description TPP2 object network HSCN-GW host 194.155.28.113 object network Spine1 subnet 10.0.0.0 255.0.0.0 object-group network TPPgroup description TPP IP range group network-object object TPP network-object object TPP2 object-group service DM_INLINE_TCP_1 tcp port-object eq www port-object eq https access-list Split-Tunnel-ACL standard permit 192.168.0.0 255.255.0.0 access-list AnyConnect_Client_Local_Print extended deny ip any4 any4 access-list AnyConnect_Client_Local_Print extended permit tcp any4 any4 eq lpd access-list AnyConnect_Client_Local_Print remark IPP: Internet Printing Protocol access-list AnyConnect_Client_Local_Print extended permit tcp any4 any4 eq 631 access-list AnyConnect_Client_Local_Print remark Windows’ printing port access-list AnyConnect_Client_Local_Print extended permit tcp any4 any4 eq 9100 access-list AnyConnect_Client_Local_Print remark mDNS: multicast DNS protocol access-list AnyConnect_Client_Local_Print extended permit udp any4 host 224.0.0.251 eq 5353 access-list AnyConnect_Client_Local_Print remark LLMNR: Link Local Multicast Name Resolution protocol access-list AnyConnect_Client_Local_Print extended permit udp any4 host 224.0.0.252 eq 5355 access-list AnyConnect_Client_Local_Print remark TCP/NetBIOS protocol access-list AnyConnect_Client_Local_Print extended permit tcp any4 any4 eq 137 access-list AnyConnect_Client_Local_Print extended permit udp any4 any4 eq netbios-ns pager lines 24 logging enable logging asdm informational mtu management 1500 mtu Inside 1500 mtu EXT-VPN 1500 mtu LLP-HSCN 1500 no failover no monitor-interface service-module icmp unreachable rate-limit 1 burst-size 1 asdm history enable arp timeout 14400 no arp permit-nonconnected arp rate-limit 16384 nat (Inside,EXT-VPN) source static Corp-Subnet Corp-Subnet destination static L2TP-Subnet L2TP-Subnet route EXT-VPN 0.0.0.0 0.0.0.0 188.39.159.169 1 route LLP-HSCN 0.0.0.0 0.0.0.0 194.155.28.113 2 route LLP-HSCN 10.0.0.0 255.0.0.0 194.155.28.113 1 route LLP-HSCN 20.146.120.0 255.255.255.0 194.155.28.113 1 route LLP-HSCN 20.146.248.0 255.255.255.0 194.155.28.113 1 route Inside 192.168.0.0 255.255.0.0 192.168.1.1 1 timeout xlate 3:00:00 timeout pat-xlate 0:00:30 timeout conn 1:00:00 half-closed 0:10:00 udp 0:02:00 sctp 0:02:00 icmp 0:00:02 timeout sunrpc 0:10:00 h323 0:05:00 h225 1:00:00 mgcp 0:05:00 mgcp-pat 0:05:00 timeout sip 0:30:00 sip_media 0:02:00 sip-invite 0:03:00 sip-disconnect 0:02:00 timeout sip-provisional-media 0:02:00 uauth 0:05:00 absolute timeout tcp-proxy-reassembly 0:01:00 timeout floating-conn 0:00:00 timeout conn-holddown 0:00:15 timeout igp stale-route 0:01:10 aaa-server RADIUS protocol radius accounting-mode simultaneous ad-agent-mode interim-accounting-update periodic 24 aaa-server RADIUS (Inside) host 192.168.1.6 key xxxxxxxxx user-identity default-domain LOCAL aaa authentication enable console RADIUS LOCAL aaa authentication http console RADIUS LOCAL aaa authentication ssh console RADIUS LOCAL aaa authorization command LOCAL aaa accounting enable console RADIUS aaa accounting ssh console RADIUS aaa authorization http console RADIUS aaa authentication login-history http server enable http 192.168.20.0 255.255.255.0 management http 192.168.20.0 255.255.255.0 Inside http 192.168.1.0 255.255.255.0 Inside http 212.159.16.13 255.255.255.255 EXT-VPN no snmp-server location no snmp-server contact crypto ipsec ikev1 transform-set ESP-3DES-SHA esp-3des esp-sha-hmac crypto ipsec ikev1 transform-set ESP-3DES-SHA mode transport crypto ipsec ikev1 transform-set ESP-3DES-MD5 esp-3des esp-md5-hmac crypto ipsec ikev1 transform-set ESP-DES-MD5 esp-des esp-md5-hmac crypto ipsec ikev1 transform-set ESP-AES-128-SHA esp-aes esp-sha-hmac crypto ipsec ikev1 transform-set ESP-AES-192-SHA esp-aes-192 esp-sha-hmac crypto ipsec ikev1 transform-set ESP-AES-128-MD5 esp-aes esp-md5-hmac crypto ipsec ikev1 transform-set ESP-AES-192-MD5 esp-aes-192 esp-md5-hmac crypto ipsec ikev1 transform-set ESP-AES-256-SHA esp-aes-256 esp-sha-hmac crypto ipsec ikev1 transform-set ESP-AES-256-MD5 esp-aes-256 esp-md5-hmac crypto ipsec ikev1 transform-set ESP-DES-SHA esp-des esp-sha-hmac crypto ipsec security-association pmtu-aging infinite crypto dynamic-map L2TP-MAP 10 set ikev1 transform-set ESP-3DES-SHA crypto dynamic-map L2TP-MAP 10 set validate-icmp-errors crypto dynamic-map L2TP-MAP 10 set nat-t-disable crypto dynamic-map SYSTEM_DEFAULT_CRYPTO_MAP 65535 set ikev1 transform-set ESP-AES-128-SHA ESP-AES-128-MD5 ESP-AES-192-SHA ESP-AES-192-MD5 ESP-AES-256-SHA ESP-AES-256-MD5 ESP-3DES-MD5 ESP-DES-SHA ESP-DES-MD5 crypto map L2TPVPN 20 ipsec-isakmp dynamic L2TP-MAP crypto map L2TPVPN interface EXT-VPN crypto map LLP-HSCN_map 65535 ipsec-isakmp dynamic SYSTEM_DEFAULT_CRYPTO_MAP crypto map LLP-HSCN_map interface LLP-HSCN crypto map Inside_map 65535 ipsec-isakmp dynamic SYSTEM_DEFAULT_CRYPTO_MAP crypto map Inside_map interface Inside crypto ca trustpool policy crypto ikev2 policy 1 encryption aes-256 integrity sha group 5 2 prf sha lifetime seconds 86400 crypto ikev2 policy 10 encryption aes-192 integrity sha group 5 2 prf sha lifetime seconds 86400 crypto ikev2 policy 20 encryption aes integrity sha group 5 2 prf sha lifetime seconds 86400 crypto ikev2 policy 30 encryption 3des integrity sha group 5 2 prf sha lifetime seconds 86400 crypto ikev2 policy 40 encryption des integrity sha group 5 2 prf sha lifetime seconds 86400 crypto ikev2 enable Inside client-services port 443 crypto ikev2 enable EXT-VPN client-services port 443 crypto ikev2 enable LLP-HSCN client-services port 443 crypto ikev1 enable Inside crypto ikev1 enable EXT-VPN crypto ikev1 enable LLP-HSCN crypto ikev1 policy 10 authentication pre-share encryption 3des hash sha group 2 lifetime 86400 telnet timeout 5 ssh stricthostkeycheck ssh 192.168.0.0 255.255.0.0 Inside ssh timeout 10 console timeout 0 dhcpd address 192.168.20.231-192.168.20.254 management dhcpd enable management ! threat-detection basic-threat threat-detection statistics access-list no threat-detection statistics tcp-intercept ntp server 192.168.250.20 source Inside ntp server 192.168.1.51 source Inside prefer webvpn enable Inside enable EXT-VPN enable LLP-HSCN hsts enable max-age 31536000 include-sub-domains… Read more »
Hi Paul,
Please look in to security access-list between your VPN user subnet and your 3-External network. Also make sure NAT is configured for VPN user subnet.