Whether you are a networking professional or a student trying to learn and pass Cisco certifications, one of the challenges is getting your hands on the equipment. It is always a chicken or egg problem. You will have access to bunch of routers and switches after you landed a job but how do you gain the experience necessary to land on your dream job? There is no doubt that the best way to learn a technology is practicing in a lab. Without spending hundreds of dollars on eBay (like I did) buying used routers and switches to practice, not mentioning the space and power you’ll need to keep that physical rack running, people started looking for a solution to virtualize the lab environment. Here is a step-by-step tutorial on Cisco VIRL Installation on VMWare ESXi.
Cisco Virtual Internet Routing Lab (VIRL) is a software tool Cisco developed to build and run network simulations without the need for physical hardware.
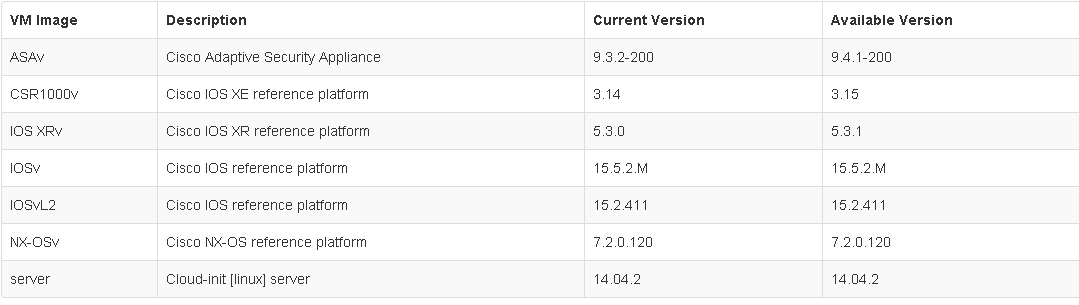
Under the hood, VIRL is an OpenStack-based platform that runs IOSv, IOSvL2, IOS XRv, NS-OSv, CSR1000v, and ASAv software images on its built-in hypervisor. VIRL provides a scalable, extensible network design and simulation environment using the VM Maestro GUI. Recently, I have seen extensive development and improvement made on the browser based operations using HTML5. If you want to run non-Cisco virtual machines, VIRL also has extensive ability to integrate with third-party vendor virtual machines such as MS Windows, Juniper, Palo Alto Networks, Fortinet, F5 BigIP, Extreme Networks, Arista, Alcatel, Citrix and more.
Cisco VIRL Installation on VMWare ESXi
VIRL comes in two different editions – Personal Edition and Academic Edition. Both have the same features except the Academic Edition is cheaper. At the time of writing, Academic Edition costs $79.99 USD per year and Personal Edition costs $199.99 USD per year. VIRL has a license limit to simulate up to 20 Cisco nodes at a time. You may pay extra $100 USD to upgrade to 30 Cisco nodes maximum. To qualify purchasing the Academic Edition, you must be faculty, staff and students of any public or private K-12 institution or Higher Education institution.
Cisco VIRL is community-supported and is designed for individual users. For enterprise users who want TAC support, in-depth documentation, training and more, there is Cisco Modeling Labs (CML), an enterprise version of VIRL. Of course the CML costs much more.
If you already have your VIRL setup and looking to use the simulation lab on the go, check out my how to access VIRL behind a firewall, using your favorite Telnet or SSH client.
Here are a few benefits VIRL provides:
- Design, configure and production staging using authentic version of Cisco’s network operating systems.
- IOSv: IOSv is an implementation of Cisco IOS routers. It supports up to 15 Gigabit Ethernet Interfaces.
- IOSvL2: OSvL2 is an implementation of Cisco IOS Layer-2 switches such as Cat2950 and Cat2960. It supports up to 16 Gigabit Ethernet interface (one reserved for management purposes).
- IOS-XRv: A virtual version of IOS-XR, used on high-end carrier-grade routers such as the CRS series, 12000 series, and ASR9000 series.
- NX-OSv: A virtual version of NX-OS for Cisco’s Nexus-series Ethernet switches and MDS-series Fibre Channel storage area network switches. NX-OS is designed to support high performance, high reliability server access switches used in the data center.
- CSR1000v: A virtual version of software running on Cisco Cloud Services Routers such as CSR 1000v. It’s an IOS XE image running in a virtualized environment (VMWare support now, Citrix XEN, Amazon, Windows Hypervisor and OpenStack). The CSR1000v is designed as a virtual router that resides on the hypervisor server as a client instance and provides any services a normal router.
- ASAv Firewall: A virtual version of Cisco Adaptive Security Appliance (ASA). It supports the 9.x code train that running on the Next Generation ASA-X.
VMWare Host ESXi Preparation
When deploying your VIRL lab on a VMWare ESXi server, you need to have sufficient administrative access to import the VM image, create or modify port-groups attached to the VIRL instance. At minimum, four port-groups may need to be created or provisioned. Consult with your VMWare system administrator if you are not already an admin managing the server.
System requirements:
- A minimum of 2 logical CPU cores (not physical CPU) and 4GB of memory that is dedicated to the VIRL virtual machine. 4 logical CPUs and 8GB of memory or more is highly recommended.
- At least 100GB of free disk space.
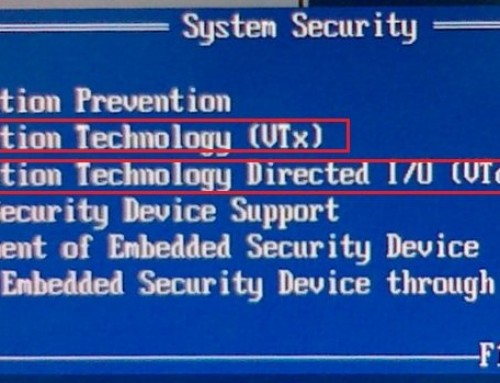
- Intel CPUs with Intel VT-x / EPT extensions present and enabled in the BIOS.
- Outbound TCP ports 4505 and 4506 must be permitted on your Internet firewall to allow connections to the Cisco SALT licensing servers.
- Supported hypervisors: VMware ESXi 5.1U2 (Build 1483097), ESXi 5.5U1 (Build 1623387), ESXi 6.0 (Build 2494585) and later.
Please note: ESXi host MUST have Intel CPU with VT-X / EPT support. AMD processors are NOT supported.
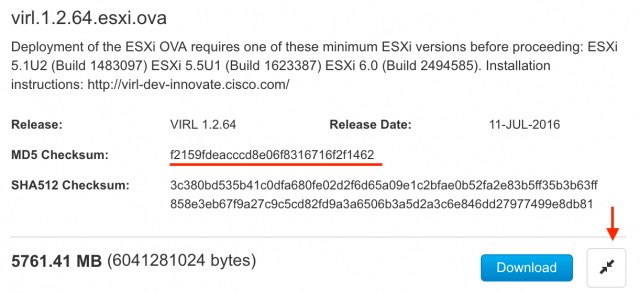
Step1: Purchase and download the VIRL OVA
You can purchase a copy of VIRL license on VIRL.cisco.com. You’ll need to login with your Cisco.com account and make the purchase. Because the installation image downloaded is large, it is possible that the file is corrupted during download. To save your time later, it is important to make sure that the downloaded file matches the original.
Use Microsoft File Checksum Integrity Verifier (FCIV) tool to calculate the MD5 checksum on the file downloaded. Compare it with what is shown on Cisco’s download website. If they do not match, your file is likely corrupted. You will need to download again. On Mac OS X use the command “md5 filename” and “md5sum filename” on Linux.
Step2: Create Port-Groups in VMware ESXi
The VIRL virtual machine comes with 5 virtual network interfaces that are used for various purposes.
- VM Network: this is the default network interface that we use to access and manage the VIRL VM, over SSH for example. It is also the network where VIRL server goes out to the Internet for licensing and updates.
- FLAT: first Layer-2 network
- FLAT1: second Layer-2 network
- SNAT: Layer-3 / SNAT network – EXT-NET
- INT: clustering network
If you are working with an existing VMware infrastructure, the VM Network should already exist in most cases. It is the same network that your server admin uses to manage other virtual machines. They are often named “server network” or “management network” So you only need to create four more Port-Groups for VIRL.
Now, connect to your ESXi host machine using vSphere Client. Navigate to “Configuration > Networking” and click on “Properties”.
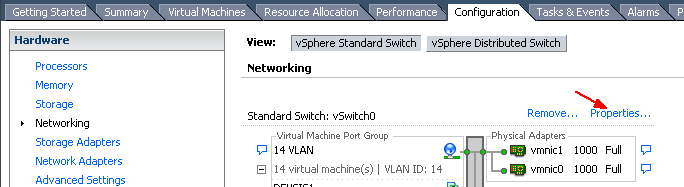
Here you’ll see your existing Port Groups (in my case 14 VLAN, 15 VLAN, 16 VLAN and Management Network). We need to create Flat, Flat1, SNAT and INT.

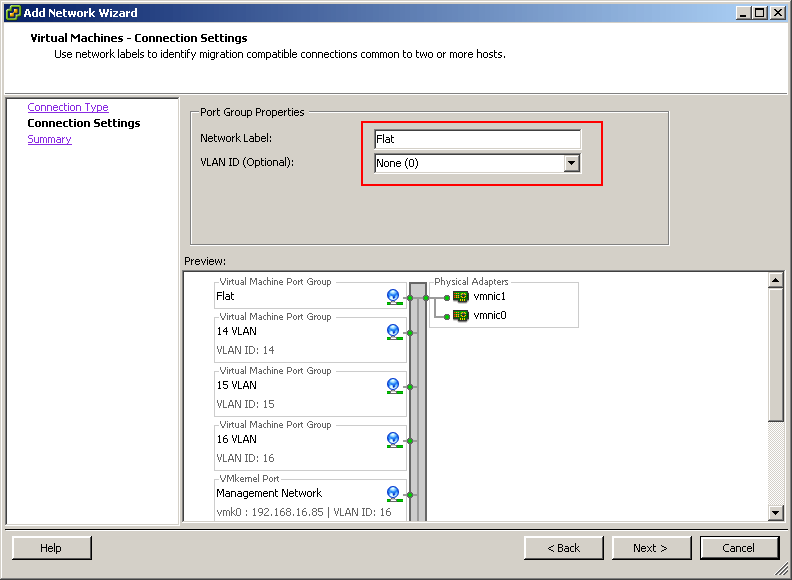
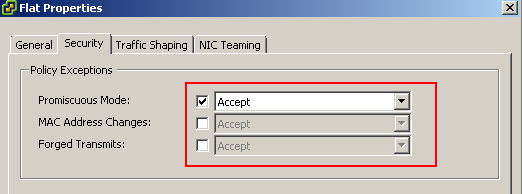
Click on “Add” on the left lower corner. Name the network label “Flat”. You may leave the VLAN ID “None (0)” as untagged for now. I will explain later in this session when you may want to change it to a different VLAN ID. Go through the wizard and the Port Group “Flat” is now created.
Select the newly created “Flat” Port Group and go to Security tab. Check the Promiscuous Mode box and make it Accept. Verify MAC Address Change and Forged Transmit is also Accept.
Promiscuous Mode: An interface in a port group which allows use of promiscuous mode can see all network traffic traversing the virtual switch.
By enabling these security options, it provides greater flexibility accessing the management console of the simulated network nodes, as well as enabling the possibility of communicating with external physical networks.
Repeat the same process and create Flat1, SNAT and INT.
Step 3: Deploy VIRL image (OVA) to ESXi
What is an OVA image? An OVA image is an Open Virtualization Archive that contains a compressed, “installable” version of a virtual machine. Cisco VIRL team has packaged the VIRL VM instance into an OVA image for ease of deployment on VMware.
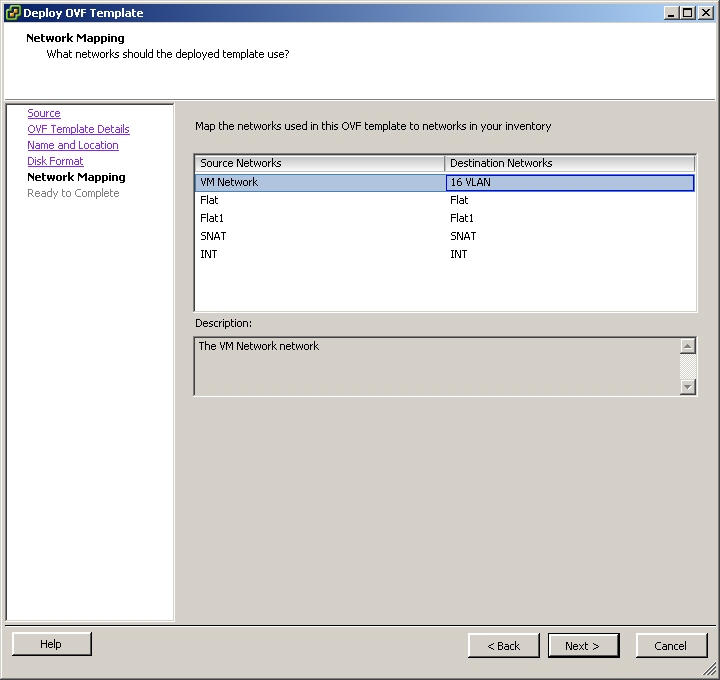
If you are in vCenter, select the VM host that you’d like to install VIRL in vSphere Client. Select “File – Deploy OVF Template” from the menu.

Locate your downloaded “virl-x.x.x.esxi.ova” image and go through the wizard. The wizard is self-explanatory. You only need to pay attention to the following-
- Select the target datastore that contains at least 50GB of free disk space.
- Confirm “Thick Provisioned Lazy Zeroed” for the disk format.
- The “VM Network” in the OVA should be mapped to one of your existing server Port-Groups. In my case it was VLAN 16, an existing port group in my environment, where all my physical and virtual development servers reside. Click OK and start importing. Wait until it is complete.
The “VM Network” in the OVA should be mapped to one of your VM Port Groups. In my case it was VLAN 16, an existing port group in my environment, where all my physical and virtual development servers reside. Click OK and start importing. Wait until it is complete.

VIRL official documentation recommends minimum of 2 vCPUs and 4GB of memory to run. I found simulations fail frequently with ASAv and NS-OS with only 4GB of RAM. I recommend 4 vCPUs and 12GB of RAM if your system admin allows, 8GB of RAM will be fine in most cases.
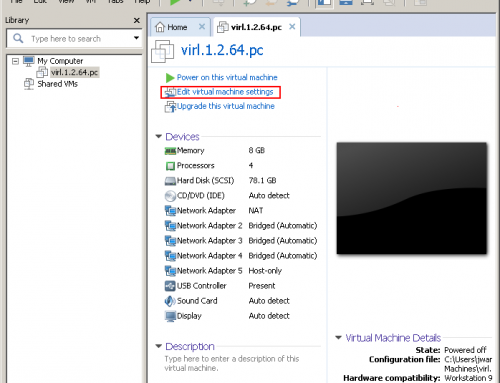
To make the system resource adjustment, select the virtual machine deployed (usually named Virl-version.xx) and click on Edit Virtual Machine Settings.

Enable “Reserve all guest memory (All locked)”. Memory reservations are necessary to ensure node stability in simulations running on heavily loaded vSphere hosts.
Save the setting and close the window. Now your VIRL server is ready to be launched.
Step 4: Launch VIRL and assign static management IP
Launch the VIRL virtual machine in ESXi.
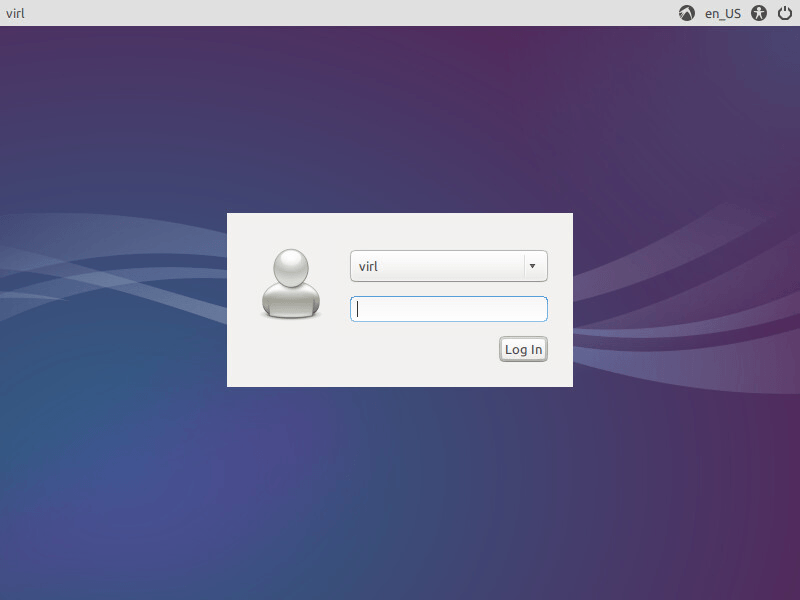
Before a static IP address is assigned, VIRL server attempts to obtain a dynamic IP from your DHCP server. In most server networks, DHCP server is not enabled. Even if it is, I do not recommend using DHCP address since it may change over time when the lease expires. We will assign a static IP to VIRL. Right click on VIRL VM and select “Open Console”. You’ll see VIRL has booted up with a login screen in GUI. Here is the default credential to login VIRL.
Username: virl
Password: VIRL
Issue this command to edit network interface configuration.
sudo vi /etc/network/interfacesHere we only update eth0’s configuration to work in your environment. (in my case it is 192.168.16.80)
auto eth0
iface eth0 inet static
address 192.168.16.80
netmask 255.255.255.0
gateway 192.168.16.1
dns-nameservers 192.168.16.43 8.8.4.4
Save the file and exit (:qw). Reboot the system (sudo reboot now). And now the VIRL is running on the static IP you assigned. (192.168.16.80)

After VIRL is rebooted, you should be able to SSH to the IP assigned.
Step 5: Enable KVM Acceleration (important!)
SSH to the VIRL VM and issue the following command:
virl@virl:~$ sudo kvm-ok
INFO: Your CPU does not support KVM extensions
KVM acceleration can NOT be used
If it shows output as above, your system is not VT-x/EPT ready or isn’t configured to handle KVM accelerations yet.
Note: You do need to have KVM acceleration enabled before proceed to the next step. Otherwise system will not perform properly. Why?
VIRL is a VM and also a host. What this means is that the VM you deployed on your workstation or ESXi server will in turn deploy virtual machines within itself. This is called nested virtualization. For this to function properly we need to be able to pass the CPU “flags” from the host to the VIRL virtual machine. In essence tricking the VM to thinking it has direct access to the CPU.
What is VT-x? Intel VT (Virtualization Technology) is the company’s hardware assistance for processors running virtualization platforms. Intel VT includes a series of extensions for hardware virtualization. The Intel VT-x extensions are probably the best recognized extensions, adding migration, priority and memory handling capabilities to a wide range of Intel processors.
First you want to make sure your system supports KVM extensions. To see what model of CPU you have and what flags are reported, run these commands:
lscpu | egrep 'Arch|On-Line|Vend|Virt'
egrep -wo 'vmx|ept|svm|npt|ssse3' /proc/cpuinfo  | sort | uniq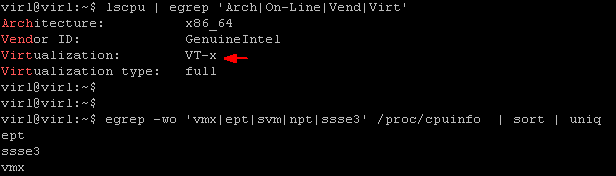
If you don’t see VT-x support in the command output, please make sure your CPU model supports VT-x. You can check the specs on Intel or AMD websites. If your CPU does support VT-x, there are couple of more places to check.
BIOS Settings: Some manufactures do not have Virtualization Technology enabled in BIOS by default. Make sure it is enabled in your BIOS. Here are couple of examples.
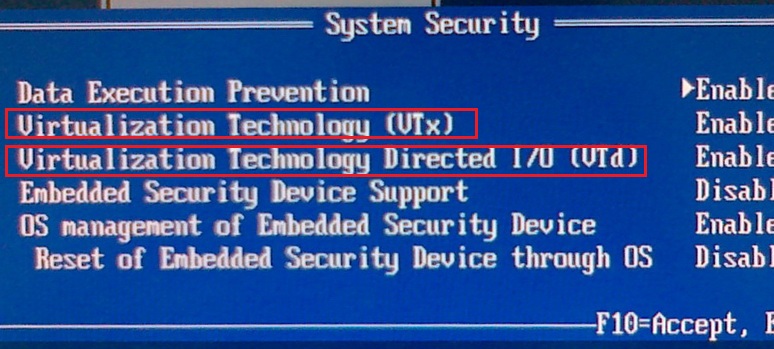
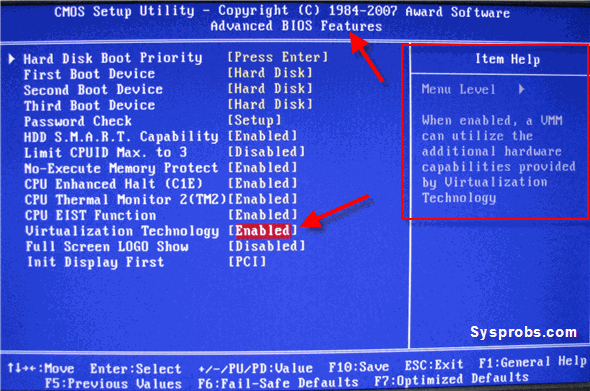
If all above have been verified and setup correctly, you need to make sure VIRL itself is configured to use VT-x.
Check in the VM directory in datastore, there should be a file named “VIRL-version.vmx”. Download and open the file using a text editor.
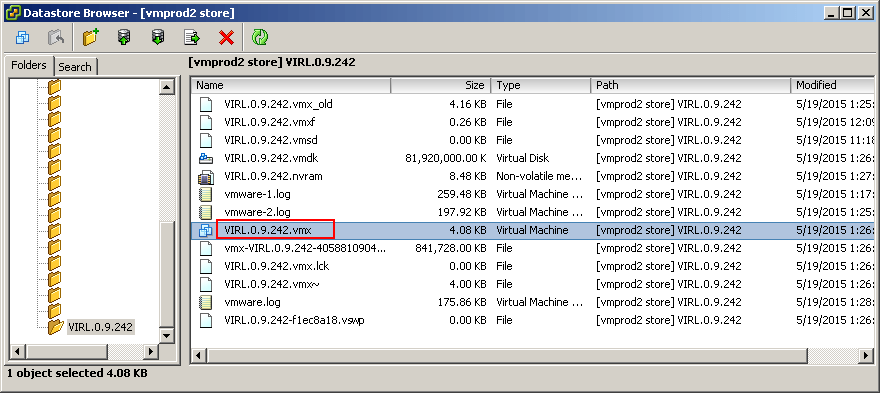
Look for this two lines:
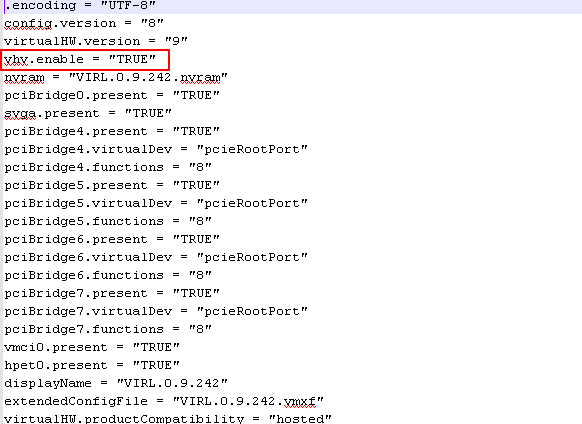
virtualhw.version = “9”
It should say 9 or 10. If it doesn’t, close down VMware Workstation, change the line to read “9” or add the entire line if it doesn’t exist (it should be there). While you’re at it, you could also check for the presence of
vhv.enable = "TRUE"Make sure it says “TRUE”.
Save the file and restart VIRL VM. SSH back in and do the following verification.
virl@virl:~$ sudo lsmod | grep kvm
virl@virl:~$ cat /proc/cpuinfo | sed -nre '/^flags/s/^.*(vmx).*$/\1/p'
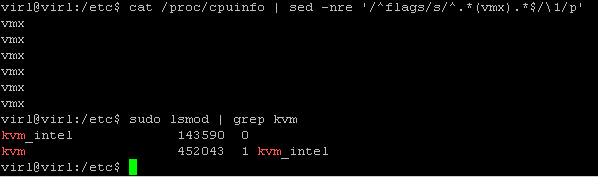
virl@virl:~$ sudo kvm-ok
INFO: /dev/kvm exists
KVM acceleration can be used
Step 6: Configure NTP
SSH to the VIRL VM.
Make sure NTP is configured and the system is able to synch time.
Very the NTP service configuration file.
sudo vi /etc/ntp.confYou should find the following NTP servers defined at the bottom of the file. If not, add them.
server 0.ubuntu.pool.ntp.org
server pool.ntp.org iburst
server pool.ntp.org iburst
server pool.ntp.org iburst
Restart NTP service.
sudo service ntp stop
sudo ntpd –gq
sudo service ntp start
Use the NTP query command to ensure that NTP peering is established.
sudo ntpq -pIt may take several minutes for the NTP daemon to establish peers. You may need to reenter the NTP Query command multiple times over the period of several minutes before a peer is indicated. You should see something like this when NTP peers are established.
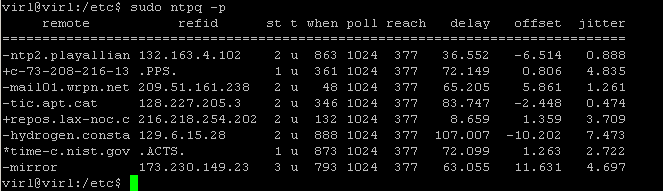
Note: You do need to have NTP peering established before proceed to the next step. Otherwise system will not perform properly.
Step 7: License Activation
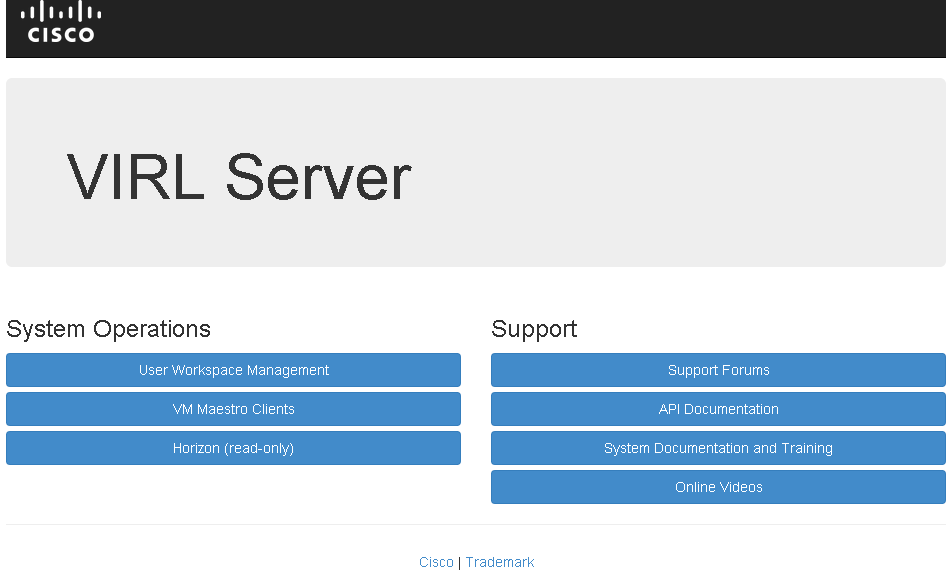
Access the VIRL web GUI by going to the IP address we configured for VIRL. In my case it is http://192.168.16.80/
Click on User Workspace Management. The username is “uwmadmin”, the password is “password” by default.
On the left side menu, select “VIRL Server > Salt Configuration and Status”. It shows the default configuration and some errors. Expect to see those error until your VIRL license is activated. You may ignore them.

Go and click on “Reset keys and ID”. In the next screen you’ll enter the licensing servers and key information. Here is an example of mine.
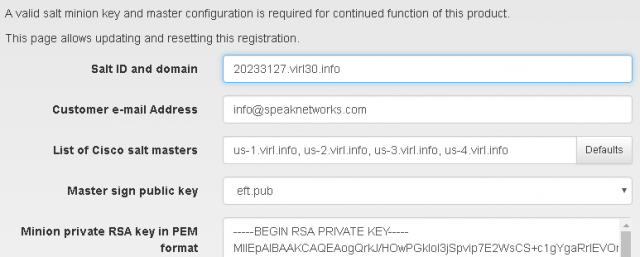
- Salt ID and domain: license file name without “.pem”.
- Customer e-mail Address: your email address
- List of Cisco salt master: insert multiple SALT server separated by comma.
us-1.virl.info, us-2.virl.info, us-3.virl.info, us-4.virl.info
eu-1.virl.info, eu-2.virl.info, eu-3.virl.info, eu-4.virl.info
Note: I have seen the SALT server domain names changed several times over last year. If you are unable to contact the SALT servers, check Cisco VIRL office website for the latest.
- Master sign public key: keep default value
- Minion private RSA key in PEM format: open your .pem file in any text editor such as Notepad, copy & paste the entire content here.
Click “Reset”. It’ll take a while for VIRL to check in with the SALT server to activate its license. Sometimes it fails for the first attempt. You can click on “Check status now” to refresh the status.

VIRL must have Internet access and be able to call home to the Cisco Salt Stack to activate VIRL license. It re-evaluates your license every 7 days.
Step 7: Ubuntu OS update
VIRL runs on Ubuntu operating system. Ubuntu is a Debian-based Linux operating system. Just like you would update your Windows and Mac OS for security patches, it is a good idea to update the Ubuntu OS as well. Use the following commands to update.
sudo apt-get update            # Fetches the list of available updates
sudo apt-get upgrade          # Strictly upgrades the current packages
sudo apt-get dist-upgrade # Installs updates (new ones)
Reboot the VIRL server after OS update.
virl@virl:~$ sudo reboot nowStep 9: Final verification
After the OS has been updated, it is necessary to run a few more verifications to conclude that the VIRL server is ready for use. SSH to the VIRL VM.
Display the status of the OpenStack Neutron agents. Verify that for each Neutron agent is “alive” column shows ‘:-)’. There should be a minimum of four Neutron agents present.
virl@virl:~$neutron agent-listlinux-bridge-agent
Metadata agent
DHCP agent
L3 agent
virl@virl:~$sudo virl_health_status | grep listening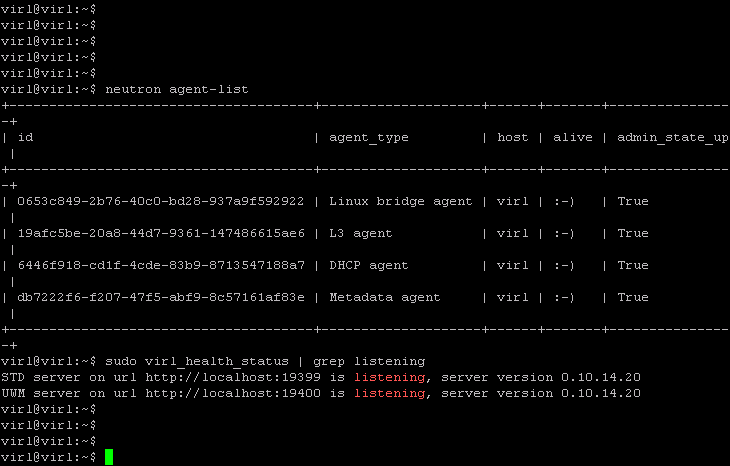
You may restart VIRL related services if you did not see the results expected.
virl@virl:~$sudo service virl-std restart
virl@virl:~$sudo service virl-uwm restart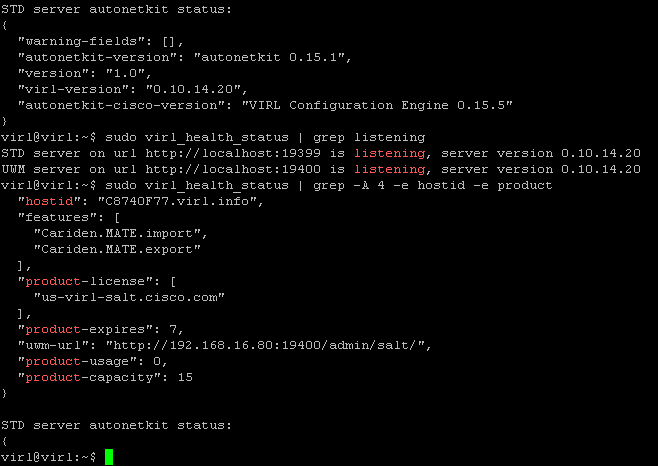
To verify the license configuration:
virl@virl:~$sudo virl_health_status | grep -A 4 -e hostid -e product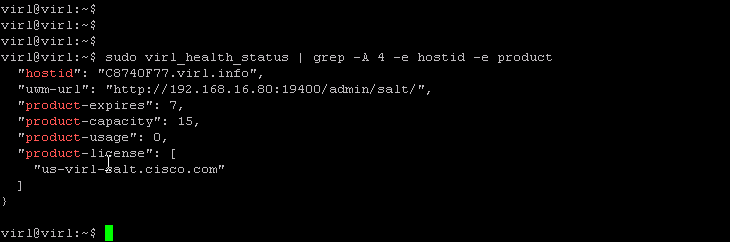
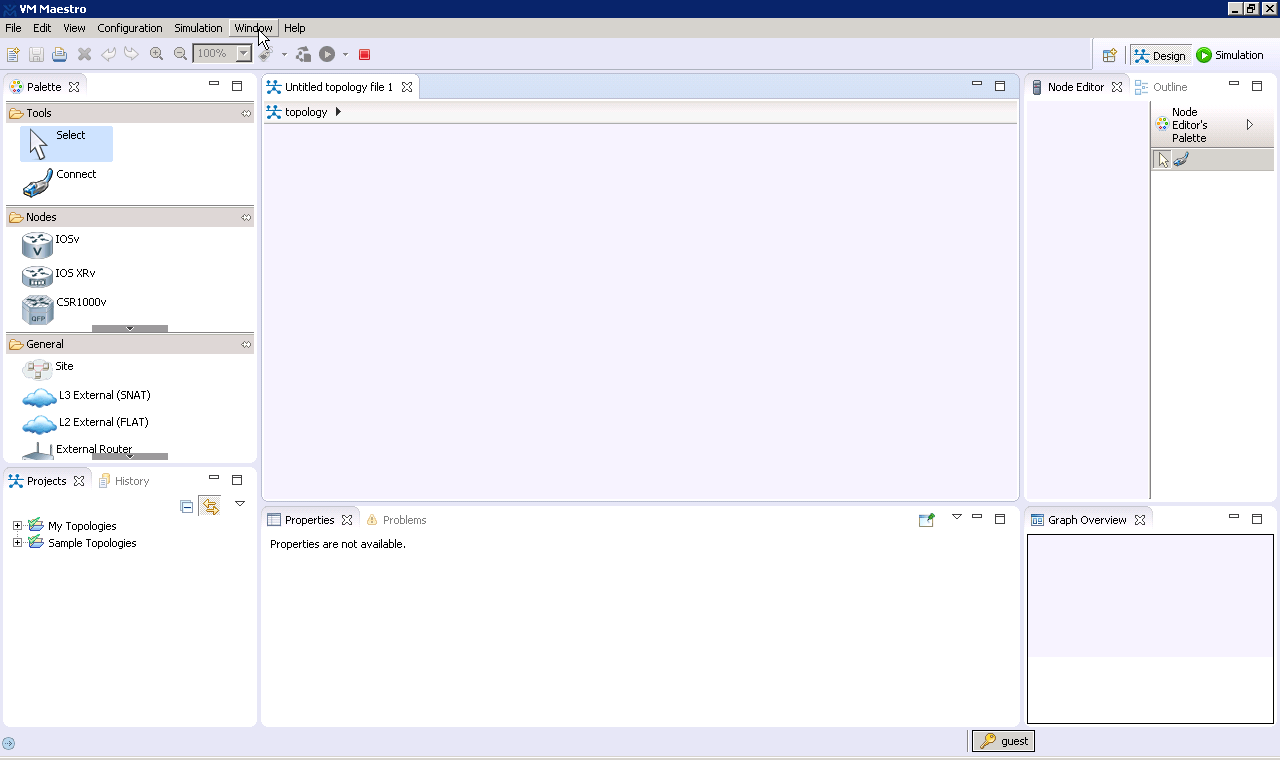
Step 9: Connect to VIRL server using VM Maestro
VM Maestro is the client-side application that is used to build topologies, generate configurations and visualizations, and manage simulations that execute on the VIRL host or virtual machine. Think it is the VIRL version of GNS3 GUI front end.
VM Maestro is packaged with VIRL and is available for installation on Windows, OS X, and Linux platforms. To download the installer, go to VIRL’s IP in URL http://192.168.16.80/ and click on “VM Maestro Clients. It actually redirects to http://192.168.16.80/download/

Assuming that you’re running 64-bit Windows, Java tends to run in 32-bit mode by default for most people. You need to install the 32-bit VM Maestro to work. Or you could install a 64-bit version of Java. The following combinations should work:
- 32-bit Windows + 32-bit Java + 32-bit VM Maestro
- 64-bit Windows + 64-bit Java + 64-bit VM Maestro
- 64-bit Windows + 32-bit Java + 32-bit VM Maestro
If you have multiple versions of Java installed, and VM Maestro is picking up the wrong one, you need to:
Make sure that the right version of Java is on your PATH so that java -version at the command prompt shows the right Java installation. Edit the vmmaestro.ini file to point to the right Java installation.
To edit the vmmaestro.ini file, you’d just add a couple of lines between the -clean and the -vmargs line, adjusting the path to your Java installation, as appropriate.
-clean
-vm
C:\Program Files\Java\jre7\bin\javaw.exe
-vmargs
When you first launch VM Maestro, you’ll be prompted to enter the VIRL server’s address. Enter the IP address 192.168.16.80 in this example. The default username is “guest” and password is also “guest”. You are now connected to the VIRL backend using VM Maestro.
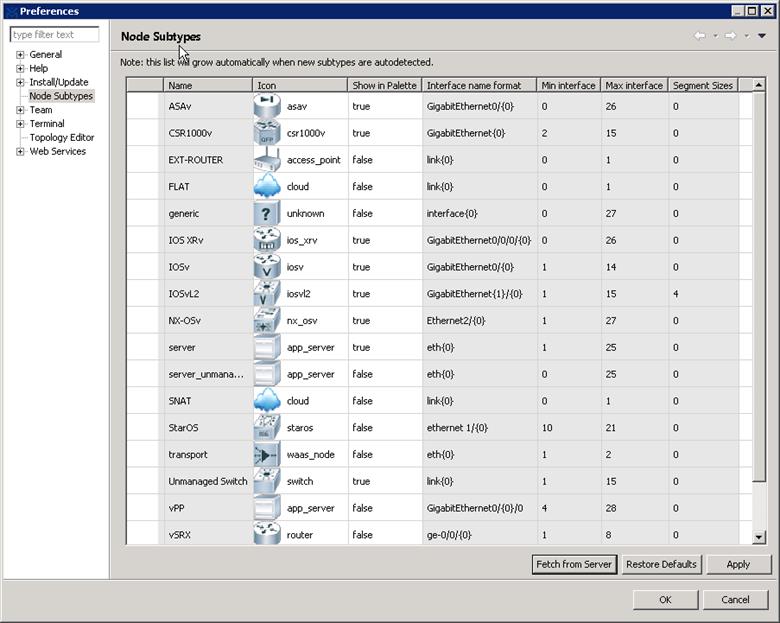
The very first thing I would recommend you to update the “node subtypes” in File à Preferences à Node Subtypes. Click “Fetch from Server” to receive the latest subtypes. As you can see from before and after, you now got a lot more node types to lab with.
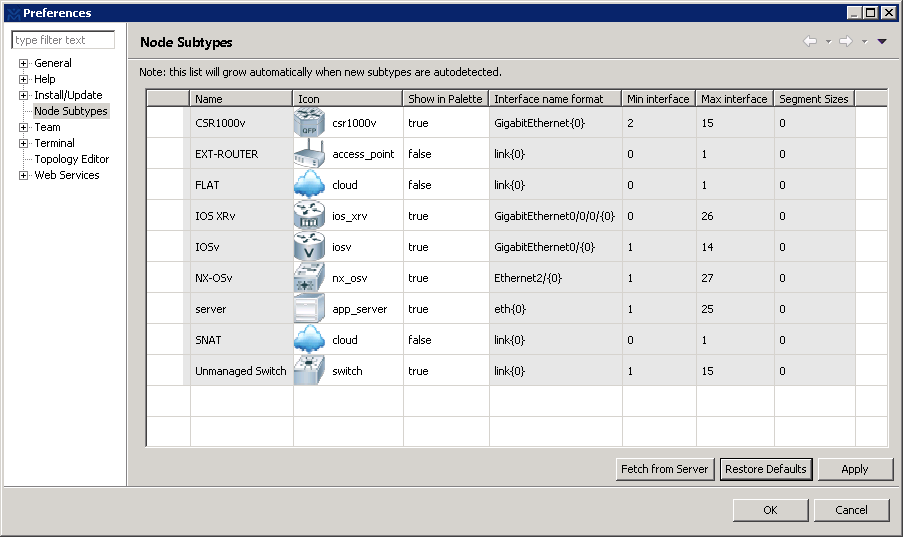
After import, you’ll see a lot more device types you may use to simulate networks.
By now your VIRL and VM Maestro have been installed and your lab environment is fully functional. In my next session, you’ll learn how to access the lab behind a firewall remotely, using your own Telnet/SSH terminal, as well as setting up a simple lab.
VIRL Default Credentials
For your convenience, here is a list of credentials used during our VIRL installation process. Please note username / password are case sensitive.
- SSH to VIRL Server: virl / VIRL (username / password)
- User Workspace Management (UWM) admin: uwmadmin / password
- User Workspace Management (UWM) guest: guest / guest
- Live Visualization: guest (or simulation owner’s user-id) / guest (or simulation owner’s password)
- VM Maestro: guest / guest
It concludes the tutorial on Cisco VIRL Installation on VMWare ESXi.
I’d love to hear from you!
If you have any questions regarding the content, feedback or suggestions for future topics, please leave a comment below.

Very Nice Article Jack!!!
I am thinking about purchasing a Dell Poweredge R710 2U from eBay, The Specs seems to match the requirements for running virl.
Specifications
2x Intel Xeon 2.93ghz 8mb Cache 6.4 GT/s Quad Core CPUs X5570
(http://ark.intel.com/products/37111/Intel-Xeon-Processor-X5570-8M-Cache-2_93-GHz-6_40-GTs-Intel-QPI)
6x 4gb DDR3 Memory
2x 146gb 15k SAS 3.5″ Hard Drives
4x Blanks Included (will not hold drives)
No Optical Drive Included
Perc 6i Controller with Battery
4x Onboard Gigabit Ethernet
iDrac6 Express (No Dedicated NIC)
2x 570w Power Supplies
Before I purchase this device, I would like to know your Opinion about this Server.
Thanks in Advance
Balaji
Hi Balaji,
Thanks for leaving a comment on my blog. From the specs of the server, I’m sure it will do the job just fine. A few things to consider-
Are you going to run VMWare ESXi on the server and share the host with other VMs? VIRL does not require a lot of HDD spaces. If you are not going to fully populate all the HDD bays I recommend you getting a 1U server instead. The PowerEdge R310 is a great option. It holds up to 32GB RAMs and comes with 4 hot-swappable HDD bays.
Remember that VIRL demands more memory than CPU. If you want server with faster CPU I recommend R320. But in the end of the day you are more likely running into memory limitation than CPU. I have a Dell R310 with two 500GB SAS 15k HDDs, RAID 1 (mirrored), two 2.5Ghz quad core CUPs and 24GB of memory. It costed me about $350 on ebay.
By all means, if you are planning this server for number of other VMs and they are CPU and disk intensive, and you need a lot of disk space or storage, you should get the 2U server instead. I hope it helps. Keep me posted on your server / VIRL lab build. I’m doing the same thing on a R310 and will update my bog with my findings.
Thanks.
Thanks Very Much for you very Valuable Input Jack!
Based Upon Your Suggestion, I would like to go for a Dell R310 than a R710 Since I have no intentions of Sharing the VMs. I will keep you posted as I make any progress setting up the Lab.
Thanks
Balaji
This is a great article. I setup my VIRL by following your instruction. Thank you!
Hi Jack,
Thanks for your concise guide. I followed your guide and have recently installed Virl version 1.1.1 on esxi host and Maestro on local machine.I am facing issues ,openstack response service failing in system service section,I have tried salt-call state.sls openstack-restart but the issue is not resolved.I can load initial config for simple two router but simulation is failing with error No valid host was found. Web services under VMM is point to the ip address as well,so not sure what is the issue.
My Esxi host has 5 network cards:
vmnic0 –>connect to my internet router,which i use to connect to Virl
vmnic1—>connected to my Cisco switch
vmnic2—>connected to my Cisco switch
vmnic3—>connected to my Cisco switch
vusb0 –>System management connector not used
Following your guide I created FLAT, FLAT1. SNAT, INT,so my questions is that my Esxi host must have one physical network for each of of FLAt,FLAt1,SNAT,INT?
Thanks
Hi kmio,
Your ESXi host does not need to have dedicated NICs for FLAT, FLAT1 and etc. Don’t get confused the physical NICs with “port-group” within VMWare, they are virtual switch ports that are mapped to each VLANs.
In your case that some service is not starting, I suggest you start simple with default configuration by following this guide exactly. Make the baseline work first before customization. Let me how it goes and happy to help.
Thanks Jack,I ended up upgrading to latest Virl version and have followed your advice and going with default,however every time I power on Virl vm OpenStack services response is failing.The only way to make it work is to manually run this command sudo salt-call state.sls openstack.restart
which then I can do simulation.I contact Cisco provided all the logs they requested but they have not identified my issue.
The fact that you could start the service by manually executing the command tells me that it must be something it was waiting on during the boot process that wasn’t available or wasn’t ready in time. You can look through logs in your /var/log/ and see why it is failing. It may give your some hint on what it was waiting on.