The Pro version of VMware Fusion has more features and greater flexibilities compared to the standard version. When working with VIRL, the Pro version provides a GUI interface for creating virtual networks required by VIRL, whereas Fusion does not. There is a workaround that you can create virtual interfaces via command line but it is never straightforward and hard to manage down the road. I recommend you investing in a Pro version of Fusion to avoid issues. I’ve put together a step-by-step tutorial on Cisco VIRL Installation on VMware Fusion Pro for Mac OS. This guide is based on VMware Fusion Pro version 8.1.1. If you only have VMware Player or non-Pro version Fusion, keep reading and I’ll have tricks and tips for you to make it work. Let’s get started.
System requirements:
- A minimum of 2 logical CPU cores (not physical CPU) and 4GB of memory that is dedicated to the VIRL virtual machine. 4 logical CPUs and 8GB of memory or more is highly recommended. Here is how to check your CPU and RAM on a Mac OSX.
Jacks-MacBook-Pro:~ jackwang$ sysctl hw.memsize
hw.memsize: 17179869184
Jacks-MacBook-Pro:~ jackwang$ sysctl hw.ncpu
hw.ncpu: 4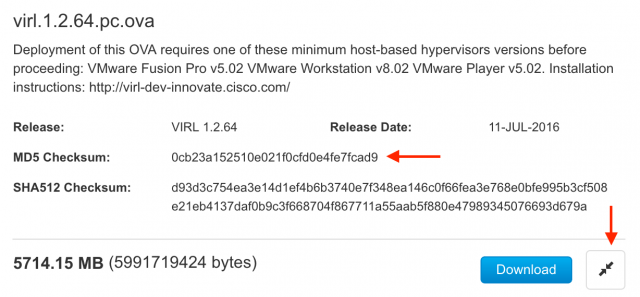
The above example shows that my Mac has four logical CPUs and 16GB of RAM. I’m good to go.
- At least 80GB of free disk space.
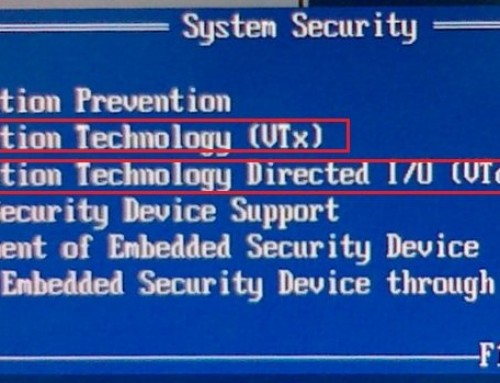
- Intel CPUs with Intel VT-x / EPT or AMD CPUs with AMD-v/RVI extensions present and enabled in the BIOS. If your Mac comes with an Intel CPU, you should be good to go.
- Outbound TCP ports 4505 and 4506 must be permitted on your Internet firewall to allow connections to the Cisco SALT licensing servers.
- VMware Fusion Pro v5.02 or later
Cisco VIRL Installation on VMware Fusion Pro for Mac OS
Step 1: Validate downloaded installation image
Because the installation image downloaded is large, it is possible that the file is corrupted during download. To save your time later, it is important to make sure that the downloaded file matches the original. Mac comes with the utility of checking DM5 hash sum. It should match what is provided on Cisco’s download website.
Jacks-MacBook-Pro:Downloads jackwang$ md5 virl.1.2.64.pc.ova
MD5 (virl.1.2.64.pc.ova) = 0cb23a152510e021f0cfd0e4fe7fcad9
Jacks-MacBook-Pro:Downloads jackwang$
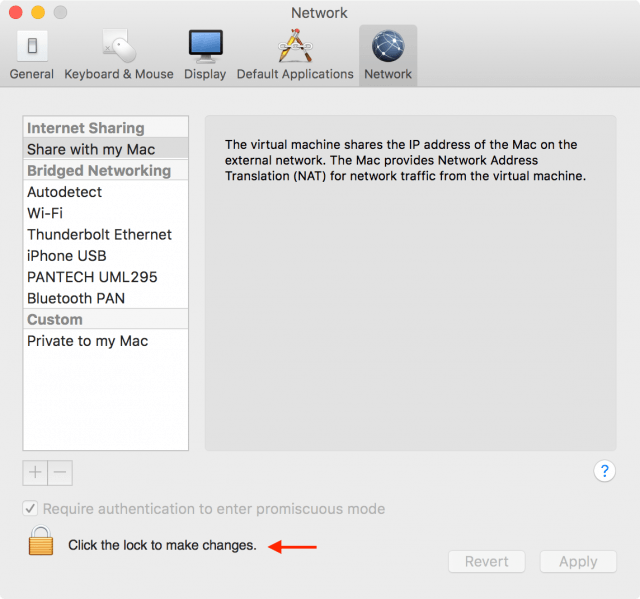
Click on the “+” sign to create a new virtual network. If this is your fist time creating virtual networks in Fusion, “vmnet2” will be created. If you have created virtual interfaces for other software or tools in the past, it’ll use the next incremental numbers such as vmnet3 for your VIRL installation. We’ll be creating four virtual networks. Do keep a note on which ones are created for your VIRL virtual machine’s use. In our example as a fresh install, “vmnet2” through “vmnet5” will be created.
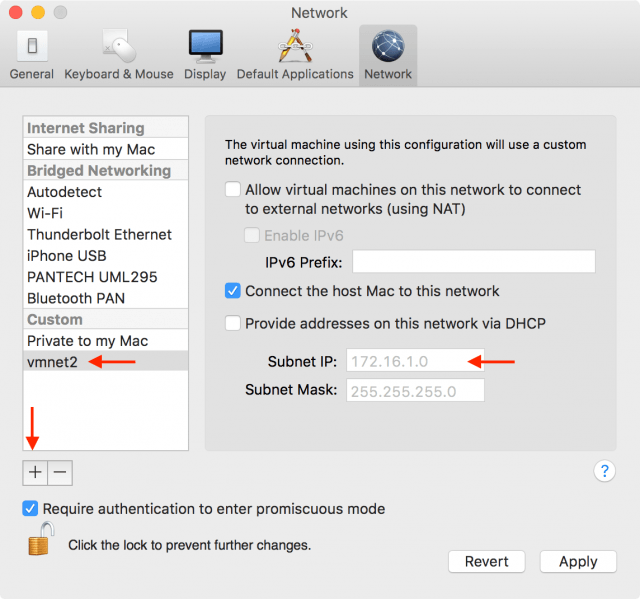
Once you see “vmnet2” has been created on the left, enter “172.16.1.0” in “Subnet IP:” field.
Click “Apply”, and uncheck “Provide address on this network via DHCP” and click “Apply” again. See below is the final state of “vmnet2” creation.
Next, we’ll follow the same procedure and create three more virtual networks. This is how it looks like in the end.
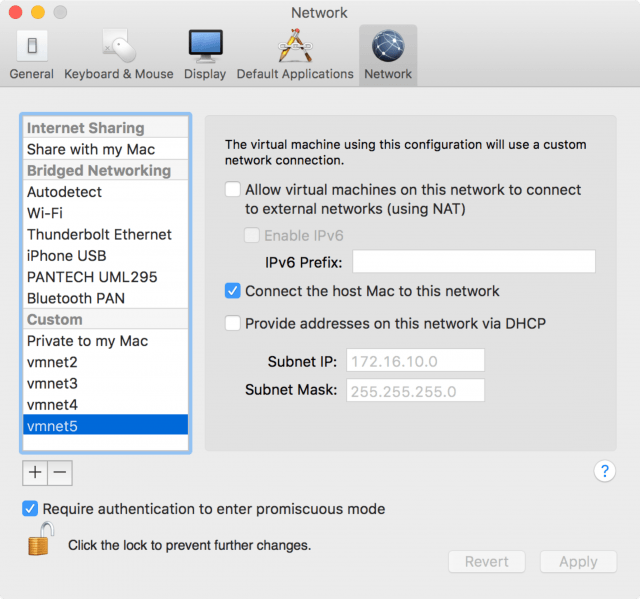
In summary, here are the virtual networks we have created in Fusion Pro:
- vmnet2: 172.16.1.0 /24
- vmnet3: 172.16.2.0 /24
- vmnet4: 172.16.3.0 /24
- vmnet5: 172.16.10.0 /24
If you are running the non-Pro version of VMware Fusion, it does not come with a GUI to create virtual networks. A workaround is to create the virtual networks through command line. Here is an example of the code that you can copy and paste to the Mac console. It assumes vmnet2 is the first available virtual network in the Fusion. Adjust to match your environment accordingly.
sudo /Applications/VMware\ Fusion.app/Contents/Library/vmnet-cfgcli vnetcfgadd VNET_2_DHCP no
sudo /Applications/VMware\ Fusion.app/Contents/Library/vmnet-cfgcli vnetcfgadd VNET_2_HOSTONLY_SUBNET 172.16.1.0
sudo /Applications/VMware\ Fusion.app/Contents/Library/vmnet-cfgcli vnetcfgadd VNET_2_HOSTONLY_NETMASK 255.255.255.0
sudo /Applications/VMware\ Fusion.app/Contents/Library/vmnet-cfgcli vnetcfgadd VNET_2_VIRTUAL_ADAPTER yes
sudo /Applications/VMware\ Fusion.app/Contents/Library/vmnet-cfgcli vnetcfgadd VNET_3_DHCP no
sudo /Applications/VMware\ Fusion.app/Contents/Library/vmnet-cfgcli vnetcfgadd VNET_3_HOSTONLY_SUBNET 172.16.2.0
sudo /Applications/VMware\ Fusion.app/Contents/Library/vmnet-cfgcli vnetcfgadd VNET_3_HOSTONLY_NETMASK 255.255.255.0
sudo /Applications/VMware\ Fusion.app/Contents/Library/vmnet-cfgcli vnetcfgadd VNET_3_VIRTUAL_ADAPTER yes
sudo /Applications/VMware\ Fusion.app/Contents/Library/vmnet-cfgcli vnetcfgadd VNET_4_DHCP no
sudo /Applications/VMware\ Fusion.app/Contents/Library/vmnet-cfgcli vnetcfgadd VNET_4_HOSTONLY_SUBNET 172.16.3.0
sudo /Applications/VMware\ Fusion.app/Contents/Library/vmnet-cfgcli vnetcfgadd VNET_4_HOSTONLY_NETMASK 255.255.255.0
sudo /Applications/VMware\ Fusion.app/Contents/Library/vmnet-cfgcli vnetcfgadd VNET_4_VIRTUAL_ADAPTER yes
sudo /Applications/VMware\ Fusion.app/Contents/Library/vmnet-cfgcli vnetcfgadd VNET_5_DHCP no
sudo /Applications/VMware\ Fusion.app/Contents/Library/vmnet-cfgcli vnetcfgadd VNET_5_HOSTONLY_SUBNET 172.16.10.0
sudo /Applications/VMware\ Fusion.app/Contents/Library/vmnet-cfgcli vnetcfgadd VNET_5_HOSTONLY_NETMASK 255.255.255.0
sudo /Applications/VMware\ Fusion.app/Contents/Library/vmnet-cfgcli vnetcfgadd VNET_5_VIRTUAL_ADAPTER yes
Step 3: Deploy VIRL VM image (OVA) in Fusion Pro
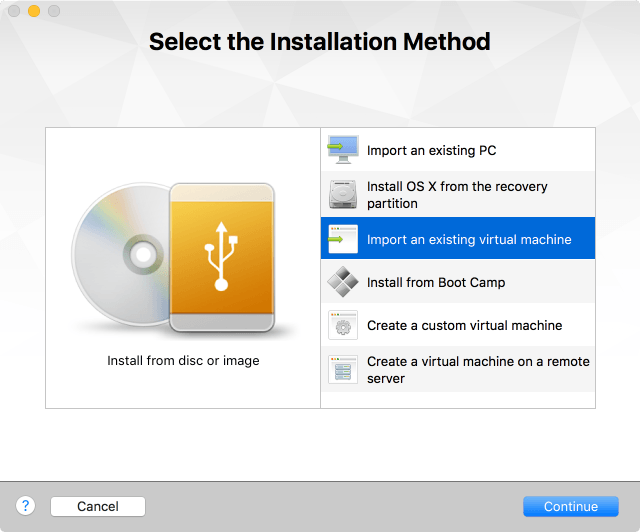
Launch VMware Fusion Pro and select “Import an existing virtual machine” from the startup wizard. If this screen did not come up by default, go to menu “File” > “Import…”.
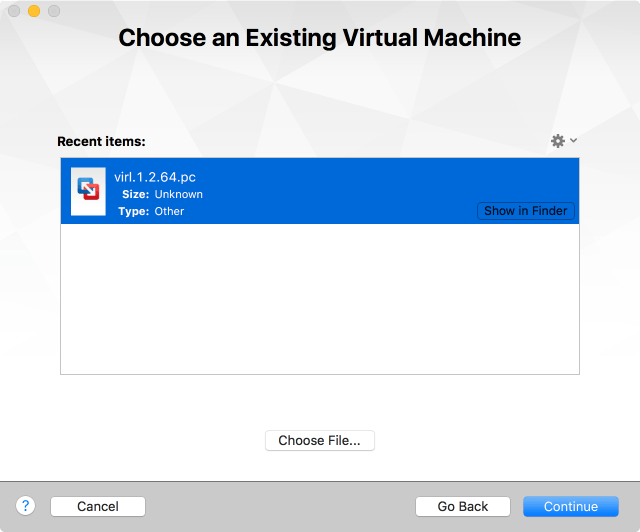
In the next screen select the downloaded VOA image file and click on next. It’ll then ask to name the virtual machine. I would keep the default name of the OVA image so we know what VIRL version it is by the VM’s name.
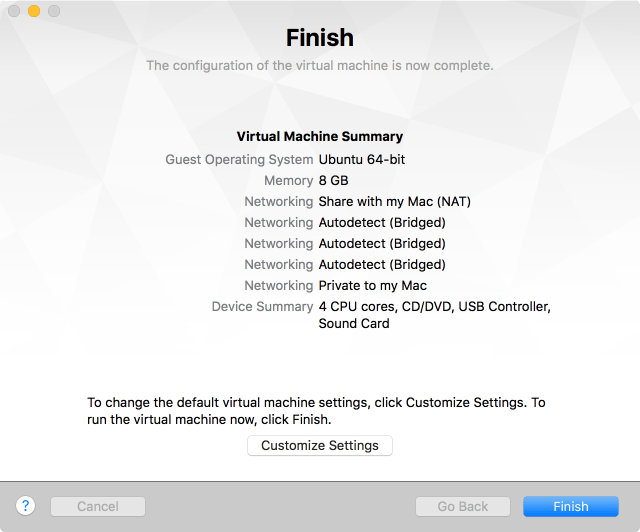
Once the virtual machine is imported, review the information and click on “customize Settings”. Here we map the Network Adapters of VIRL server to the virtual networks (vmnet2 – vmnet5) we just created.

Click on “Network Adapter 2” and go in to the next screen. Select “vmnet2”. Return to the main screen by clicking on “Show All”. Repeat the same steps and assign “vmnet3” through “vmnet5” to the remaining Network Adapters.
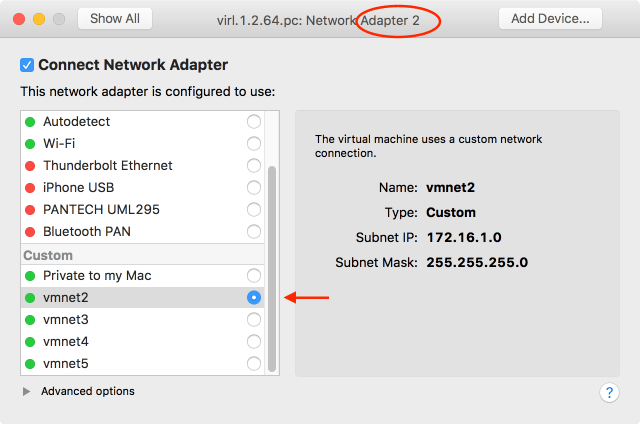
Note that “Network Adapter 1” will be used for Internet and host connectivity and should not be modified.
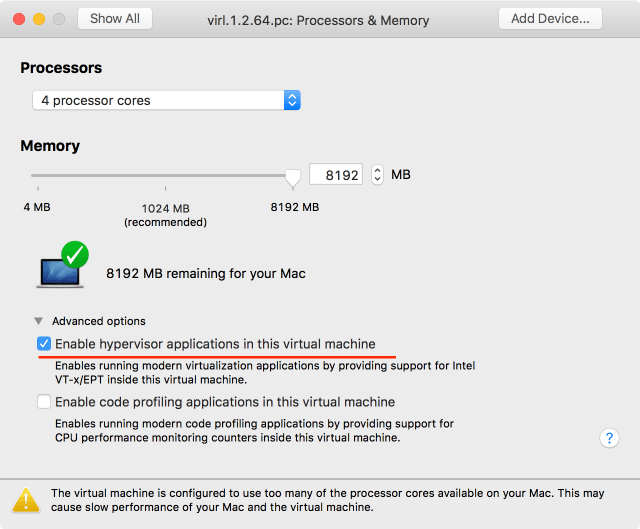
Next go to “Processors & Memory” and adjust CPU and Memory allocated to the VIRL server. 2 CPU and 4GB RAM is minimum, 4 CPU and 8GB RAM is recommended.
Also make sure “Enable hypervisor applications in this virtual machine” is checked.
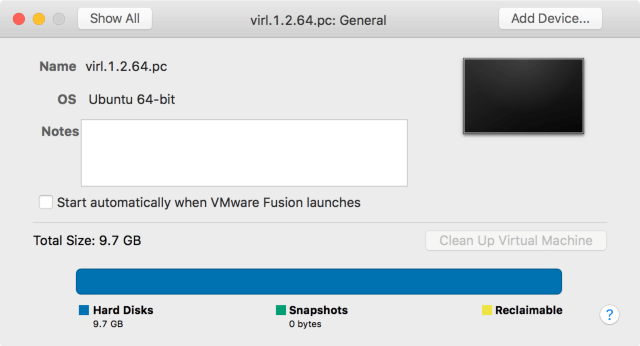
In “General”, you may want to start VIRL server automatically when Fusion is started. As you can see, VIRL is taking about 9.7GB of your hard drive space.
Now your VIRL virtual machine has been imported and is ready for launch.
Step 4: Launch VIRL virtual machine in Fusion Pro
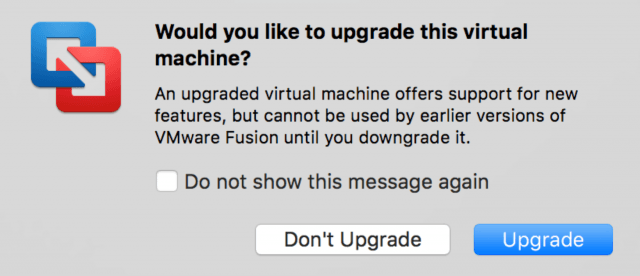
We now go ahead and launch the VIRL virtual machine for the first time. It is safe to upgrade the virtual machine in case Fusion Pro asks to upgrade.
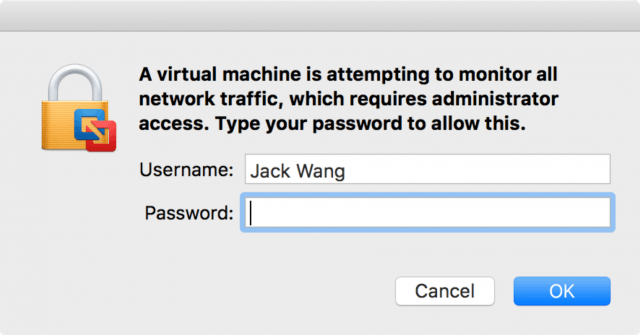
I received a pop up message asking for admin password as shown below. Enter the password and click OK.
VIRL server now has booted up with a GUI. Login using default credential (case sensitive):
Username: virl
Password: VIRL
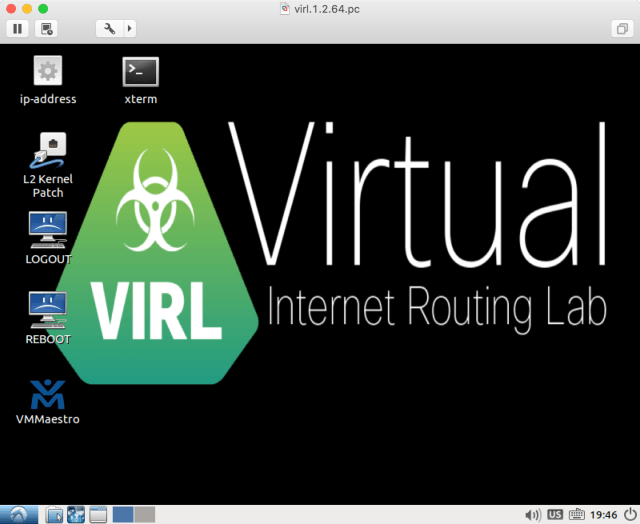
We now need to run a few tasks to make sure the VIRL server is ready for license activation.
First locate the IP address of the VIRL server and SSH to it.
You can use Linux command “ifconfig” in the xterm to display the interface IP addresses. Because there are so many virtual network interfaces have been created on the VIRL server, it is hard to identify which one is the management IP assigned by our Fusion Pro host.
Cisco created a shortcut to quickly locate the management IP. On the desktop of VIRL console, click on the icon named “ip-address” on the top left corner. In our example, the management IP of VIRL is 192.168.59.128.
inet addr:192.168.59.128 Bcast:192.168.59.255 Mask:255.255.255.0
inet6 addr: fe80::20c:29ff:fe12:5caa/64 Scope:Link
Now we may SSH to the VIRL server using any SSH client on the Mac. You may choose to work in the console. I found it is a lot more responsive using command line in SSH than GUI.
From this step forward, follow the same process described in Cisco VIRL Installation on VMWare ESXi “ Step 5: Prepare for license activation”.
It concludes my tutorial Cisco VIRL Installation on VMware Fusion Pro for Mac OS.