One of the most important aspects of labbing with Cisco VIRL is making sure that your hard work is saved. People studying CCNA, CCNP and CCIE can use VIRL to build fairly complex labs consisting of dozens routers. In this session we’ll explain how VIRL handles the configuration files and how to save configurations on VIRL. The obvious reason of saving configurations is that you can resume your work next time running the simulation seamlessly. The other good use is that you can export the configurations in text format and use them to configure physical routers.
Suppose you have a lab consists of 10 routers and one switch. You’ve built tons of configurations already. You’d like to take a break and come back to the lab tomorrow. In terms of what services and computers can be shut down while you are away, you need to think of it is a “client and server” system. VIRL is the server side application who is doing the most heavy-lifting work. Maestro is the front end user interface that can run on your laptop or any workstation. When you shutdown Maestro without terminating the simulation, your lab is still running on the server. You can reconnect to it using Maestro next time. You’ll be asked whether to stop the simulation at exit.
In case you are running server and client on the same computer using VM Workstation, Player or Fusion Pro, it is obvious that the simulation is terminated when the computer is shut down. Be sure to follow the next session to save the configurations.
While the simulation is still running, you have two options to save the configuration.
Option 1: Save all the configurations in the project .virl file.
Pros:
Convenience – All in one backup. Everything is saved in one file.
Portability- You can take this .virl file to other VIRL server and start the simulation in matter of minutes.
Cons:
Need to extract individual node configuration from the single large file. The .virl file isn’t bad to read but I feel a little less efficient if you just want a router’s configuration.
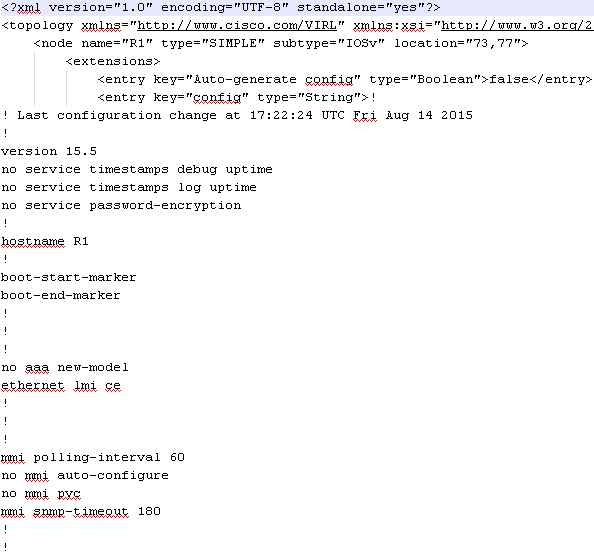
The project topology .virl file is a clear-text file in xml format. It contains all the information of your project and the configurations of all the simulated nodes. By default, it is located at:
C:\Users\username\vmmaestro\workspace\My Topologies
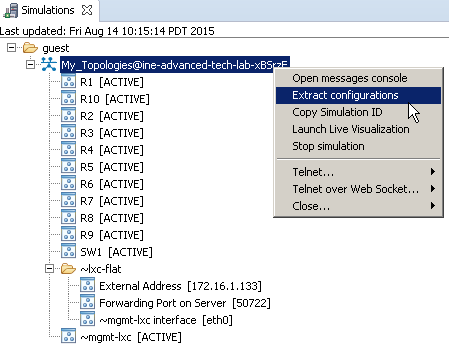
When you are ready to save all the configurations, you must close all the console windows internal or external to the lab. Then go to Simulations tab, select the project you are running. Right click and select “Extract configurations”.
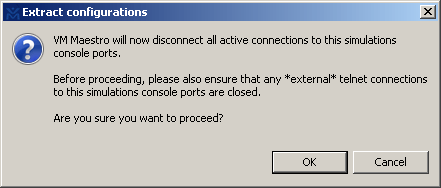
A conformation window will appear and let you know that all the active connections to the console ports will be closed. Click OK.
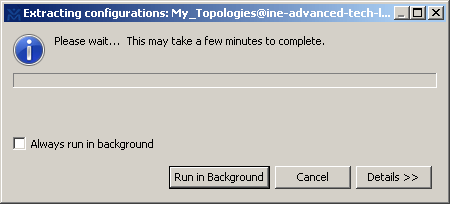
In the Console tab, logs indicate the system has downloaded the configuration from each node.

If you neglected to close all the Console windows, nodes with console window still open will error out. It seems VIRL cannot extract configuration from a node if there was an active console connection. I saw this in the logs while having R1 and SW1 console open. Configurations on R1 and SW1 will fail to be backed up.

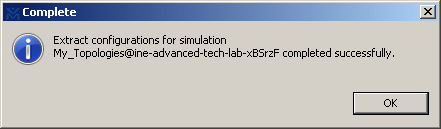
If everything is good, you’ll see the task has completed successfully.
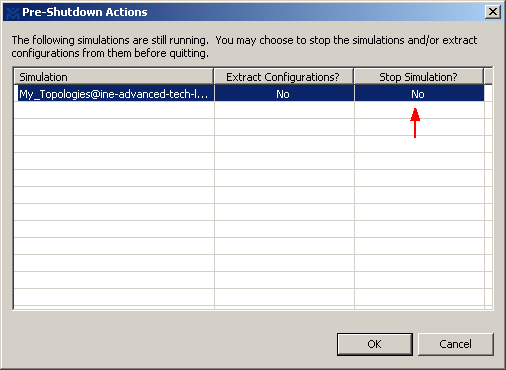
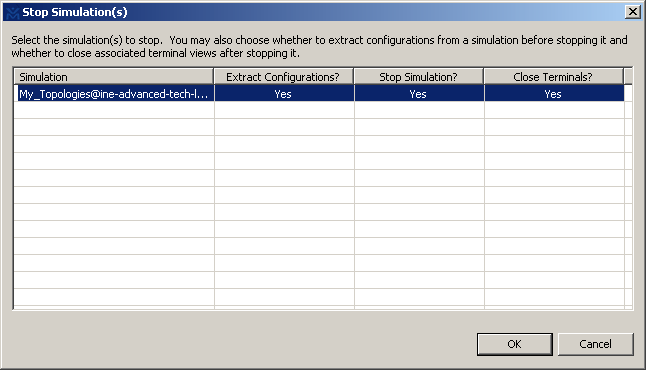
Optionally, you can have VIRL save the configuration before stopping a simulation. Remember this dialog box? Make sure you select “Yes” in Extract Configurations.
Let’s take a peek into the .virl file. Go to the folder where project .virl files are stored. For me it is located at C:\Users\jwang\vmmaestro\workspace\My Topologies. Open the .virl using a text editor.
Next time when you want to continue working on this project, just load the .virl file and start simulation in Maestro.
Option 2: Copy the Configurations manually
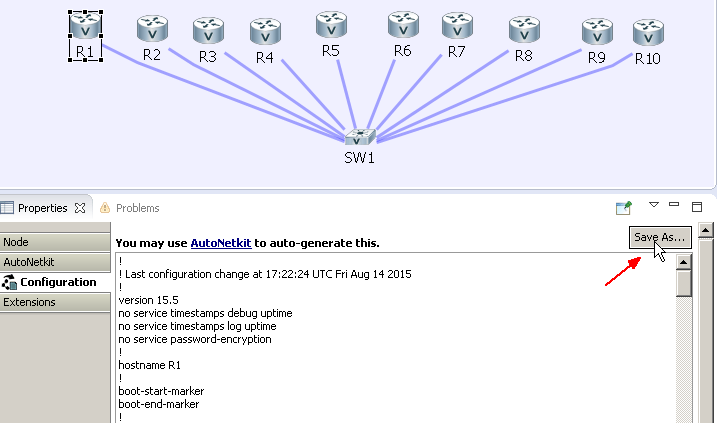
In Design view, select the node and go to “Configuration” on the left. Click “Save As” to export the configuration to a file. You can also select all the texts in the window (Ctrl+A) and copy & paste to a notepad. Keep in mind that configuration changes made here will not be pushed to the router until next simulation.
Pros: If you only need to copy and send one router’s configuration to your friend, this is the quickest way to do it. You may choose only to copy a session of it.
Cons: You’ll need to save configuration one node at a time.
With the advantages and disadvantages for each method, it is up to you to choose based on your specific situation.
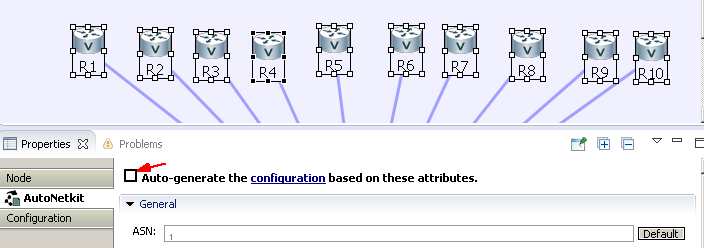
Reminder- make sure “Auto-generate the Configuration” is not checked in AutoNetkit for all nodes. It will overwrite your configuration next time when you start the simulation. Do not click on “Build Initial Configurations” if you are working on an ongoing project.
I’d love to hear from you!
If you have any questions regarding the content, feedback or suggestions for future topics, please leave a comment below.

Use the operating system commands to view or modify the node configuration. You have modified a configuration within one or more nodes running within the simulation and want to save the changes.
Hello, in general VIRL documentation is not very good, i am struggling with how to save any work i have done in an LXC, do you have any advice?
Did this article help? You can find more in depth explanations in my book about virl. http://www.virlbook.com