In this article, we’ll address how to access VIRL behind firewall use external Telnet SSH client to connect to a simulated network. If you are in the process of setting up a VIRL server on your network, please check out my in-depth step-by-step instruction on Cisco VIRL Installation on VMWare ESXi. Since VIRL requires and reserves quite a bit memory to run multiple nodes especially you want to simulate ASAv, IOS-XR and NX-OS, most people prefer running VIRL on a more power server infrastructure in a datacenter environment. Unless you only simulate networks while you are on the same network as the servers, it is more often you need to access VIRL behind a firewall over Internet. Of course it is possible to VPN into your server network and access VIRL as if you were local but not all corporate VPN is setup to allow.
In this session, I will demonstrate where to locate the TCP/IP ports required by VIRL to function and how to configure a firewall such as Cisco ASA to allow remote access to your lab. For those who prefer using your own Telnet/SSH client like SecureCRT and Putty, you may configure your system to launch it automatically when you try to connect to a virtual router.
There are two sets of ports required- ports used by VM Maestro to communicate with VIRL; and the ports used by the SSH/Telnet client to connect to the Console or management interface of the simulated network nodes.
Ports required connecting to VIRL server by VM Maestro
VM Maestro client uses these ports to connect to the VIRL server:
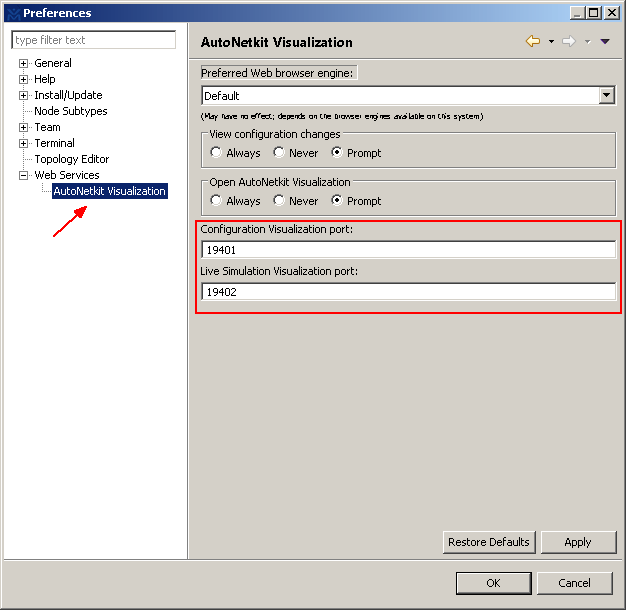
Configuration Visualization Port: 19401
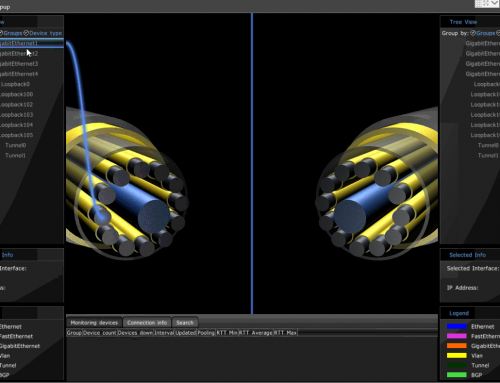
Live Simulation Visualization Port: 19402
Web Services: 19399Here is where you can find and change the ports if you wish.

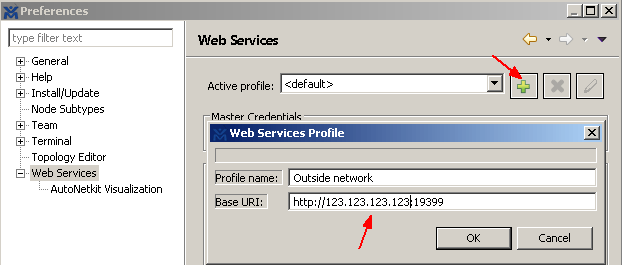
I found it is handy to install VM Maestro on a laptop so I can simulate networks anywhere I go. (Remember you don’t need a powerful machine to run the front end GUI Maestro. You need a powerful machine to run the back end VIRL server instead.) You can also create multiple Web Service Profiles to connect to the VIRL server. In my case I created two profiles. One for internal use where my laptop is on the same network as the server, I connect to the VIRL using its private IP address. The other profile is for external use while I’m traveling outside the network. I configure the public IPs NAT’d to the VIRL server.
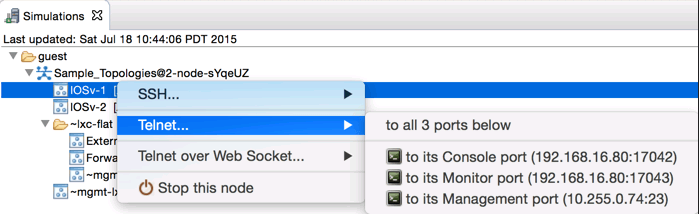
Ports required connecting to the console ports of simulated network nodes
VIRL uses the following TCP port range to connect to console. You can view or edit it here.
virl@virl:~$ vi /etc/virl.ini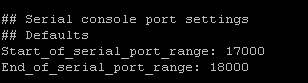
It is a range of TCP ports between 17000 and 18000. When network nodes are simulated, VIRL picks a random port in this range for console access over Telnet protocol. You may change it to a different range if it overlaps with your existing applications.
Cisco ASA Firewall configuration
ASA version 8.3 and newer:
!* VIRL internal IP: 192.168.16.80
!* VIRL NAT'd public IP: 67.67.67.80

! Define objects for VIRL external IP and internal IP
object network VIRL-EXT
host 67.67.67.80
object network VIRL-INT
host 192.168.16.80
!
! Define ports to be allowed from internet
object-group service VIRLTCP tcp
description VIRL TCP ports
port-object range 17000 18000
port-object range 19399 1940
!
! Configure a static NAT for VIRL server
object network VIRL-INT
nat (inside,outside) static VIRL-EXT
!
! Allow internet inbound for both VM Maestro and SSH/Telnet client console access
access-list outside_access_in extended permit tcp any object VIRL-INT object-group VIRLTCP
!
! Apply ACL to inbound direction on outside interface
access-group outside_access_in in interface outside
ASA version Pre-8.3:
!* VIRL internal IP: 192.168.16.80
!* VIRL NAT'd public IP: 67.67.67.80

! Configure a static NAT for VIRL server
static (inside,outside) 67.67.67.80 192.168.16.80 netmask 255.255.255.255
!
! Allow internet inbound access for VM Maestro to connect to VIRL
access-list INBOUND_ACL extended permit tcp any host 67.67.67.80 range 19399 19402
!
! Allow SSH/Telnet client to connect to console ports of simulated nodes
access-list INBOUND_ACL extended permit tcp any host 67.67.67.80 range 17000 18000
!
! Apply ACL to inbound direction on outside interface
access-group INBOUND_ACL in interface outside
Connect VIRL using external Telnet or SSH client
For those who prefer using their own Telnet/SSH client like SecureCRT and Putty (for Mac users, iTerm2 or the built-in Terminal), you may configure your system to launch it automatically when you try to connect to a virtual router. The terminal window come with VM Maestro are not as intuitive and customizable as those widely popular clients such as SecureCRT, Putty and iTerm2 for Mac.
VM Maestro provides the option of using external terminal programs. First we need to understand how to call those programs in command line.
Putty:
Firstly you need to find out the PATH where the program putty.exe is located. The easiest way is open Windows Explore and search for “putty.exe” on your C: or whatever hard drive volume you installed the applications. For me, it is located at “C:\Program Files (x86)\putty.exe”.
Open VM Maestro and go to Files – Preferences. Select Cisco Terminal and go to Use external terminal applications.
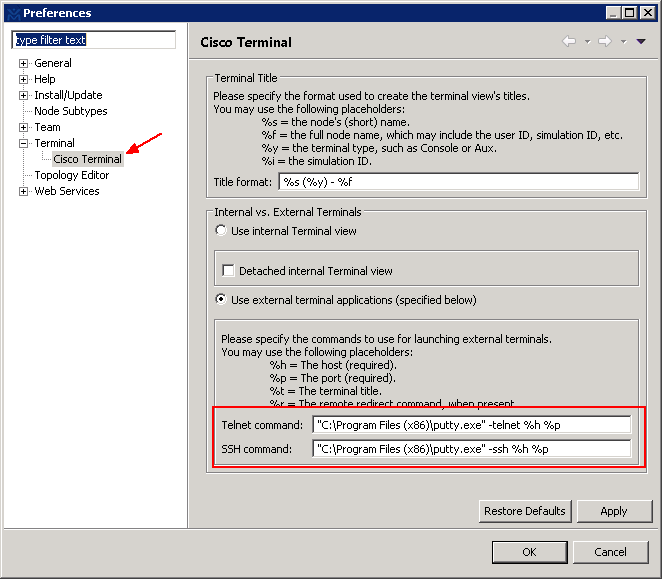
From version 1.2.4, VM Maestro has changed the command format. You do not need to double-quotes and must insert the arguments in the second line.
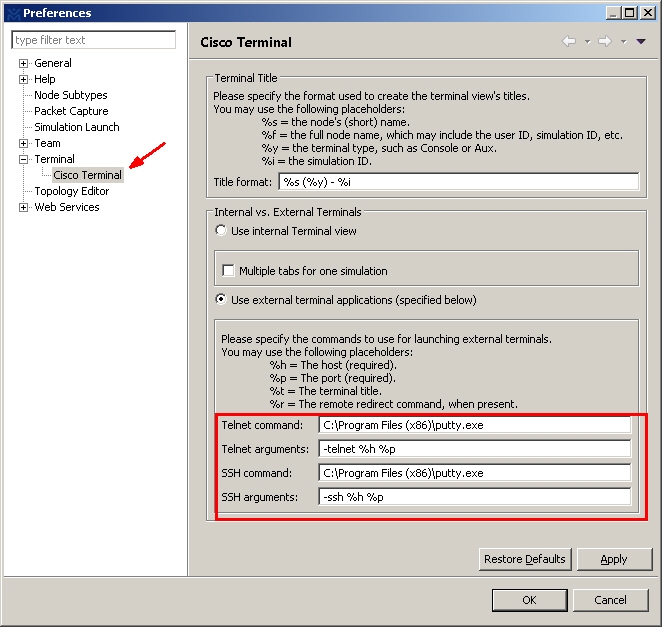
Use your putty.exe path and insert the commands. The double-quotes must be included to preserve the spaces within the path.
Telnet commands: "C:\Program Files (x86)\putty.exe" -telnet %h %p
SSH commands: "C:\Program Files (x86)\putty.exe" -ssh %h %p

%h specifies the host to connect to (required)
%p specifies the port to connect to (required)
%t the title of your terminal client (optional)
%r the remote redirect command (optional)
SecureCRT
Similarly, find the path to SecureCRT.exe. In my environment it is “C:\Program Files\VanDyke Software\SecureCRT\SecureCRT.exe”. Put the following string into the Telnet and SSH command boxes:
Telnet commends: "C:\Program Files\VanDyke Software\SecureCRT\SecureCRT.exe" /N %t /T /TELNET %h %p
SSH commends: "C:\Program Files\VanDyke Software\SecureCRT\SecureCRT.exe" /N %t /T /SSH %h %p

The /T option ensures Secure CRT creates a tab for new sessions, instead of opening a new window.
The /N option sets the tab's title based on the title format string. Make sure to validate / adapt the path of the binary.
You are all set. Now every time you right click on a simulated network node and open Console port, your external terminal program Putty or SecureCRT will be launched instead.
Mac OS X
For Mac users, I’ll pick the most commonly used built-in terminal client and the free 3rd party iTerm2 as examples. Unlike in Windows environment you can call an external application from Maestro directly; in Mac OS we’ll have to use Apple Script to call iTerm2 or Terminal. The overall process is rather simple except you call a Script from Maestro instead calling the terminal applications directly.
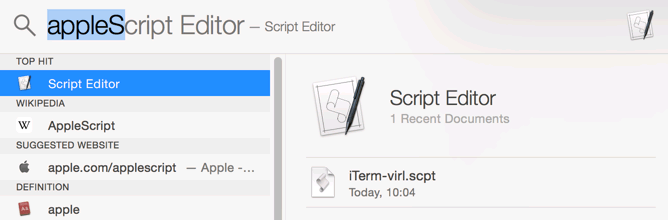
Open Apple Script Editor. If you have never used it before, just search it in Spotlight Search. Copy and paste the code below in the Script Editor and save file format as “script”.
For iTerm 2:
on run argv

-- last argument should be the window title
set windowtitle to item (the count of argv) of argv as text

-- all but last argument go into CLI parameters
set cliargs to ""
repeat with arg in items 1 thru -2 of argv
set cliargs to cliargs & " " & arg as text
end repeat

tell application "iTerm"
activate
if current terminal exists then
set t to current terminal
else
set t to (make new terminal)
end if

tell t
launch session "Default Session"
tell the current session
write text cliargs
set name to windowtitle
end tell
end tell
end tell
end run
For Mac OS X built-in Terminal:
on run argv
tell application "Terminal"
activate
-- open a new Tab, sadly, there is no method
tell application "System Events"
keystroke "t" using {command down}
end tell
repeat with win in windows
try
if get frontmost of win is true then
set cmd to "/usr/bin/" & item 1 of argv & " " & item 2 of argv & " " & item 3 of argv
do script cmd in (selected tab of win)
set custom title of (selected tab of win) to item 4 of argv
end if
end try
end repeat
end tell
end run 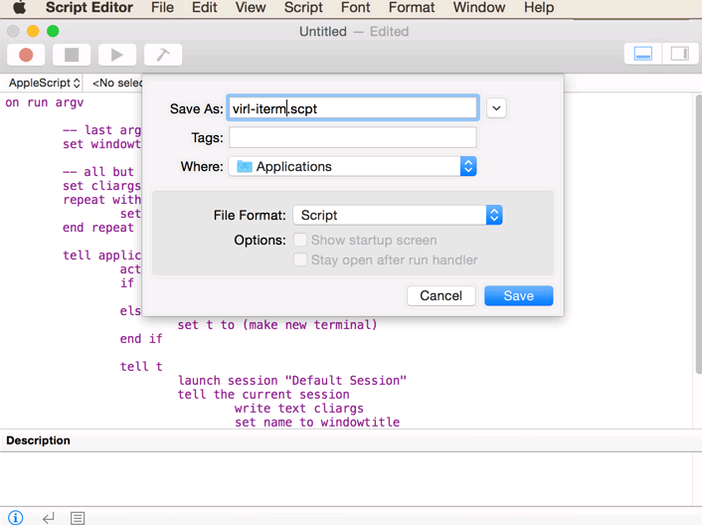
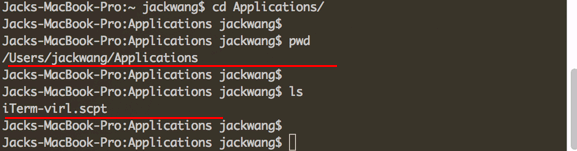
After you saved the script, you may call it from Maestro. Make sure you use the correct PATH to point to the script you just saved. You can use the Linux command “pwd” (stands for print working directory) and “ls” to verify the path. For me, it is located at /Users/jackwang/iTerm-virl.scpt. Change your path accordingly.
Here is the format you are going to put in Maestro. Don’t change anything else other than the PATH to your script.
For Telnet: /Usr/bin/osascript /Users/jackwang/iTerm-virl.scpt telnet %h %p %t
For SSH: /Usr/bin/osascript /Users/jackwang/iTerm-virl.scpt ssh -Atp%p guest@%h %r %t
Insert the configuration in Maestro, File – Properties.
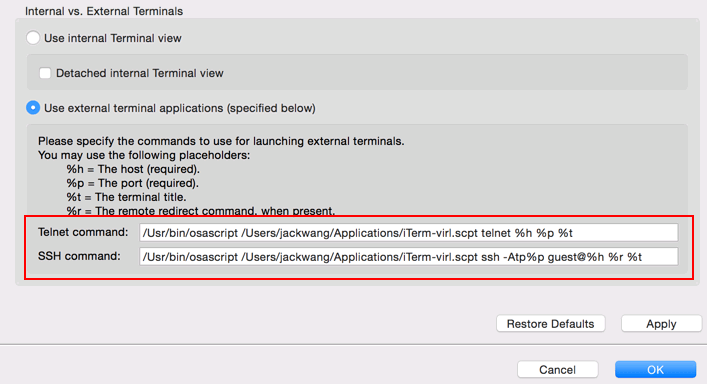
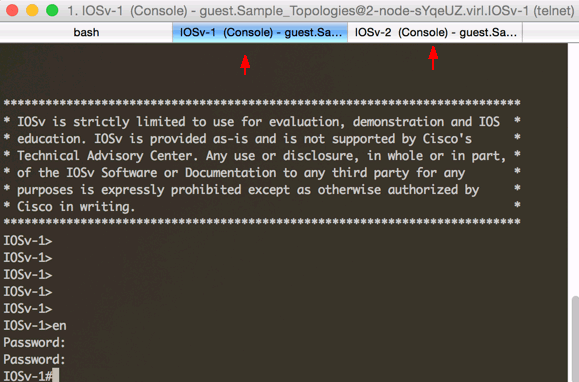
Now when you open a Telnet session to a node’s Console port, it will open your iTerm2 or built-in Terminal client.
Tab tiles display the host names nicely.
You can now work on your simulation lab anywhere you go, and with your favorite SSH or Telnet client. In my next article, I will explain the difference among Private Project Network, Private Simulation Network and Shared Flat Network. Different scenarios building Flat, Flat1, SNAT and INT will be demonstrated.
If you haven’t already, check out my in-depth step-by-step instruction on Cisco VIRL Installation on VMWare ESXi.
I’d love to hear from you!
If you have any questions regarding the content, feedback or suggestions for future topics, please leave a comment below.
Get notified when the article is updated.

Got so close. I’m able to deploy simulations and access live visualizations externally but I still I can’t access the terminal of any deployed devices either using maestro or directly with putty. I’ve forwarded 17000-18000 but still when i putty i just get a blank screen, when I right click it does show the correct public ip but a similar thing still occurs. Any Ideas?
If everything works inside the network but not from outside network, it can be an issue with your firewall / NAT configuration. You can do a port scanning using one of the online tools and make sure those ports are indeed open to the outside. I would recommend using VPN over opening firewall holes because it is more security.
I am having this same issue. My laptop is on the same subnet as the VIRL Management interface. I get a blanks screen and hitting enter moves the cursor, but nothing else. I get no response back from SecurieCRT.
Saved as a favorite, I really like your blog!
Thank you for your kind words. Please subscribe and more to come!
Very helpful. Thank you. Still trying to figure out the best way to build a server. This is exactly what I’ll need once complete. Great website too.
Hi, I have bit of a confusion, I have followed all the steps but when I am outside and right click on a device to telnet on the console port, it uses a LAN ip and hence it does not connect, manually if I put the public IP with the appropriate port (eg. 123.123.123.123 port 17042) in putty it works, but not by right clicking on Mastero. Any suggestions please? Does it work for you directly?
Aamir,
Since you are outside and not on the same LAN as the VIRL server, you’ll need to connect using the NAT’ed public IP address. To make right-click and telnet work, you can configure OpenVPN, which put you directly on the same network. Follow this video https://www.youtube.com/watch?v=ftRV1qPayPk
Thank you very much for this information, but is there any method that Maestro uses shows/uses the public address? Or while configuring the external terminal instead of %h, I can manually give the static Public IP?
No, static IP in Maestro won’t work because it needs to replace it with each router’s real IP when you clicked. Maestro is really going less important as Cisco team is improving the UWM web based management console. As far as I know there are a lot more you can do on the web based UI. Upgrade to the latest version and try it out yourself.
Yes, I finally figured out how to do this. I am natting my virl over the internet so in the virl console settings i used this for my telnet argument
“-telnet publiciphere %p -sshlog %h.txt”
this allows putty to telnet via public ip, while still using the %h argument so virl will let you apply it
To which IP of VIRL you must connect to telnet to virtualized nodes consoles? VIRL management interface, the same as for internet connection from VIRL?
Hi Bman, can you explain more about your question? I don’t quite understand.
When you’re installing VIRL in ESXI you need to create 5 interfaces (management, SNAT, FLAT1, FLAT2, INT). If order to make telnet connection to consoles of virtualized noded, you are connecting to management interface?
When you are connecting to a simulated node inside VIRL, you will Telnet to VIRL’s management IP on a different TCP port. For example, when you connect to R1, you’ll telnet to 192.168.16.80 (VIRL’s management IP on port 17001. It is a range of TCP ports between 17000 and 18000. When network nodes are simulated, VIRL picks a random port in this range for console access over Telnet protocol. You may change it to a different range if it overlaps with your existing applications.
Got it. Thx Jack for clarification!