In this example, we’ll step through Cisco ASA 5506-X FirePOWER configuration example and activate the FirePOWER module in a typical network. We used ASA 5506-X running code 9.5(2) and ASDM version 7.5(2).
Before proceed, please make sure the followings are taken into consideration. If you are configuring a brand new ASA 5506-X, you may skip to Step 1.
- It is not recommended to configure and run Could Web Security (ScanSafe) at the same time running FirePOWER. Technically it is possible to split traffic to be inspected by one of the method respectively, however it is not recommended.
- Do not enable ASA’s HTTP inspection features since FirePOWER provides more advance HTTP inspection than ASA.
- Cisco Mobile User Security (MUS) is not compatible with FirePOWER.
Cisco ASA 5506-X FirePOWER Configuration Example Part 2
Step 1: Update ASA software and ASDM code
Download the recent stable release from Cisco.com and transfer the codes to the ASA.
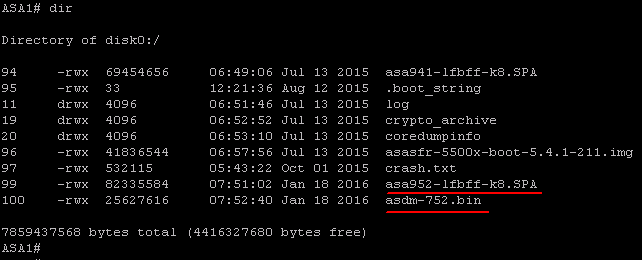
Set the system to boot to the new image. Configure the ASDM image to be used.
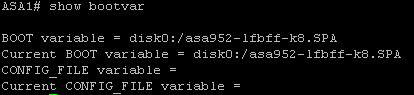
ASA1(config)# boot system disk0:/asa952-lfbff-k8.SPA
ASA1(config)# asdm image disk0:/asdm-752.bin
Write memory and verify the bootvar is set correctly. Reboot the system to load the new image.
Step 2: Verifying FirePOWER module status
Using “show module”, you can verify the FirePOWER module is online and healthy.
ASA1# sho module

Mod Card Type                                  Model             Serial No.
---- -------------------------------------------- ------------------ -----------
ASA 5506-X with FirePOWER services, 8GE, AC, ASA5506           JAD19280XXX
sfr FirePOWER Services Software Module          ASA5506           JAD19280XXX
Mod MAC Address Range                 Hw Version   Fw Version   Sw Version
---- --------------------------------- ------------ ------------ ---------------
1 5897.bd27.58d6 to 5897.bd27.58df 1.0         1.1.1       9.5(2)
sfr 5897.bd27.58d5 to 5897.bd27.58d5 N/A         N/A         5.4.1-211
Mod SSM Application Name           Status           SSM Application Version
---- ------------------------------ ---------------- --------------------------
sfr ASA FirePOWER                 Up               5.4.1-211
Mod Status             Data Plane Status     Compatibility
---- ------------------ --------------------- -------------
1 Up Sys             Not Applicable
sfr Up                 Up
Step 3: Physical cabling
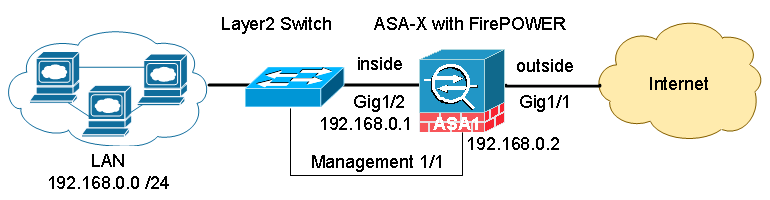
On ASA 5506-X through ASA 5555-X platforms, the ASA itself and FirePOWER module share the same physical management interface (ASA 5585-X has dedicated management interface for each). For the shared management interface, you have two options to configure.
Option 1: Dedicate the management interface to FirePOWER, and manage the ASA through its inside or outside interface.
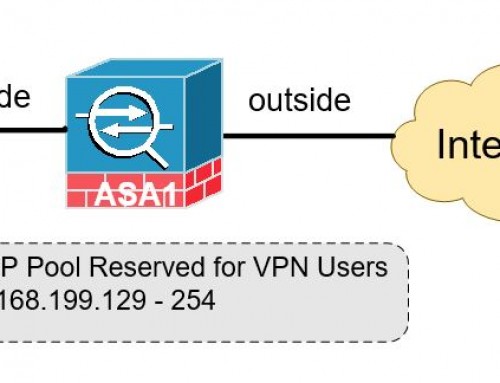
In order to run in this mode, you must not configure a name on the management interface. You need to configure a FirePOWER management IP on the same network as inside interface of the ASA. In our example, we have 192.168.0.1 on the inside interface and 192.168.0.2 on the management interface.
Keep in mind that FirePOWER management interface must have internet access for signature updates and communication to the Management Center. Traffic cannot pass through the ASA’s backbone. Instead, management traffic must enter and exit through the same physical port. Illustrated below is a typical cabling setup where management interface is connected to the same layer 2 switch as the inside network.
Option 2: Share management interface between ASA and FirePOWER
If you have a layer 3 device such as a layer 3 switch on your network, this method of configuration is recommended. The ASA and the FirePOWER module share the same physical management interface with different IP addresses. The management IP addresses are on a separate network or VLAN, dedicated to management traffic. Internet bound traffic initiated from the management IP is routed through the layer 3 device to the inside interface of the ASA.
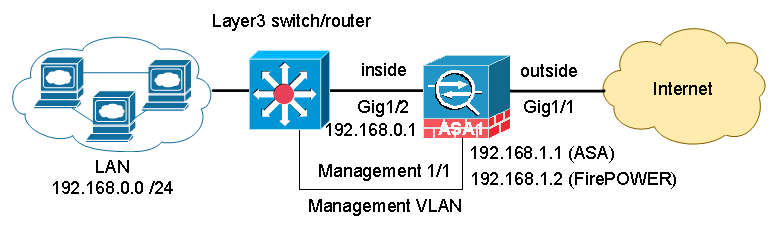
In our example, we assigned 192.168.1.1 for ASA management and 192.168.1.2 for FirePOWER management. Please note that the IP address under management interface configuration only reflects the ASA management IP. FirePOWER management IP is not shown under “show running-config”.
interface Management1/1
 management-only
 nameif management
 security-level 100
 ip address 192.168.1.1 255.255.255.0
Step 4: Initial configuration of FirePOWER module
On console CLI interface, enter the FirePOWER module using session command:
ASA1# session sfr
Default username / password: admin / Sourcefire
The first time you access the FirePOWER module, you are prompted for basic configuration parameters.
System initialization in progress. Please stand by.
You must change the password for 'admin' to continue.
Enter new password:
Confirm new password:
You must configure the network to continue.
You must configure at least one of IPv4 or IPv6.
Do you want to configure IPv4? (y/n) [y]:
Do you want to configure IPv6? (y/n) [n]:
Configure IPv4 via DHCP or manually? (dhcp/manual) [manual]:
Enter an IPv4 address for the management interface [192.168.45.45]: 192.168.1.2
Enter an IPv4 netmask for the management interface [255.255.255.0]:
Enter the IPv4 default gateway for the management interface []: 192.168.1.1
Enter a fully qualified hostname for this system [Sourcefire3D]:
Enter a comma-separated list of DNS servers or 'none' []:
Enter a comma-separated list of DNS servers or 'none' []:
Enter a comma-separated list of DNS servers or 'none' []: 4.2.2.2
Enter a comma-separated list of search domains or 'none' [example.net]:
If your networking information has changed, you will need to reconnect.
For HTTP Proxy configuration, run 'configure network http-proxy'
Applying 'Default Allow All Traffic' access control policy.
At the end of this step, we have completed the initial setup of the ASA and the FirePOWER module. A “Default Allow All Traffic” policy is activated on the FirePOWER module. It will inspect and monitor all traffic being sent to the module. It will not drop any traffic.
Now you may proceed to Configure and Manage ASA FirePOWER Module using ASDM or Configure and Manage ASA FirePOWER Module using FirePOWER Management Center.
If you are looking for best practice, baseline configuration of the ASA 5506-X before moving on to setting up the FirePOWER module, please read: Basic Cisco ASA 5506-x Configuration Example, or download configuration template for FREE.
Continue reading:
Cisco ASA 5506-X FirePOWER Configuration Example Part 1
Configure and Manage ASA FirePOWER Module using ASDM Part 3
Configure and Manage ASA FirePOWER Module using Management Center Part 4
Dear Mr Jack Wang,
I need to apply the URL filter on an ASA5516-X, it is currently in production with ASA IOS, and it has 200 ACL, 30 NAT, VPN L2L, VPN Remote.
The question is:
When registering with an FMC, do I lose the ASA configuration that I already have in production?
Traffic rules, NAT, PAT, etc. should I apply them from the FMC? or am I still working normally with the ASA IOS?
Thanks.
You will not lose the ASA side of configuration when registered with FMC. The FMC only takes care of Firepower service, where all the next-gen features reside. FMC does not touch your ASA side. With Cisco’s new Firepower firewalls running FTD code, it is one piece of unified software that is managed by FMC. I’d suggest you looking into Cisco’s new 1000 series, it replaces your ASA 5516-x. https://www.cisco.com/c/en/us/products/security/firepower-1000-series/index.html
Dear Mr Jack Wang,
I have a problem install cisco asa 5525X. I was do every thing like your guide but no traffic, data can show on Firesight management.
The Firesight have a critical on Health:
Critical Modules:1,Normal Modules:11,Disabled Modules:17
Module Interface Status: Interface ‘DataPlaneInterface0’ is not receiving any packets
I think it mean no traffic can connect throught SFR module senser.
the file config in the link:
https://drive.google.com/file/d/0B0MwyKg0U28wM0J2bTc0Nlp0QXM/view?usp=sharing
can you help me to solved.
Thank you very much!
I have seen similar issues in the past. It is generally caused by one of these two things.
1. Make sure you have activated the FirePOWER licenses on the unit. If you have pair of ASAs in HA cluster, both ASAs must carry valid FirePOWER licenses and activated on both units. Make sure FirePOWER configurations on both ASAs are in sync as well.
2. In FirePOWER configuration, go to Policies>Access Control. Make sure you have configured an Access Control Policy, and nothing in there could potentially block all traffic. The Default Action on the bottom sends filtered traffic to a Intrusion Policy. If you use the default Intrusion Policy it should not block general internet access.
Lastly, it is possible that you need to re-image the FirePOWER module. Here is the post.
https://supportforums.cisco.com/discussion/12525066/problem-secondary-cisco-asa-5525x-sfr-and-firesight
Let me know how it goes.
Hi Jack Wang
I was resolved problem, my problem is not route from inside to outside done.
Thanks You for reply so much! 🙂
Hi Jack,
After configuring the ASA and Firepower module and running well in a layer 2 environment, we need to add a layer 3 switch as a core switch for our current LAN.
I can change the ASA inside and management interface but how do I reconfigure the Firepower Module management IP? What command do I run? Do I have to reimage and reconfigure the whole device again?
When I deregister the FMC from the Firepower Module, do I have to reconfigure all the policies and licenses again after re-register the FMC after the managemnt IP changes?
Thank you in advance!
Jeffrey,
You should not need to reimage and configure everything. But before you making any changes, make sure you grab a backup for just in case. To change the management IP of a FirePower module, go to the Management Center -> Devices -> Device Management and change the management IP. The other way to do this is that login the FirePower module, “ASA1# session sfr”, “sudo /usr/local/sf/bin/configure-network”
You may need to drop into expert mode first (i.e. the Linux OS). Simply type “expert” for that.
Hi,
I have a problem in configuring ASA 5506-X FirePOWER module. If I set FirePOWER IP on the same subnet of ASA (in my case ASA, at inside interface, is 192.168.0.5) and the I configure the gateway as the ASA inside IP, my FirePOWER module doesn’t ping external hosts (i can’t ping any public IP address) but i can ping hosts in my LAN network. I needed to set FirePOWER IP with a public IP (one of the IPs of my outside interface) and then my FirePOWER module start to navigate and so i can update signatures, etc..
So, My ASA LAN IP is: 192.168.0.5 (the outside interface is correctly configured with public IP and everything works) / if I set, for example, 192.168.0.2 with gateway 192.168.0.5 on my FirePOWER interface, my FirePOWER module can’t update (no internet connection); if I set one of the public IPs on my FirePOWER interface, my FirePOWER module can update (internet connection OK).
I think that something is not working correctly. Can I set public IP on FirePOWER interface?
Thank you
Samuele, as explained in this article, you have two options to configure the manage interface. For option 1, you must *not* configure a name on the management interface. Check if you have “nameif” statement under the interface configuration. If you do, please remove it. To do option 2, I believe it is what you are trying to do, you will need to route all traffic to a L3 LAN switch first and let the L3 switch forward the traffic to the ASA’s inside IP. So your gateway IP configured on the Firepower module should be the L3 switch, not the ASA inside IP.
Hi Jack,
The L3 setup works for the Firepower module but the ASA IP address is NOT reachable via Management 1/1 because of Asymmetric routing. Return traffic from ASA back to my workstation is preferring the INSIDE interface & not the Management interface. I have an L3 Switch connected on the ASA INSIDE interface. I don’t think adding a static route pointing to the Management interface would be ideal. Please let me know your thoughts.
Ron, once you dedicated the management interface to Firepower, you shall use the ASA’s inside IP to manage the ASA itself.
Thanks Jack for the quick response. Here is what I did, I dedicate the management interface to Firepower but placed it on a different Vlan. I did not assign Management IP address/nameif on ASA Management 1/1 interface. The firepower module is using the connected L3 Switch as the default gateway. I have not cutover our production traffic but it looks like it will work. Let me know your thoughts.
Hi Jack,
I am a bit confused on how to configure the FirePower with a L3 switch.
Currently I have the following physical connection setup:
– LINK 1: ASA inside interface G1/2 (IP: 10.10.100.1) connected to the L3 Switch interface G1/0/47 (IP: 10.10.100.3);
– LINK2: ASA management interface M0/0 (FirePower IP: 10.10.100.2) connected to the L3 Switch interface G1/0/48 with no IP address (I guess I have to configure an IP address?);
– A static route configure in the L3 switch for internet access:
ip route 0.0.0.0 0.0.0.0 10.10.100.1
In this scenario, what I have to do in order to have access to the FirePower module?
1. Should I put the LINK 1 and LINK 2 into different subnets?
2. If so, the FirePower gateway will be the the L3-switch G1/0/48 interface IP address right?
Thank you in advance.
You should have Link 1 and 2 on different subnet. Check “Option 2” in this article. The ASA and the FirePOWER module share the same physical management interface with different IP addresses. From the FirePower module, Internet bound traffic initiated from the management IP is routed through your core switch to the inside interface of the ASA.
i stand to be corrected but putting .1 and .2 of the same subnet on the inside and Management will not be possible. kindly advice
John, are you sharing the management interface between ASA And Firepower (Option 2)? When following the instruction in this article, where did you get the error what exact the error says?