As mentioned previously, there are two ways to configure and manage ASA FirePOWER module using ASDM and FirePOWER Management Center. We’ll cover in both options.
Configure and Manage ASA FirePOWER Module using ASDM
Preparation
Step 1: Enable HTTP service on the ASA
By default, HTTP service is not enabled on the ASA. You need first enable HTTP service and specify the network and interface where access is allowed.
http server enable
http 192.168.0.0 255.255.255.0 inside
http 192.168.1.0 255.255.255.0 management
Step 2: Open a web browser and go to the management IP of the ASA
In our example, enter the following URL: https://192.168.1.1/admin. Here you may choose to install the ASDM client on your local computer or use Run ASDM directly from a Java-enabled browser. I recommend download a local copy of the ASDM client and use without going through the web browser every time.
Licensing FirePOWER features using ASDM
Launch and Log in ASDM using the ASA’s username and password. (Not the FirePOWER)
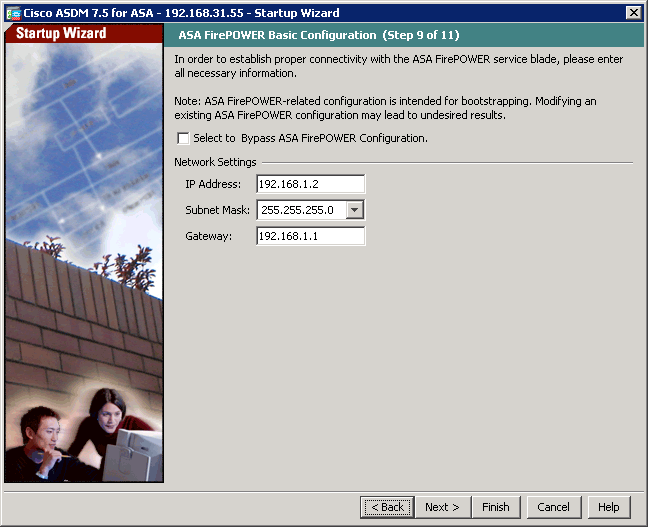
Optionally you may change or update the management IP of the FirePOWER module using the Setup Wizard.
To configure the FirePOWER module, you must login ASDM with an ASA username that has privilege level 15. If you could not find the FirePOWER Configuration option and see the warning message under ASA FirePOWER Status tab, that’s because you logged in using an account without privilege 15.

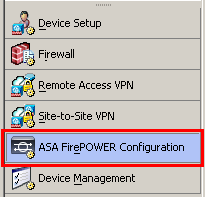
In ASDM, choose Configuration – ASA FirePOWER Configuration tab on the lower left corner and click “Licenses”.
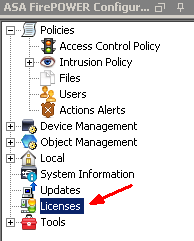
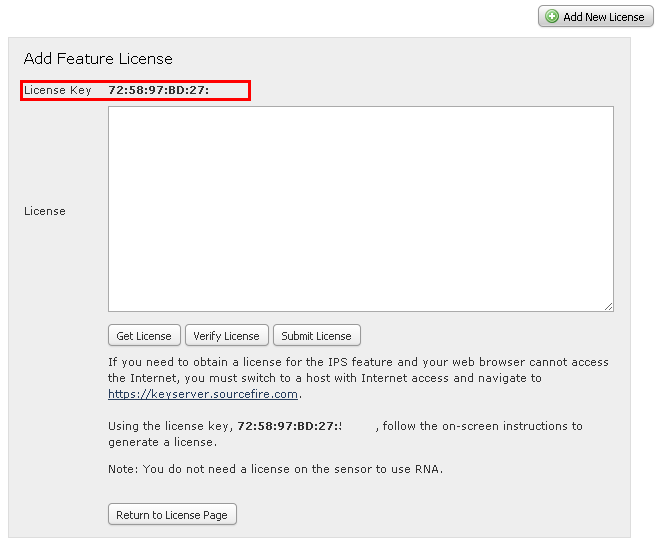
If you have not added any licenses, you will see a blank panel with the only option “Add New License” option. Click on “Add New License”.
The licensing procedure goes in the following order:
- Purchase the license from your Cisco vendor.
- Receive a Product Authorization Key (PAK) either by email or by physical mail.
- Go to Cisco Product License Registration portal http://www.cisco.com/go/license to generate a license file.
- Copy and paste the license hash strings into the FirePOWER license tab and activate.
Here are the screenshots for each step.
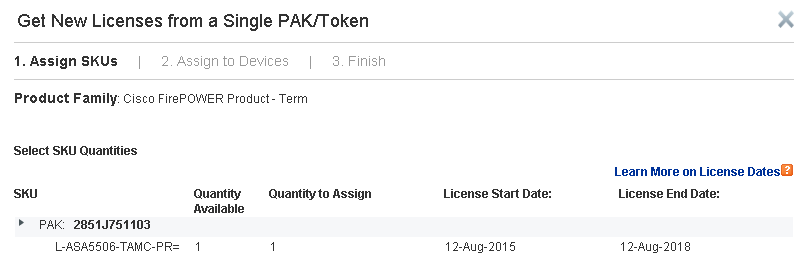
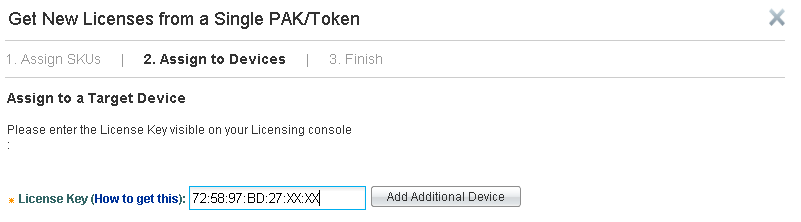
Go to http://www.cisco.com/go/license and enter PAK. Click on Fullfil

Verify the license description and click on Next.
Copy the License Key from ASDM – ASA FirePOWER Configuration – Licenses and paste to Cisco web portal.
Enter your information and click on Finish.
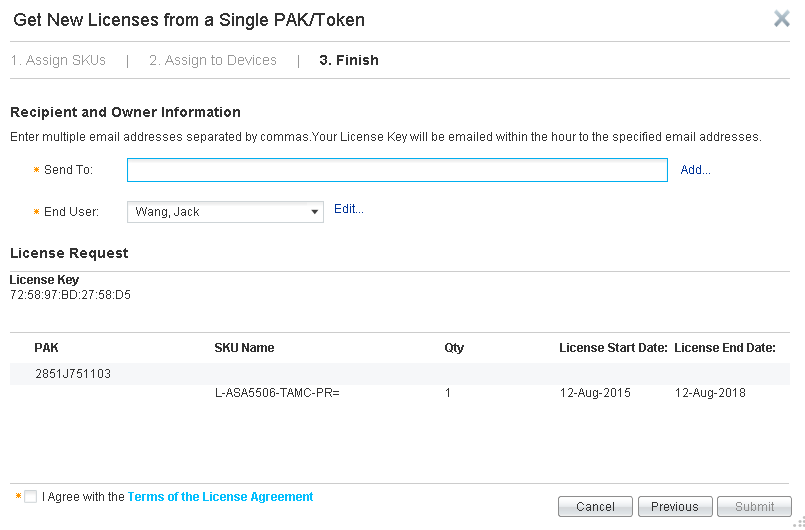
Your license file is generated and emailed to you. You can also download it directly. You will receive a .lic file in plain text format.
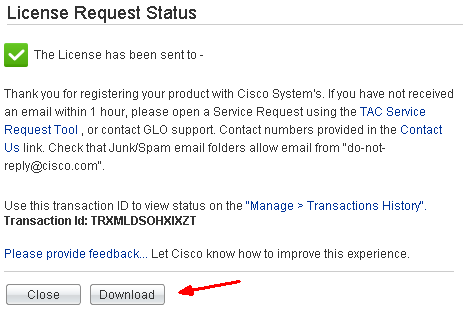
Open the .lic file using a text editor like Notepad. Copy and paste the content between “BEGIN” and “END” into the blank field of License on FirePOWER License in ASDM.
— BEGIN SourceFire Product License :
— END SourceFire Product License —
Tip 1: Do not include anything outside the BEGIN and END lines. Sometimes the license comes with “Device” and “Feature” descriptions. You must exclude them.
Tip 2: If you purchased multiple licenses such as Malware and URL Filtering, the licenses will come in one .lic file. You must activate one license at a time. That means, copy & paste one session of the BEGIN and END at a time and activate it. And repeat the same process to activate additional feature licenses. If you tried to copy and paste multiple licenses into the field and activate, you will receive an error “Invalid license key”.
Tip 3: Protection and Control licenses should come with the product when you purchased the ASA 5506-X with FirePOWER. Sometime I have seen customers did not receive the base Protection and Control license PAKs. You will need to open a TAC Service Request and they will generate a license file for you free of charge.
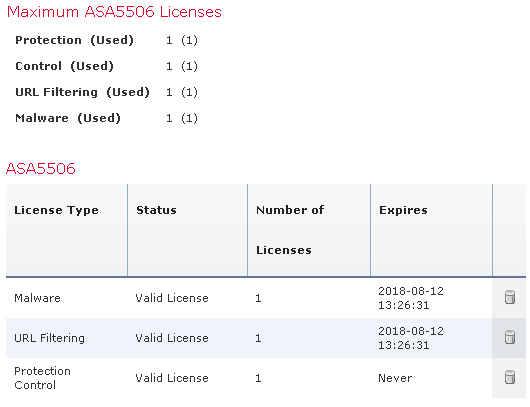
Once all the licenses have been activated, you’ll see a summary like below.
Send Traffic to FirePOWER Module to be inspected
By default, the ASA does not redirect traffic to the FirePOWER module for additional inspection. It works nothing different from a traditional firewall. The FirePOWER module works like a service card. In the Cisco ASA software architecture, traffic needs to be redirected to the service module using Service Policy configuration. You may create Service Policy on the ASA that identifies specific traffic that you want to send.
In this example, we’ll send all traffic to FirePOWER for inspection. Go to ASDM – Configuration – Firewall – Service Policy Rules and add a new Service Policy. Since we will be sending all traffic to the FirePOWER module, we’ll utilize the existing “global_policy”.
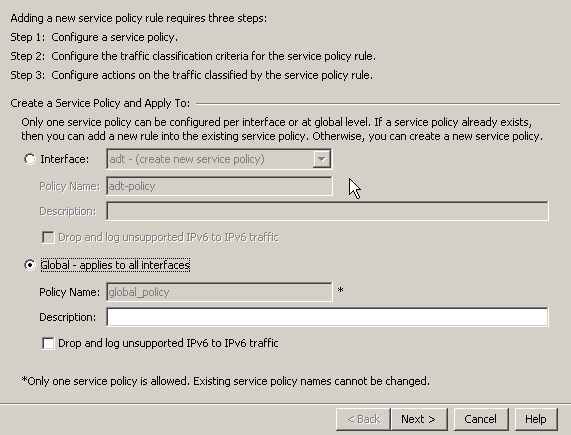
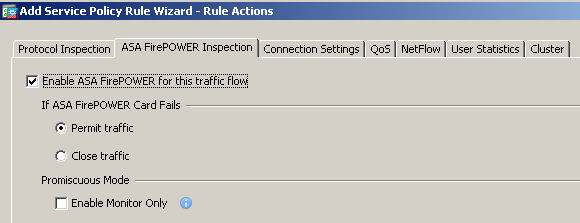
It is self-explanatory that you want all traffic to pass through the FirePOWER module when there is a software failure. (Hardware for ASA 5585-X) Apply the rule.
You may choose to configure the Service Policy rule using CLI. Here is the configuration sample..
class-map global-class
 match any
policy-map global_policy
class global-class
 sfr fail-open
It is important to note that FirePOWER only activated the ‘Default Allow All Traffic’ access control policy initially. All traffic redirected to it will be monitored but none will be dropped. You need to configure and fine tune your own FirePOWER policies in a real-world network.

FirePOWER Code Update and Rule Update
It is a good practice to periodically check and run software code updates, security patches. Similar to anti-virus signature updates, FirePOWER’s rule database also needs to be updated as soon as the new ones are released.
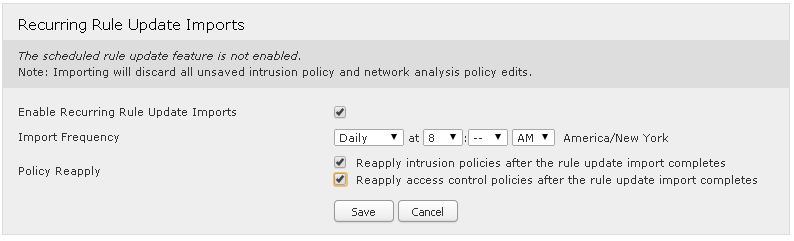
Run updates in ASDM
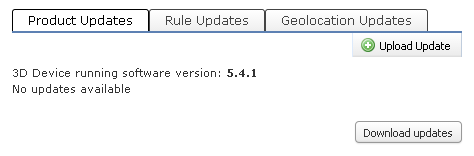
For standalone installations, you can run updates in ASDM – ASA FirePOWER Configuration – Updates. Please note you need to update all three categories:
- Product Updates
- Rule Updates
- Geolocation Updates
Continue reading:
Cisco ASA 5506-X FirePOWER Configuration Example Part 1
Cisco ASA 5506-X FirePOWER Configuration Example Part 2
Configure and Manage ASA FirePOWER Module using Management Center Part 4
Hi. Is this feature (limited Firepower sfr module management through ASDM) also implemented in 5525 / 5515 or is it just in 5506 ?
cheers, pete
It applies to all ASA-X models come with an active Firepower license.
Thanks, you’ve made my day with this excellent tutoriel
Glad it was helpful.
Hi Jack, i am having trouble configuring Access policy on firepower module through ASDM on cisco 5506 asa, can you please help in this. it is the first time i will be configuring it.Any link?,
I do not have a management centre and only can use ASDM.
Regards
Vaibhav
Using ASDM to configure Firepower works very similar to the Management Center, even the GUI looks the same. I’m putting together detailed step by step tutorials in my future posts really soon. in the meantime, please check out this link: http://www.petenetlive.com/KB/Article/0001107
I activated control license though ASDM and already i’m going to active this license by the Firesight manager , but the license key that is shown in the Firesight manager is different as the other one(ASDM output license key ) and because of the last registeration in the cisco site I could not get another LIC with same PAK . 1- what is the license key which is in the firesight menu ( should not be same with firepower license key? ). 2- Is this license related to the firesight manager own license ? and is it possible to config and apply IPS policy rule with evaluatoin license 3- could we use the control license of ASA Firepower in the firesight manager to configure and apply policy of the IPS capbilities ? …………… I am confused that output license key of the fiesight is for the Control license activation OR for the firepower management Activation —————
1. They are different. If you were using the Management Center, the license key was generated by Cisco using the identifier of the MC (looks like 92:58:xx:xx:xxx:xx) and the license key is issued to the MC. You then can assign a particular license to any of its managed Firepower sensor as you wish. The MC acts as your own licensing server.
2. MC does not require license. It normally comes with a 50000 license it never expires. Go to see it in System> Licenses.
3. That is the correct way of doing it if you have more than one Firepower sensor and managed centrally.
Hi Jack,
Thanks for your tutorial. I have followed it but I still missing the ASA FirePower configuration tab. I used a user with privilege 15. I only can see the ASA FirePower Status tab at home. I have ASA Version 9.5(2), ASDM version 7.5(2) and the ASA Firepower version 5.4.1-211. What could it be the problem?
Regards
Juan,
Did you see the same warning message “cannot manage ASA FirePOWER onbox” in yellow? If so, double check the user you used to login the ASDM. It is the ASA user account, not the FirePOWER account. If you did not see the yellow warning message, what do you see at the same place?
Hi Jack,
I do not see any message, only the information that the FirePower Status Tab shows.
Thank you for you ressponse
You’ll have to check if your FirePOWER module supports ASDM-based management. Have you tried managing it via the Management Console?
Hi Jack, I finally could use the ASDM, the problem was an issue with windows 10 and java. I used a windows server 2008 and the same version of java and it works.
Thank you for you help
Thanks for the update since a lot people may run into the same issue.
Hi Jack. First, thanks for your useful articles.
I have a question.
The Policy example you described with the CLI commands
class-map global-class
match any
policy-map global_policy
class global-class
sfr fail-open
Are not the same (same results) as the default policy that is activated at the end of the SFR network confuguration with the command #session sfr that displays that by default it will “Allow All Traffic”?
The CLI commends mentioned above basically say “Any traffic that has passed the legacy ASA inspection (ACLs, security policies and etc.), send to the FirePower service module for additional evaluation.”, “If FirePower module has failed, bypass it and send the traffic to the egress interface of the ASA”. Don’t get confused with the FirePower “allow all traffic” configuration. That happens inside the FirePower module, basically putting the FirePower service in monitoring only mode without dropping any based on the FirePowr’s access policy. It has nothing to do with the ASA layer.
Hi,
When I try to route Any Traffic from my ASA to firepower it gives an error default inspection as traffic match criteria. Along with this, there are 2 rules in global_policy configured. Will it be fine if delete those two rules?
The two rules are inspection default in which the traffic match criteria is default inspection criteria and some protocols are selected in the rule action.
In the second Class_default in which any traffic is selected in match criteria and rule action is account for users to send packet, receive packet.
Please suggest.
Can you share what’s exactly configured under “class-map global-class” and “policy-map global_policy”?
I am not able to attach the screenshot here. But for policy-map global policy service is default-inspection and in rule actions, there are some protocols selected. I am not sure how to view the global-class?
Global policy:
Service-policy: global_policy
Class-map: inspection_default
Inspect: dns preset_dns_map, packet 49449475, lock fail 0, drop 2, reset-drop 0, 5-min-pkt-rate 0 pkts/sec, v6-fail-close 0 sctp-drop-override 0
Inspect: ftp, packet 26, lock fail 0, drop 0, reset-drop 0, 5-min-pkt-rate 0 pkts/sec, v6-fail-close 0 sctp-drop-override 0
Inspect: h323 h225 _default_h323_map, packet 2, lock fail 0, drop 0, reset-drop 0, 5-min-pkt-rate 0 pkts/sec, v6-fail-close 0 sctp-drop-override 0
tcp-proxy: bytes in buffer 0, bytes dropped 0
Inspect: h323 ras _default_h323_map, packet 0, lock fail 0, drop 0, reset-drop 0, 5-min-pkt-rate 0 pkts/sec, v6-fail-close 0 sctp-drop-override 0
Inspect: rsh, packet 2, lock fail 0, drop 0, reset-drop 0, 5-min-pkt-rate 0 pkts/sec, v6-fail-close 0 sctp-drop-override 0
Inspect: rtsp, packet 2, lock fail 0, drop 0, reset-drop 0, 5-min-pkt-rate 0 pkts/sec, v6-fail-close 0 sctp-drop-override 0
tcp-proxy: bytes in buffer 0, bytes dropped 0
Inspect: esmtp _default_esmtp_map, packet 2, lock fail 0, drop 0, reset-drop 0, 5-min-pkt-rate 0 pkts/sec, v6-fail-close 0 sctp-drop-override 0
Inspect: sqlnet, packet 2, lock fail 0, drop 0, reset-drop 0, 5-min-pkt-rate 0 pkts/sec, v6-fail-close 0 sctp-drop-override 0
Inspect: skinny , packet 2, lock fail 0, drop 0, reset-drop 0, 5-min-pkt-rate 0 pkts/sec, v6-fail-close 0 sctp-drop-override 0
tcp-proxy: bytes in buffer 0, bytes dropped 0
Inspect: sunrpc, packet 2, lock fail 0, drop 0, reset-drop 0, 5-min-pkt-rate 0 pkts/sec, v6-fail-close 0 sctp-drop-override 0
tcp-proxy: bytes in buffer 0, bytes dropped 0
Inspect: xdmcp, packet 0, lock fail 0, drop 0, reset-drop 0, 5-min-pkt-rate 0 pkts/sec, v6-fail-close 0 sctp-drop-override 0
Inspect: sip , packet 2, lock fail 0, drop 0, reset-drop 0, 5-min-pkt-rate 0 pkts/sec, v6-fail-close 0 sctp-drop-override 0
tcp-proxy: bytes in buffer 0, bytes dropped 0
Inspect: netbios, packet 0, lock fail 0, drop 0, reset-drop 0, 5-min-pkt-rate 0 pkts/sec, v6-fail-close 0 sctp-drop-override 0
Inspect: tftp, packet 0, lock fail 0, drop 0, reset-drop 0, 5-min-pkt-rate 0 pkts/sec, v6-fail-close 0 sctp-drop-override 0
Inspect: ip-options _default_ip_options_map, packet 0, lock fail 0, drop 0, reset-drop 0, 5-min-pkt-rate 0 pkts/sec, v6-fail-close 0 sctp-drop-override 0
Class-map: class-default
Default Queueing Packet recieved 76746395, sent 45861583, attack 485726